📌 Featured findings (jump to bottom): 🔬 Grove — the hidden training-data pipeline · 🛡️ Anti-Distillation — Anthropic's 5-layer defense
Harness Engineering: A Comprehensive Guide Based on Claude Code
A Comprehensive Textbook on AI Agent Infrastructure Design
"The model is the agent. The code is the harness. Build great harnesses. The agent will do the rest."
📣 As featured in Chinese AI media — This Harness Engineering analysis has been republished by Chinese AI publications including QingkeAI (青稞AI) and others, with 20,000+ reads and 2,000+ shares across WeChat. Original article.
This tutorial is based on reverse engineering and systematic analysis of the Claude Code source code (~512,664 lines of TypeScript). Written in the style of an academic textbook, it provides an in-depth examination of every design decision, engineering trade-off, and implementation detail of an AI Agent Harness. The text adheres to academic writing conventions, constructing a theoretical framework atop the code analysis and distilling scattered implementation details into reusable design principles.
Intended Audience: AI engineers, Agent system architects, and researchers interested in LLM application infrastructure.
Prerequisites: Familiarity with TypeScript, experience with LLM API calls, and a working knowledge of basic system design concepts.
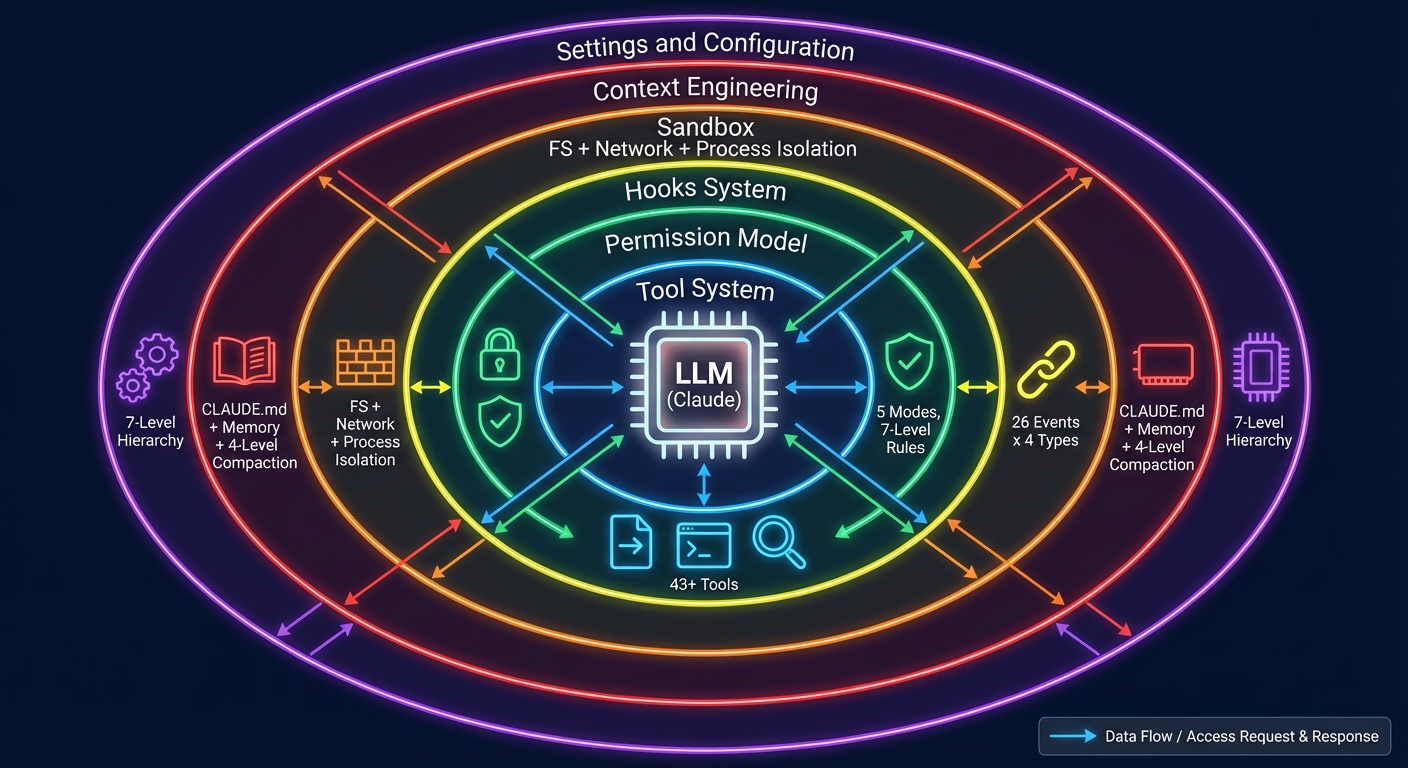 Figure 0-1: Harness Engineering Architecture Overview — The LLM is surrounded by six layers of Harness infrastructure: the Tool System (43+), the Permission Model (5 modes), the Hooks System (26 events x 4 types), the Sandbox (file + network + process isolation), Context Engineering (CLAUDE.md + memory + 4-level compaction), and Settings & Configuration (7-level hierarchy).
Table of Contents
- Chapter 1: What Is Harness Engineering?
- Chapter 2: Claude Code Architecture Overview
- Chapter 3: Agent Loop — The Heart of the Harness
- Chapter 4: Tool System — The Agent's Hands
- Chapter 5: Permission Model — Constraint Architecture
- Chapter 6: Hooks System — Lifecycle Extensibility
- Chapter 7: Sandbox & Security — The Safety Net
- Chapter 8: Context Engineering — The Art of Information Management
- Chapter 9: Settings & Configuration — Harness Tunability
- Chapter 10: MCP Integration — Extending the Harness Boundary
- Chapter 11: Sub-Agent System — Multi-Agent Orchestration
- Chapter 12: Skills & Plugins — The Extension Ecosystem
- Chapter 13: Building Your Own Harness — A Practical Guide
- Chapter 14: Advanced Patterns and Design Philosophy
- Chapter 15: Building a Mini Harness from Scratch (Hands-on Lab)
- Chapter 16: Competitive Analysis
- Conclusion: From Reader to Builder
- References
- Appendix A: Claude Code Source File Index
- Appendix B: Reference Resources
- Appendix C: Complete ToolUseContext Type Definition
- Appendix D: 13 Guard Rules Reference Model
Chapter 1: What Is Harness Engineering?
Imagine you are about to train a wild horse. You would not simply mount it — you would first build fences, prepare reins, and lay out a track. This "infrastructure" is not the horse itself, but without it, even the finest horse remains untamed.
AI Agents are no different. The model (LLM) is the horse — powerful yet unbroken. Harness Engineering is the discipline of building fences, crafting reins, and laying tracks.
1.1 Definition
Harness Engineering is the engineering discipline of designing the environment, constraints, feedback loops, and infrastructure that enable AI Agents to operate reliably at scale.
The term was formally introduced by the OpenAI engineering team in early 2026. They described internal systems comprising "over one million lines of code, none of which were written by humans" — engineers no longer wrote code directly but instead "designed systems that enabled AI Agents to write code reliably."
A simple analogy helps illustrate the concept:
┌─────────────────────────────────────────────────┐
│                                                 │
│   Agent = Model (LLM)                          │
│   Harness = Everything Else                     │
│                                                 │
│   ┌──────────┐     ┌────────────────────────┐  │
│   │  Claude   │ ←── │  Tools, Permissions,   │  │
│   │  Opus/    │ ──→ │  Hooks, Sandbox,       │  │
│   │  Sonnet   │     │  Memory, Settings,     │  │
│   │          │     │  MCP, Skills, Agents   │  │
│   └──────────┘     └────────────────────────┘  │
│      Model              Harness                 │
│                                                 │
└─────────────────────────────────────────────────┘
1.2 Three Pillars
To understand Harness Engineering, it is most instructive to decompose it into three pillars. Consider the analogy of constructing a building: Context Engineering is the foundation (ensuring that the right information is in place), Architectural Constraints are the load-bearing walls (ensuring structural integrity), and Entropy Management is the building maintenance (preventing degradation over time).
mindmap
  root((Harness Engineering))
    Context Engineering
      静态上下文
        CLAUDE.md
        AGENTS.md
        设计文档
      动态上下文
        日志与指标
        Git 状态
        CI/CD 状态
      上下文压缩
        四级管道
        按需加载
        记忆系统
    Architectural Constraints
      权限模型
        5 种模式
        7 级规则层级
        AI 分类器
      工具约束
        Schema 验证
        并发安全标记
        延迟加载
      安全边界
        沙盒隔离
        硬编码拒绝
        纵深防御
    Entropy Management
      定期清理
        死代码检测
        文档一致性
      约束验证
        依赖审计
        模式强制
      性能监控
        覆盖率守卫
        回归检测
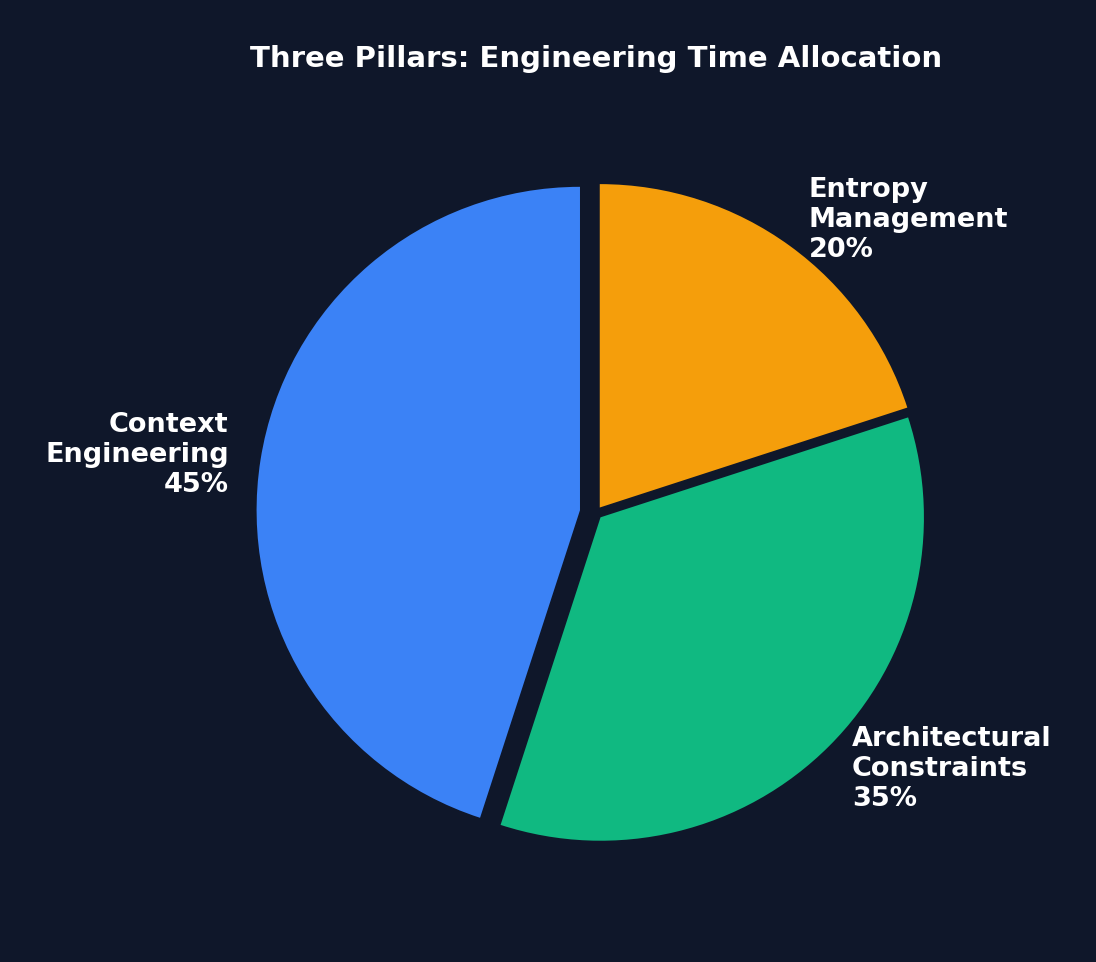 Figure 1-2: Engineering Time Allocation Across the Three Pillars — Context Engineering commands the largest share (45%), because "information the Agent cannot see might as well not exist." Architectural Constraints come second (35%). Entropy Management accounts for 20% but is critical for long-term stability.
Pillar One: Context Engineering
Manages the accessibility, structure, and timing of information. Key techniques include:
- Static Context: Repository documentation, CLAUDE.md/AGENTS.md files, design documents
- Dynamic Context: Logs, metrics, directory mappings, CI/CD status
- Core Principle: "Information the Agent cannot access within its context does not exist"
Pillar Two: Architectural Constraints
Establishes boundaries through mechanical enforcement rather than suggestions:
- Dependency hierarchies (Types -> Config -> Repo -> Service -> Runtime -> UI)
- Deterministic linter enforcement of custom rules
- LLM-based auditors reviewing Agent compliance
- Structural tests and pre-commit hooks
A counterintuitive benefit: Constraining the solution space makes the Agent more efficient, not less — by preventing fruitless exploration.
Pillar Three: Entropy Management
Periodic cleanup Agents address code degradation:
- Documentation consistency verification
- Constraint violation scanning
- Pattern enforcement
- Dependency auditing
1.3 Harness Engineering vs. Related Disciplines
| Discipline | Relationship |
|---|---|
| Prompt Engineering | A subset of Context Engineering (single interaction vs. system-level) |
| ML Engineering | An independent discipline; assumes the model is already deployed |
| Agent Engineering | Complementary; Harness engineers build infrastructure for Agents |
| DevOps | Overlapping infrastructure skills applied to the AI context |
1.4 Pause and Reflect
Before continuing, consider the following question:
If you were building an AI coding assistant today, where would you spend 80% of your engineering time — improving the model, or improving the systems surrounding the model?
If your answer is "the model," Harness Engineering challenges that intuition. The LangChain case study demonstrated that modifying only the Harness — without changing the model — yielded a 14 percentage point improvement on benchmarks. The model is a given; the Harness is what you can control.
1.5 Quantitative Evidence: ROI of Harness Investment
Before delving into "why now," let the data speak for itself:
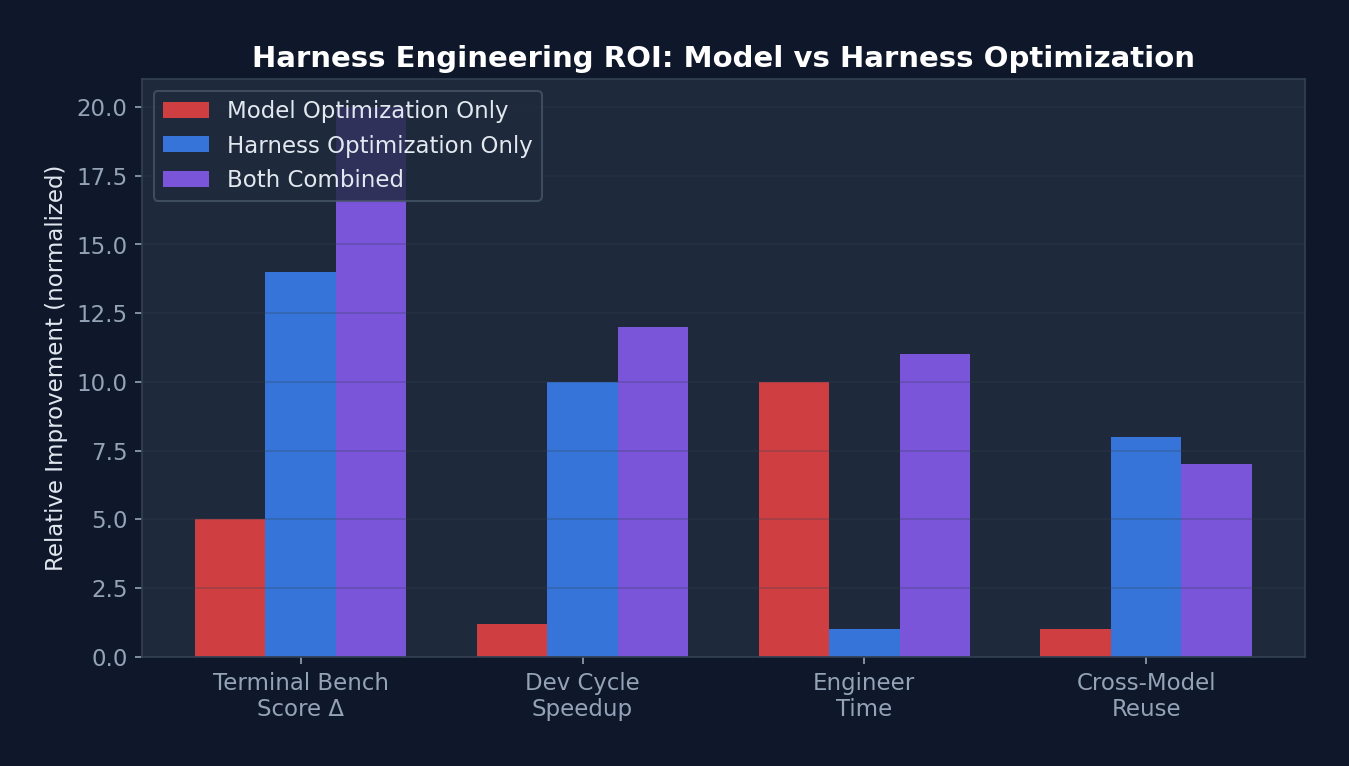 Figure 1-1: ROI Comparison of Harness Optimization vs. Model Optimization — In both Terminal Bench scores and development cycle reduction, Harness optimization yields returns far exceeding model optimization, while requiring only one-tenth the engineering effort.
| Metric | Model Optimization Only | Harness Optimization Only | Combined |
|---|---|---|---|
| Terminal Bench 2.0 Score | +3-5% (model upgrade) | +14% (LangChain case) | +18-20% |
| Development Cycle Reduction | Negligible | 10x (OpenAI million-line case) | >10x |
| Engineer Time Investment | Months (training/fine-tuning) | 1-2 hours (Level 1 Harness) | Months |
| Transferability | Model-specific | Reusable across models | Partially reusable |
Key Insight: The return on investment (ROI) of Harness optimization far exceeds that of model optimization. A carefully crafted CLAUDE.md file takes only 30 minutes to write but can boost Agent performance on a given project by 20-40%. By contrast, model fine-tuning requires weeks of effort and substantial computational resources, yet is effective only for specific tasks.
1.6 Why Now?
Three converging factors have given rise to this need:
- Model Commoditization — Competitive advantage is shifting from models to systems
- Production Deployment — Agents are moving from demos to customer-facing reliability requirements
- Benchmark Limitations — Standard metrics cannot capture multi-hour, multi-step Agent stability
Real-world impact: By modifying only the Harness architecture (without switching models), LangChain improved its Terminal Bench 2.0 score from 52.8% to 66.5%, vaulting from the top 30 to the top 5.
1.5 Implementation Tiers
| Tier | Scope | Investment | Contents |
|---|---|---|---|
| Level 1 | Individual | 1-2 hours | CLAUDE.md + pre-commit hooks + test suite |
| Level 2 | Small team | 1-2 days | AGENTS.md specification + CI constraints + shared templates |
| Level 3 | Organization | 1-2 weeks | Custom middleware + observability + scheduled Agents |
Chapter 2: Claude Code Architecture Overview
In the previous chapter we established the theoretical framework. Beginning with this chapter, we validate that theory against a real, production-grade system. That system is Claude Code — Anthropic's official AI coding assistant CLI, comprising over 500,000 lines of TypeScript. It represents the most complete production-grade Agent Harness reference implementation available today.
Why Claude Code? Because it is not an educational project — it is a real product used daily by tens of thousands of developers. Every design decision is backed by real user pain points and genuine engineering trade-offs. By reverse-engineering its architecture, we can learn practical wisdom that "textbooks never cover."
2.1 Technology Stack
| Category | Technology |
|---|---|
| Runtime | Bun (native TypeScript, high performance) |
| Language | TypeScript (strict mode) |
| UI Framework | React + Ink (terminal components) |
| CLI Parser | Commander.js (@commander-js/extra-typings) |
| Schema Validation | Zod v4 |
| Search Engine | ripgrep (invoked via BashTool) |
| API Client | @anthropic-ai/sdk |
| Protocols | MCP SDK, LSP |
| State Management | Custom Zustand-like Store + React Context |
| Telemetry | OpenTelemetry + gRPC |
| Feature Flags | GrowthBook + Bun bun:bundle |
| Auth | OAuth 2.0, JWT, macOS Keychain |
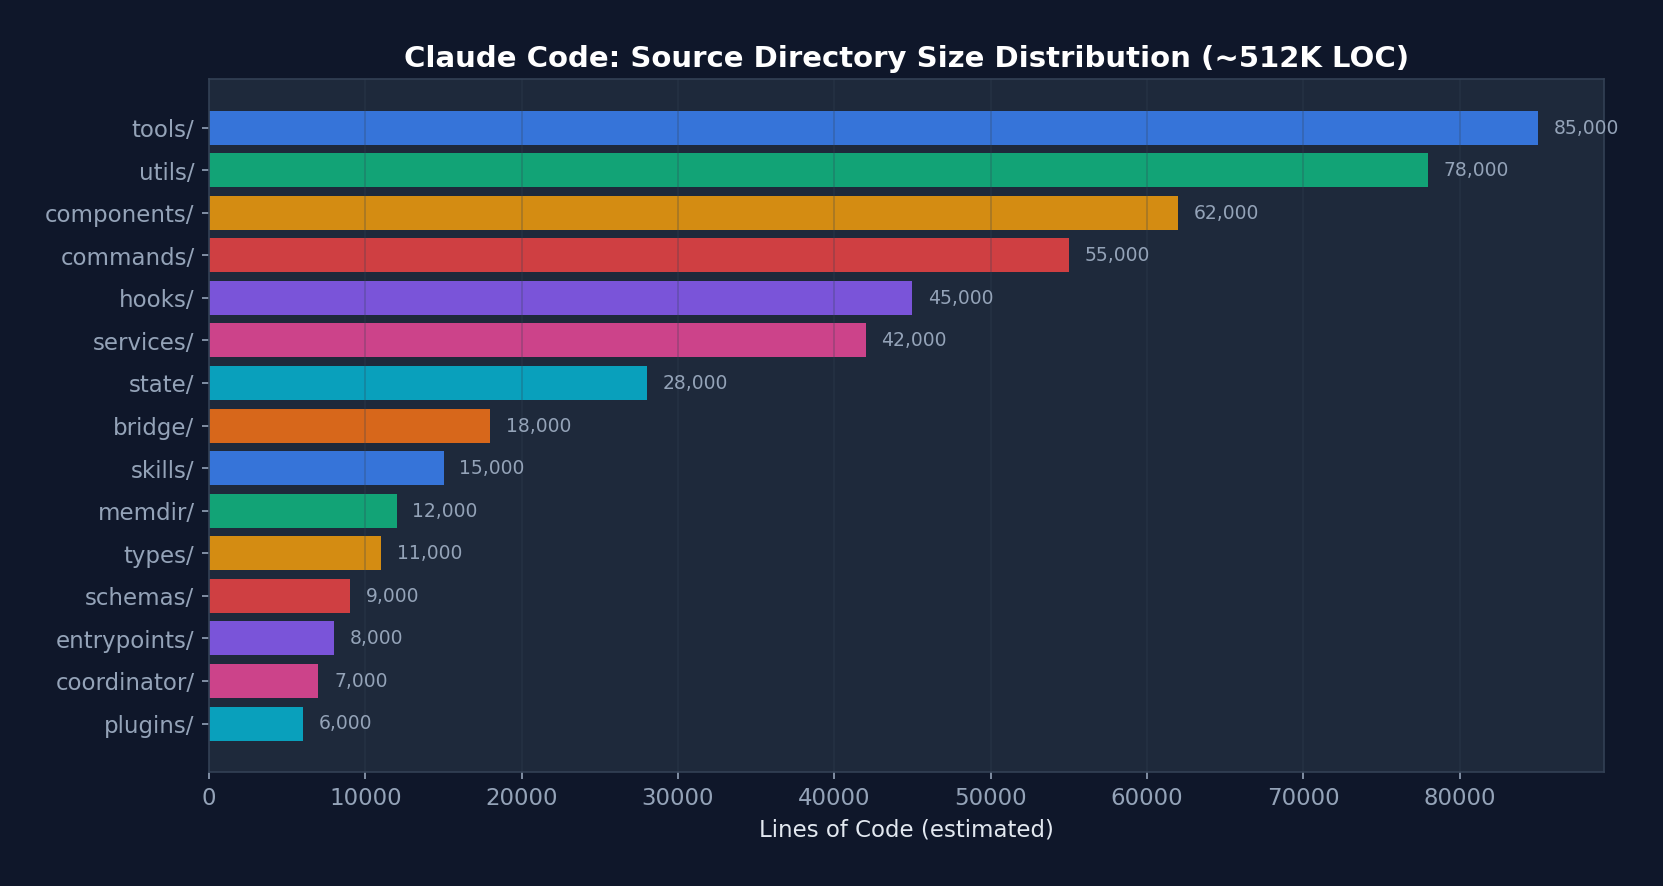 Figure 2-1: Lines of Code Distribution by Directory in Claude Code — tools/ and utils/ are the two largest directories, together accounting for approximately 32% of the codebase. This reflects the centrality of the tool system and infrastructure utilities to the Harness.
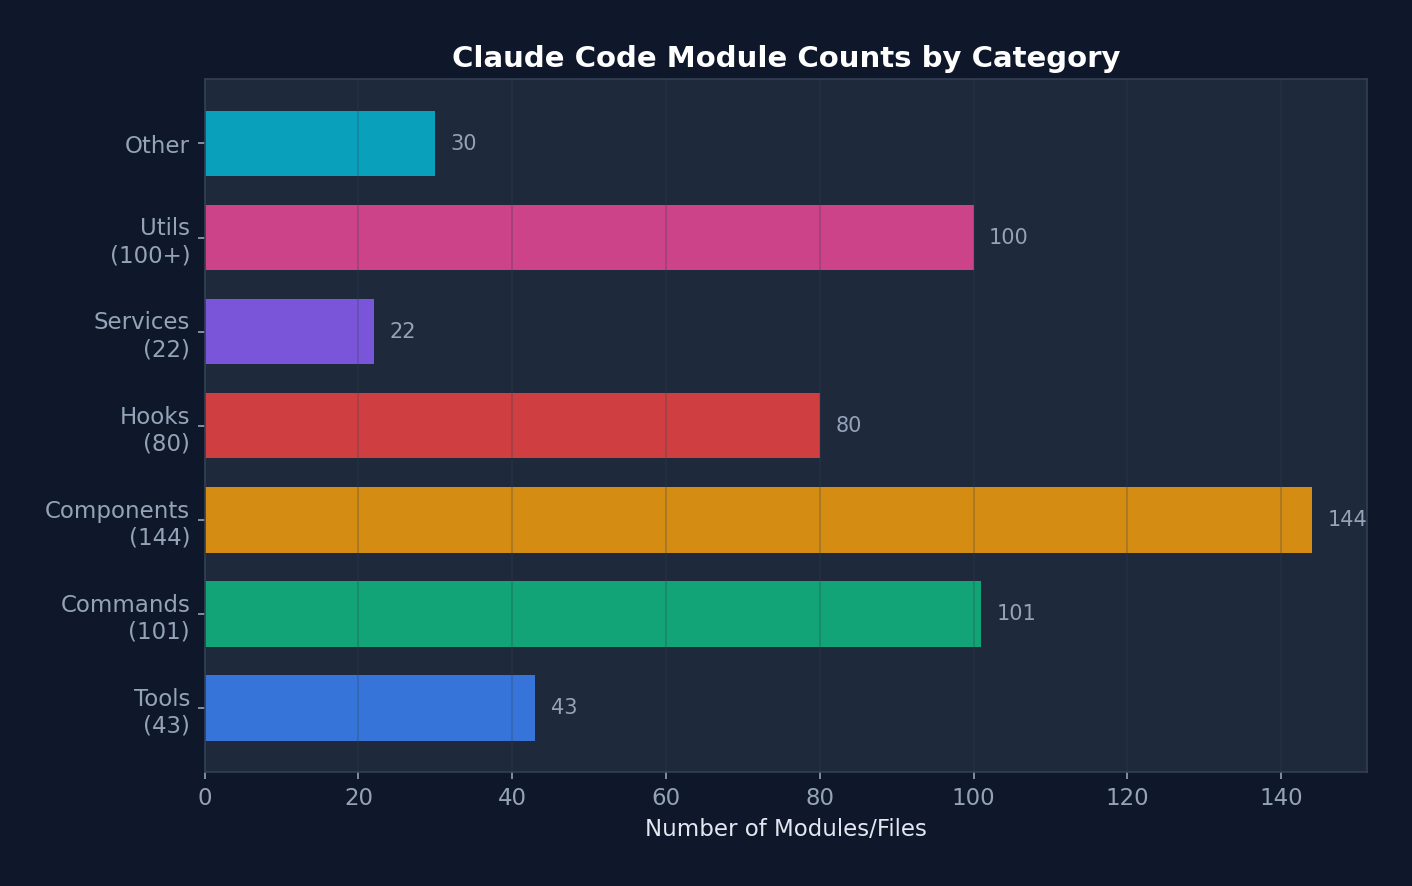 Figure 2-2: Module Counts by Category — components (144) and commands (101) are the most numerous, reflecting Claude Code's nature as a terminal UI application.
2.2 Scale
- ~1,884 TypeScript/TSX files
- 512,664 lines of code
- 43+ tools
- 100+ slash commands
- 80+ React hooks
- 144+ UI components
- 22+ service modules
- 26+ hook events
2.3 Directory Structure
src/
├── main.tsx                    # 入口点,CLI 引导(803 KB)
├── query.ts                    # 核心 Agent 循环(68 KB)
├── QueryEngine.ts              # LLM 查询引擎(46 KB)
├── Tool.ts                     # Tool 基础接口(29 KB)
├── tools.ts                    # Tool 注册表(25 KB)
├── Task.ts                     # 任务类型定义
├── commands.ts                 # 命令注册
│
├── tools/                      # 43 个工具目录
│   ├── BashTool/              # Shell 命令执行
│   ├── FileReadTool/          # 文件读取
│   ├── FileWriteTool/         # 文件创建
│   ├── FileEditTool/          # 部分文件修改
│   ├── GlobTool/              # 文件模式匹配
│   ├── GrepTool/              # ripgrep 内容搜索
│   ├── AgentTool/             # 子 Agent 生成
│   ├── SkillTool/             # Skill 执行
│   ├── MCPTool/               # MCP 服务器调用
│   ├── WebFetchTool/          # URL 内容抓取
│   ├── WebSearchTool/         # 网页搜索
│   └── ...                    # 更多工具
│
├── commands/                   # ~101 个命令目录
│   ├── commit/                # Git 提交
│   ├── review/                # 代码审查
│   ├── mcp/                   # MCP 管理
│   ├── skills/                # Skill 管理
│   └── ...
│
├── components/                 # 144+ React/Ink 终端组件
├── hooks/                      # 80+ 自定义 React Hooks
├── services/                   # 22 个服务子目录
│   ├── api/                   # Anthropic API 客户端
│   ├── mcp/                   # MCP 协议连接
│   ├── oauth/                 # OAuth 认证
│   ├── lsp/                   # 语言服务器协议
│   ├── compact/               # 对话压缩
│   ├── plugins/               # 插件加载
│   └── ...
│
├── utils/                      # 33+ 子目录,100+ 文件
│   ├── permissions/           # 权限逻辑
│   ├── hooks.ts               # Hook 执行引擎
│   ├── hooks/                 # Hook 配置管理
│   ├── sandbox/               # 沙盒适配器
│   ├── settings/              # 设置管理
│   ├── bash/                  # Shell 工具
│   ├── memdir/                # 持久记忆目录
│   └── ...
│
├── state/                      # 应用状态管理
├── entrypoints/                # CLI/MCP/SDK 入口
├── bridge/                     # IDE 双向通信
├── coordinator/                # 多 Agent 编排
├── skills/                     # Skill 系统
├── plugins/                    # 插件系统
├── memdir/                     # 记忆目录系统
├── schemas/                    # Zod 验证 Schema
├── types/                      # 类型定义
└── constants/                  # 应用常量
2.4 Entry Point Flow
main.tsx → 并行预取(MDM设置 + Keychain + API预连接)
    ↓
Commander.js CLI 解析器初始化
    ↓
preAction Hook: init() → 遥测 → 插件 → 迁移 → 远程设置
    ↓
React/Ink 渲染器启动
    ↓
交互式 REPL/对话循环
Design Philosophy: The Claude Code entry point main.tsx (803 KB) employs a lazy loading strategy. Heavy modules (OpenTelemetry, gRPC, analytics) are loaded only when needed, while critical-path resources (MDM settings, Keychain) are prefetched in parallel to ensure fast startup times.
2.5 Core Data Flow Overview
┌─────────────────────────────────────────────────────────────────────┐
│                    Claude Code 数据流全景                             │
│                                                                      │
│  用户输入 ──→ UserPromptSubmit Hook ──→ Slash Command 解析           │
│     │                                                                │
│     v                                                                │
│  QueryEngine.submitMessage()                                         │
│     │                                                                │
│     ├─→ 系统提示构建: base + tools + CLAUDE.md + MCP + memory       │
│     ├─→ 消息规范化: normalizeMessagesForAPI()                        │
│     │   ├─ 重排序 attachment 消息                                    │
│     │   ├─ 合并连续 user/assistant 消息                              │
│     │   ├─ 剥离 PDF/图片错误的重复内容                                │
│     │   ├─ 规范化工具名称(别名→正式名)                              │
│     │   └─ 工具搜索引用块处理                                        │
│     │                                                                │
│     v                                                                │
│  queryLoop() [while(true)]                                           │
│     │                                                                │
│     ├─→ 压缩管道: snip → micro → collapse → auto                    │
│     ├─→ API 调用: deps.sample() [流式]                               │
│     │                                                                │
│     ├─→ 工具执行: StreamingToolExecutor (并发) / runTools (顺序)     │
│     │   │                                                            │
│     │   ├─→ 工具分区: partitionToolCalls()                           │
│     │   │   ├─ isConcurrencySafe=true → 并发执行                     │
│     │   │   └─ isConcurrencySafe=false → 串行执行                    │
│     │   │                                                            │
│     │   └─→ 每个工具:                                                │
│     │       ├─ Zod schema 验证                                       │
│     │       ├─ tool.validateInput()                                  │
│     │       ├─ PreToolUse Hook                                       │
│     │       ├─ 权限检查 (rules → mode → classifier)                 │
│     │       ├─ Sandbox 包装 (BashTool)                               │
│     │       ├─ tool.call() [实际执行]                                │
│     │       └─ PostToolUse Hook                                      │
│     │                                                                │
│     ├─→ 错误恢复: 7 个 continue 站点                                │
│     └─→ Stop Hook → 终止或继续                                      │
│                                                                      │
│  终止 → SessionEnd Hook → 转录保存 → 退出                           │
└─────────────────────────────────────────────────────────────────────┘
2.6 Message Type System
Claude Code defines a rich message type system, with each type following a distinct processing path within the Agent Loop:
// src/types/message.ts — 消息类型层次
type Message =
  | UserMessage           // 人类输入(或工具结果)
  | AssistantMessage      // 模型响应(文本 + 工具调用)
  | AttachmentMessage     // 记忆/资源附件
  | SystemMessage         // 系统消息
  | SystemLocalCommandMessage  // 本地工具结果(bash, read 等)
  | ToolUseSummaryMessage // 压缩后的工具历史
  | TombstoneMessage      // 已删除消息标记
  | ProgressMessage       // 流式进度更新
Message normalization (normalizeMessagesForAPI) is a complex pipeline that handles:
- Consecutive user message merging: Bedrock does not support multiple consecutive user messages, so the API layer merges them
- PDF/image error content stripping: If an uploaded PDF is too large and triggers an error, subsequent turns automatically strip that content to prevent redundant transmission
- Tool name normalization: Aliases (e.g., legacy names) are mapped to current canonical names
- Tool Reference handling: When Tool Search is enabled, reference blocks are preserved; when disabled, they are stripped
- Virtual message filtering: Display messages from REPL-internal tool calls are not sent to the API
Chapter 3: Agent Loop — The Heart of the Harness
If the Harness is an automobile, the Agent Loop is its engine. No matter how luxurious the seats or how advanced the airbags, without an engine the car cannot move.
This is the most important chapter in the entire book. We will dissect Claude Code's core loop —
queryLoop()— line by line, examining how a singlewhile(true)drives the entire AI coding assistant. By the end of this chapter, you will have a thorough understanding of "how an Agent works," from the lowest level to the highest.
The Agent Loop is the most critical component of the entire Harness. In Claude Code, it is implemented as the queryLoop() function in src/query.ts.
3.1 Basic Architecture: Infinite Loop + Async Generator
Below is the actual signature and initialization of queryLoop from Claude Code's real source code (src/query.ts):
// src/query.ts — 真实的函数签名
async function* queryLoop(
  params: QueryParams,
  consumedCommandUuids: string[],
): AsyncGenerator<
  | StreamEvent
  | RequestStartEvent
  | Message
  | TombstoneMessage
  | ToolUseSummaryMessage,
  Terminal
> {
  // ===== 不可变参数 — 循环期间永不重新赋值 =====
  const {
    systemPrompt, userContext, systemContext,
    canUseTool, fallbackModel, querySource,
    maxTurns, skipCacheWrite,
  } = params
  const deps = params.deps ?? productionDeps()

  // ===== 可变跨迭代状态 =====
  // 循环体在每次迭代开始时解构此对象以保持裸名读取。
  // Continue 站点写入 `state = { ... }` 而不是 9 个独立赋值。
  let state: State = {
    messages: params.messages,
    toolUseContext: params.toolUseContext,
    maxOutputTokensOverride: params.maxOutputTokensOverride,
    autoCompactTracking: undefined,
    stopHookActive: undefined,
    maxOutputTokensRecoveryCount: 0,
    hasAttemptedReactiveCompact: false,
    turnCount: 1,
    pendingToolUseSummary: undefined,
    transition: undefined,  // 为什么上次迭代 continue 了
  }

  // 预算跟踪跨压缩边界(循环局部,不在 State 上)
  let taskBudgetRemaining: number | undefined = undefined

  // 查询配置快照(一次性捕获环境/statsig/会话状态)
  const config = buildQueryConfig()

  // 记忆预取(使用 `using` 确保在生成器退出时清理)
  using pendingMemoryPrefetch = startRelevantMemoryPrefetch(
    state.messages, state.toolUseContext,
  )

  while (true) {
    // ... 循环体(下文详解)
  }
}
State Type Definition (this is the "skeleton" of the loop):
type State = {
  messages: Message[]
  toolUseContext: ToolUseContext
  autoCompactTracking: AutoCompactTrackingState | undefined
  maxOutputTokensRecoveryCount: number
  hasAttemptedReactiveCompact: boolean
  maxOutputTokensOverride: number | undefined
  pendingToolUseSummary: Promise<ToolUseSummaryMessage | null> | undefined
  stopHookActive: boolean | undefined
  turnCount: number
  transition: Continue | undefined  // 上次迭代为何 continue
}
The state diagram below illustrates the complete lifecycle of queryLoop — each state corresponds to a phase within the loop, and each edge corresponds to a transition reason:
stateDiagram-v2
    [*] --> Compaction: 进入循环
    Compaction --> APICall: 压缩完成
    APICall --> ToolExecution: 有 tool_use 块
    APICall --> StopHooks: 无 tool_use 块
    APICall --> CollapseRetry: 413 错误
    APICall --> ReactiveCompact: collapse 失败
    APICall --> EscalateTokens: max_output_tokens
    APICall --> MultiTurnRetry: 升级后仍截断
    APICall --> FallbackModel: FallbackTriggeredError

    CollapseRetry --> Compaction: continue site 1
    ReactiveCompact --> Compaction: continue site 2
    EscalateTokens --> Compaction: continue site 3
    MultiTurnRetry --> Compaction: continue site 4
    FallbackModel --> Compaction: continue site 6

    ToolExecution --> Compaction: continue site 7\n(正常下一轮)

    StopHooks --> [*]: 正常完成
    StopHooks --> Compaction: blocking error\ncontinue site 5
    StopHooks --> [*]: hook 阻止继续

    ReactiveCompact --> [*]: 恢复失败
    MultiTurnRetry --> [*]: 重试 3 次后耗尽
Simplified Logic Flow (for comprehension):
while (true) {
    // 1. 解构状态
    const { messages, toolUseContext, ... } = state;

    // 2. 压缩管道
    // 3. 构建系统提示 + 规范化消息
    // 4. 调用 LLM API(流式)
    // 5. 收集 tool_use 块
    // 6. 错误恢复(7 个 continue 站点)
    // 7. 工具执行
    // 8. Stop Hook → 终止或继续
    // 9. 更新状态 → continue
}
Design Philosophy:
- Async Generator: Rather than returning a final result, the loop
yields every intermediate event (stream events, messages, tombstone messages). This allows the client to begin rendering before the API call completes. - Infinite loop + explicit exit: The loop exits only on
return Terminal. This is more flexible than a bounded loop, since many recovery paths require re-iteration. - Single State object: State is destructured at the start of each iteration and reassigned wholesale at continue sites, maintaining pseudo-immutable semantics.
3.2 The Seven Continue Sites
Claude Code's queryLoop has 7+ continue sites, each corresponding to a distinct recovery scenario:
┌─────────────────────────────────────────────────┐
│                 queryLoop()                      │
│                                                  │
│  ┌──────────────────────────────────────────┐   │
│  │ Continue Site 1: Proactive Compaction     │   │
│  │ Trigger: tokens exceed threshold          │   │
│  │ Action: autocompact → new messages →      │   │
│  │         continue                          │   │
│  └──────────────────────────────────────────┘   │
│                                                  │
│  ┌──────────────────────────────────────────┐   │
│  │ Continue Site 2: Prompt Too Long          │   │
│  │ Trigger: API returns prompt-too-long      │   │
│  │ Action: context-collapse → reactive       │   │
│  │         compact                           │   │
│  └──────────────────────────────────────────┘   │
│                                                  │
│  ┌──────────────────────────────────────────┐   │
│  │ Continue Site 3: Max Output Tokens        │   │
│  │ Trigger: model output truncated           │   │
│  │ Action: escalate 8k→64k → multi-turn     │   │
│  │         retry (up to 3 times)             │   │
│  └──────────────────────────────────────────┘   │
│                                                  │
│  ┌──────────────────────────────────────────┐   │
│  │ Continue Site 4: Fallback Model           │   │
│  │ Trigger: FallbackTriggeredError           │   │
│  │ Action: switch model → retry request      │   │
│  └──────────────────────────────────────────┘   │
│                                                  │
│  ┌──────────────────────────────────────────┐   │
│  │ Continue Site 5: Stop Hook Blocking       │   │
│  │ Trigger: user Hook requests additional    │   │
│  │          turns                            │   │
│  │ Action: inject Hook message → continue    │   │
│  └──────────────────────────────────────────┘   │
│                                                  │
│  ┌──────────────────────────────────────────┐   │
│  │ Continue Site 6: Image/Media Errors       │   │
│  │ Trigger: ImageSizeError /                 │   │
│  │          ImageResizeError                 │   │
│  │ Action: reactive compact (remove images)  │   │
│  │         → continue                        │   │
│  └──────────────────────────────────────────┘   │
│                                                  │
│  ┌──────────────────────────────────────────┐   │
│  │ Continue Site 7: Tool Execution           │   │
│  │ Trigger: normal tool execution complete   │   │
│  │ Action: collect results → update state →  │   │
│  │         continue                          │   │
│  └──────────────────────────────────────────┘   │
│                                                  │
│  ┌──────────────────────────────────────────┐   │
│  │ return Terminal — the only exit point      │   │
│  │ Condition: no tool calls + Stop Hook does │   │
│  │ not block                                 │   │
│  └──────────────────────────────────────────┘   │
└─────────────────────────────────────────────────┘
3.3 The Compaction Pipeline
The context window is finite — even a 1M token window can be filled during long conversations. Claude Code implements a four-level compaction pipeline, one of its most sophisticated subsystems.
flowchart TD
    subgraph Pipeline["压缩管道(每轮迭代执行)"]
        direction TB
        S["Level 1: Snip\n历史截断\n成本: 极低 | 延迟: ~0ms"]
        MC["Level 2: Microcompact\n老化工具结果缩减\n成本: 低 | 延迟: ~1ms"]
        CC["Level 3: Context-Collapse\n读时投射(不修改数组)\n成本: 中 | 延迟: ~5ms"]
        AC["Level 4: Autocompact\nLLM 全对话摘要\n成本: 高 | 延迟: ~2s"]
    end

    S -->|"释放少量 token"| MC
    MC -->|"边界消息延迟"| CC
    CC -->|"如果仍超阈值"| AC
    CC -->|"如果低于阈值"| Skip["跳过 Autocompact\n保留粒度上下文"]

    classDef light fill:#dcfce7,stroke:#16a34a,color:#14532d
    classDef medium fill:#fef9c3,stroke:#ca8a04,color:#713f12
    classDef heavy fill:#fee2e2,stroke:#dc2626,color:#7f1d1d
    classDef skip fill:#f3f4f6,stroke:#6b7280,color:#374151

    class S,MC light
    class CC medium
    class AC heavy
    class Skip skip
Source Code Annotation Analysis: Regarding the execution order of Microcompact and Snip, the source code comments: "Apply snip before microcompact (both may run — they are not mutually exclusive)... snipTokensFreed is plumbed to autocompact: snip's threshold check must reflect what snip removed." This reveals a subtle data-flow dependency: the number of tokens freed by Snip must be propagated to Autocompact's threshold check; otherwise Autocompact would underestimate the freed space, triggering unnecessary full-conversation summarization.
Regarding Context-Collapse, the comments state: "Nothing is yielded — the collapsed view is a read-time projection... summary messages live in the collapse store, not the REPL array." This means Level 3 modifies no data structures — it only changes how data is "read." This design allows collapse to persist across turns and remain fully reversible.
Each level operates independently, but a strict execution order constraint applies:
┌────────────────────────────────────────────────────────┐
│                  Compaction Pipeline                     │
│                                                         │
│  Level 1: Snip Compact (every turn)                     │
│  ├─ Feature-gated history truncation                    │
│  ├─ Tracks freed token count                            │
│  └─ Lightest weight, near-zero latency                  │
│                                                         │
│  Level 2: Microcompact (every turn)                     │
│  ├─ Replaces tool results 3+ turns old with             │
│  │  "[Previous: used {tool}]"                           │
│  ├─ Caches compacted results                            │
│  └─ Defers boundary messages until API response         │
│     (when cache_deleted_input is known)                  │
│                                                         │
│  Level 3: Context-Collapse (read-time projection)       │
│  ├─ Does not modify the message array; projects at      │
│  │  read time instead                                   │
│  ├─ Progressively drains collapsible context by         │
│  │  granularity                                         │
│  └─ Low cost, incremental                               │
│                                                         │
│  Level 4: Autocompact (triggered at >50k tokens)        │
│  ├─ Saves full transcript to disk                       │
│  ├─ LLM summarizes all messages                         │
│  ├─ Replaces all messages with summary                  │
│  └─ Heaviest weight, but frees the most space           │
│                                                         │
│  Execution order: snip → micro → context-collapse →     │
│                   auto                                   │
│  Levels are not mutually exclusive and can run in        │
│  combination                                            │
└────────────────────────────────────────────────────────┘
Design Philosophy:
- Progressive: Attempts lightweight operations first, escalating to heavy operations only when necessary
- Boundary deferral: Microcompact's boundary messages are deferred until after the API response, since cache hit information is available only at that point
- Budget tracking across compaction boundaries:
taskBudgetRemainingcaptures the final window before compaction, accumulating across multiple compaction events
3.4 Tool Execution Orchestration
Claude Code features two tool execution modes, both of which coexist in production:
Mode 1: StreamingToolExecutor (Default — Execute While Streaming)
// src/services/tools/toolOrchestration.ts — 真实代码
export class StreamingToolExecutor {
  private tools: TrackedTool[] = []
  private toolUseContext: ToolUseContext
  private hasErrored = false
  // 子 AbortController:当一个 Bash 工具出错时,
  // 兄弟子进程立即死亡,但不中止父级查询
  private siblingAbortController: AbortController
  private discarded = false

  addTool(block: ToolUseBlock, assistantMessage: AssistantMessage): void {
    const toolDefinition = findToolByName(this.toolDefinitions, block.name)
    if (!toolDefinition) {
      // 工具不存在 → 立即创建错误结果
      this.tools.push({
        id: block.id, block, assistantMessage,
        status: 'completed',
        isConcurrencySafe: true,
        pendingProgress: [],
        results: [createUserMessage({
          content: [{
            type: 'tool_result',
            content: `<tool_use_error>Error: No such tool: ${block.name}</tool_use_error>`,
            is_error: true,
            tool_use_id: block.id,
          }],
        })],
      })
      return
    }

    // 解析输入并判断是否可并发
    const parsedInput = toolDefinition.inputSchema.safeParse(block.input)
    const isConcurrencySafe = parsedInput?.success
      ? Boolean(toolDefinition.isConcurrencySafe(parsedInput.data))
      : false

    this.tools.push({
      id: block.id, block, assistantMessage,
      status: 'queued', isConcurrencySafe,
      pendingProgress: [],
    })

    void this.processQueue()  // 立即开始处理
  }

  // 当流式回退发生时,丢弃所有待处理和进行中的工具
  discard(): void { this.discarded = true }
}
Key design: addTool() is called during the model's streaming generation. Whenever a complete tool_use JSON block is identified, the tool is immediately queued for execution. While the model is still generating the second tool call, the first is already running.
Mode 2: runTools() (Fallback — Execute After Partitioning)
// src/services/tools/toolOrchestration.ts — 真实代码
export async function* runTools(
  toolUseMessages: ToolUseBlock[],
  assistantMessages: AssistantMessage[],
  canUseTool: CanUseToolFn,
  toolUseContext: ToolUseContext,
): AsyncGenerator<MessageUpdate, void> {
  let currentContext = toolUseContext

  // 核心设计:工具分区
  for (const { isConcurrencySafe, blocks } of partitionToolCalls(
    toolUseMessages, currentContext,
  )) {
    if (isConcurrencySafe) {
      // ===== 只读批次:并发执行 =====
      const queuedContextModifiers: Record<string, ((ctx) => ctx)[]> = {}
      for await (const update of runToolsConcurrently(blocks, ...)) {
        if (update.contextModifier) {
          // 收集上下文修改器,延迟应用
          queuedContextModifiers[update.contextModifier.toolUseID]
            ?.push(update.contextModifier.modifyContext)
        }
        yield { message: update.message, newContext: currentContext }
      }
      // 批次完成后,按顺序应用所有上下文修改
      for (const block of blocks) {
        for (const modifier of queuedContextModifiers[block.id] ?? []) {
          currentContext = modifier(currentContext)
        }
      }
    } else {
      // ===== 写入批次:串行执行 =====
      for await (const update of runToolsSerially(blocks, ...)) {
        if (update.newContext) currentContext = update.newContext
        yield { message: update.message, newContext: currentContext }
      }
    }
  }
}
Tool Partitioning Algorithm (partitionToolCalls):
Input: [Read("a.ts"), Read("b.ts"), Write("c.ts"), Read("d.ts")]

Partition result:
  Batch 1: { isConcurrencySafe: true,  blocks: [Read("a.ts"), Read("b.ts")] }
  Batch 2: { isConcurrencySafe: false, blocks: [Write("c.ts")] }
  Batch 3: { isConcurrencySafe: true,  blocks: [Read("d.ts")] }

Execution order: Batch 1 concurrent → Batch 2 serial → Batch 3 concurrent
Design Philosophy: Read-only tools (Read, Glob, Grep) are inherently safe for concurrent execution — they do not modify state. Write tools (Write, Edit, Bash) must execute serially because they may depend on the side effects of preceding tools. The partitioning algorithm groups consecutive tools of the same type, achieving an optimal balance between safety and performance. Context modifiers (contextModifier) are collected and applied lazily, ensuring context consistency during concurrent execution.
Why does this matter? Suppose the Agent needs to read 10 files to answer an architecture question. Without tool partitioning, these 10 Read operations would execute sequentially — each potentially taking tens of milliseconds. With partitioning, they execute concurrently, and total time approximates that of the slowest individual read. In practice, this reduces "codebase reading" operations from seconds to milliseconds. This optimization produces a "perceptual fluency" for the user — you need not understand the mechanism, but you notice the speed.
3.5 Error Recovery Cascade (with Real Source Code)
Claude Code implements a cascading recovery strategy for recoverable errors. The following is real code from src/query.ts:
Prompt Too Long (413) Recovery
// src/query.ts — 真实的 413 恢复代码
if (isWithheld413) {
  // 第 1 步: 排空 context-collapse 队列
  // 只有在上次 transition 不是 collapse_drain_retry 时才尝试
  // (如果已经排空过但仍然 413,跳过直接进入 reactive compact)
  if (feature('CONTEXT_COLLAPSE') && contextCollapse
      && state.transition?.reason !== 'collapse_drain_retry') {
    const drained = contextCollapse.recoverFromOverflow(messagesForQuery, querySource)
    if (drained.committed > 0) {
      state = { ...state,
        messages: drained.messages,
        transition: { reason: 'collapse_drain_retry', committed: drained.committed },
      }
      continue  // ← Continue Site 1
    }
  }
}

// 第 2 步: Reactive Compact(完整摘要)
if ((isWithheld413 || isWithheldMedia) && reactiveCompact) {
  const compacted = await reactiveCompact.tryReactiveCompact({
    hasAttempted: hasAttemptedReactiveCompact,  // 防止无限循环
    querySource,
    aborted: toolUseContext.abortController.signal.aborted,
    messages: messagesForQuery,
    cacheSafeParams: { systemPrompt, userContext, systemContext, ... },
  })

  if (compacted) {
    // 预算跟踪:捕获压缩前的最终上下文窗口
    if (params.taskBudget) {
      const preCompactContext = finalContextTokensFromLastResponse(messagesForQuery)
      taskBudgetRemaining = Math.max(0,
        (taskBudgetRemaining ?? params.taskBudget.total) - preCompactContext)
    }

    const postCompactMessages = buildPostCompactMessages(compacted)
    for (const msg of postCompactMessages) { yield msg }

    state = { ...state,
      messages: postCompactMessages,
      hasAttemptedReactiveCompact: true,
      transition: { reason: 'reactive_compact_retry' },
    }
    continue  // ← Continue Site 2
  }

  // 第 3 步: 所有恢复失败 → 向用户报告
  // 关键:不要进入 Stop Hooks!模型从未产生有效响应,
  // Stop Hooks 无法有意义地评估。运行 Stop Hooks 会造成死亡螺旋:
  // error → hook blocking → retry → error → ...
  yield lastMessage
  void executeStopFailureHooks(lastMessage, toolUseContext)
  return { reason: 'prompt_too_long' }
}
Max Output Tokens Recovery
// src/query.ts — 真实的 max_output_tokens 恢复代码
if (isWithheldMaxOutputTokens(lastMessage)) {

  // 升级重试:如果使用了默认的 8k 上限,升级到 64k 重试 **同一请求**
  // 无 meta 消息,无多轮交互
  const capEnabled = getFeatureValue_CACHED_MAY_BE_STALE('tengu_otk_slot_v1', false)
  if (capEnabled && maxOutputTokensOverride === undefined
      && !process.env.CLAUDE_CODE_MAX_OUTPUT_TOKENS) {
    logEvent('tengu_max_tokens_escalate', { escalatedTo: ESCALATED_MAX_TOKENS })
    state = { ...state,
      maxOutputTokensOverride: ESCALATED_MAX_TOKENS,  // 64k
      transition: { reason: 'max_output_tokens_escalate' },
    }
    continue  // ← Continue Site 3
  }

  // 多轮恢复:注入恢复消息,要求模型从断点继续
  if (maxOutputTokensRecoveryCount < MAX_OUTPUT_TOKENS_RECOVERY_LIMIT) {  // 限制 3 次
    const recoveryMessage = createUserMessage({
      content: `Output token limit hit. Resume directly — no apology, no recap. ` +
        `Pick up mid-thought if that is where the cut happened. ` +
        `Break remaining work into smaller pieces.`,
      isMeta: true,
    })

    state = { ...state,
      messages: [...messagesForQuery, ...assistantMessages, recoveryMessage],
      maxOutputTokensRecoveryCount: maxOutputTokensRecoveryCount + 1,
      transition: {
        reason: 'max_output_tokens_recovery',
        attempt: maxOutputTokensRecoveryCount + 1,
      },
    }
    continue  // ← Continue Site 4
  }

  // 恢复耗尽 → 展示被截断的错误
  yield lastMessage
}
Stop Hook Recovery
// src/query.ts — Stop Hook 阻止后的恢复
const stopHookResult = yield* handleStopHooks(
  messagesForQuery, assistantMessages, systemPrompt,
  userContext, systemContext, toolUseContext, querySource, stopHookActive,
)

if (stopHookResult.preventContinuation) {
  return { reason: 'stop_hook_prevented' }
}

if (stopHookResult.blockingErrors.length > 0) {
  state = { ...state,
    messages: [...messagesForQuery, ...assistantMessages, ...stopHookResult.blockingErrors],
    maxOutputTokensRecoveryCount: 0,
    // 关键:保留 hasAttemptedReactiveCompact 标志!
    // 如果 compact 已经运行但无法恢复 prompt-too-long,
    // 重置此标志会导致无限循环:
    // compact → 仍然太长 → error → stop hook → compact → ...
    hasAttemptedReactiveCompact,
    stopHookActive: true,
    transition: { reason: 'stop_hook_blocking' },
  }
  continue  // ← Continue Site 5
}
All Termination Reasons
// query.ts 中的 10 种终止原因
return { reason: 'completed' }           // 正常完成(无工具调用 + Stop Hook 不阻止)
return { reason: 'blocking_limit' }      // 硬性 token 限制
return { reason: 'stop_hook_prevented' } // Stop Hook 阻止继续
return { reason: 'aborted_streaming' }   // 用户中断(模型响应中)
return { reason: 'aborted_tools' }       // 用户中断(工具执行中)
return { reason: 'hook_stopped' }        // Hook 附件停止继续
return { reason: 'max_turns', turnCount }// 达到最大轮次限制
return { reason: 'prompt_too_long' }     // 413 恢复耗尽
return { reason: 'image_error' }         // 图片/PDF 太大
return { reason: 'model_error', error }  // 意外异常
In-Depth Source Code Annotation Analysis:
The following insights are drawn from internal developer comments within the Claude Code source code, revealing real-world engineering challenges encountered in production:
1. Error Withholding Strategy
The source code comments: "yielding early would leak intermediate errors to consumers like cowork/desktop that terminate on any error field, even though recovery is still running."
This means that queryLoop does not yield immediately upon discovering an error. Instead, it withholds the error, waiting until the recovery flow completes before deciding whether to expose it. This prevents downstream consumers (IDE extensions, desktop applications) from seeing intermediate errors and terminating prematurely.
2. Budget Tracking Across Compaction Boundaries
The source code comments: "remaining is undefined until first compact fires — before compact the server sees full history and counts down from {total} itself (see api/api/sampling/prompt/renderer.py:292); after compact, server only sees summary and would under-count spend."
This reveals an elegant server-client coordination design: before compaction, the server can see the full history and compute budget consumption itself; after compaction, the server can only see the summary, so the client must inform the server "how much the part you can no longer see has consumed."
3. Why hasAttemptedReactiveCompact Is Not Reset
Note that in the Stop Hook recovery path, the hasAttemptedReactiveCompact flag is preserved rather than reset. The source code explains: if compact has already run but failed to recover from prompt-too-long, resetting this flag would cause an infinite loop: compact -> still too long -> error -> stop hook -> compact -> ... This is a fix for a real production bug.
4. The using Semantics of Memory Prefetch
using pendingMemoryPrefetch = startRelevantMemoryPrefetch(...) employs the TC39 Explicit Resource Management proposal (using keyword). The source code comments: "Fired once per user turn — the prompt is invariant across loop iterations, so per-iteration firing would ask sideQuery the same question N times." using ensures that prefetch resources are automatically cleaned up when the generator exits (whether normally or abnormally).
Pedagogical Takeaway: These details reveal a core principle — the complexity of a production-grade Agent Loop lies not in "the loop itself" but in "how to recover gracefully when the loop fails." A 30-line while(true) suffices for a basic Agent Loop, but handling all edge cases properly requires 1,800+ lines. The gap between the two represents the entire value of Harness Engineering.
3.6 Pause and Reflect
Having studied the Agent Loop, attempt to answer the following:
- Why does queryLoop use
while(true)instead of recursion? (Hint: consider memory and stack depth)- Why does the compaction pipeline have 4 levels instead of 1? (Hint: consider the trade-off between cost and latency)
- If you were to add a new recovery path (e.g., "API key expired"), which parts of the code would you need to modify?
These questions have no canonical answers, but reflecting on them will deepen your understanding of the "why" rather than merely the "how."
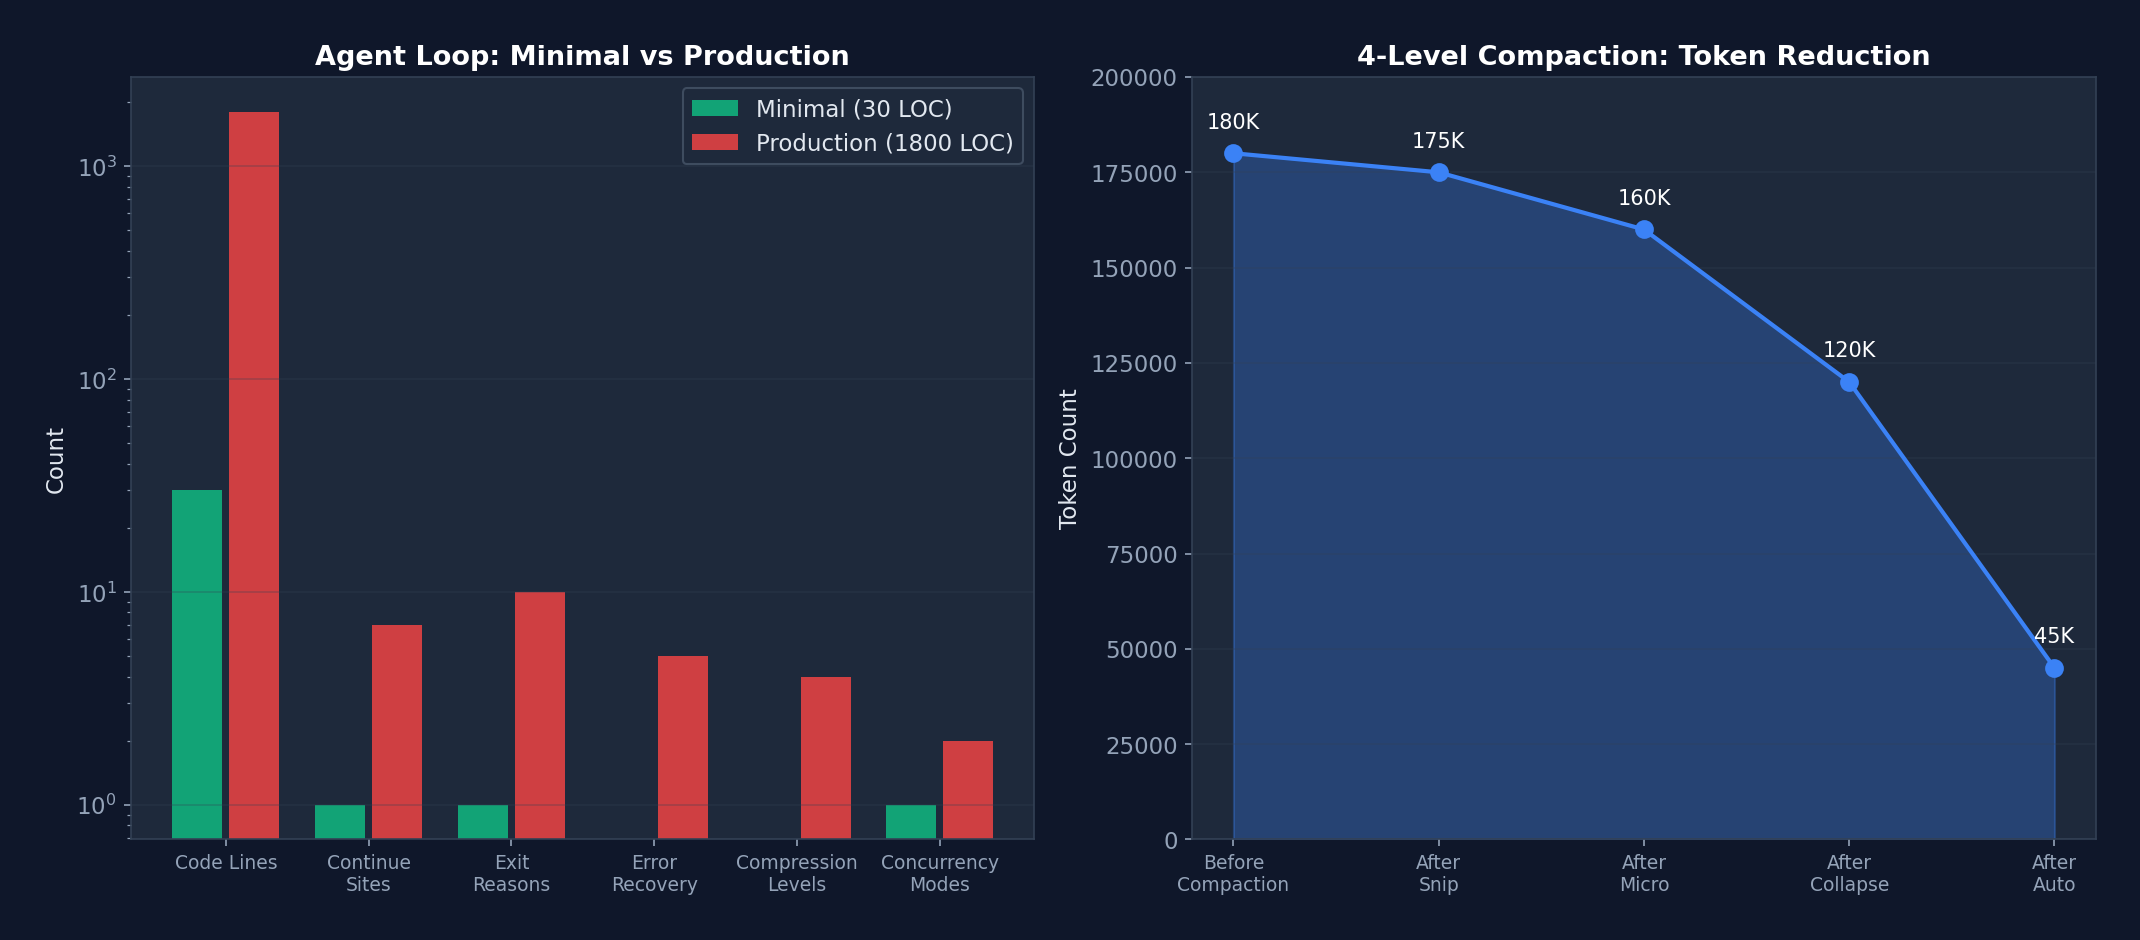 Figure 3-2: (Left) Complexity comparison between the minimal implementation and the production implementation (logarithmic scale) — a 60x increase in lines of code, where each dimension of growth corresponds to a real production requirement. (Right) Token release efficiency of the four-level compaction pipeline — from 180K progressively reduced to 45K.
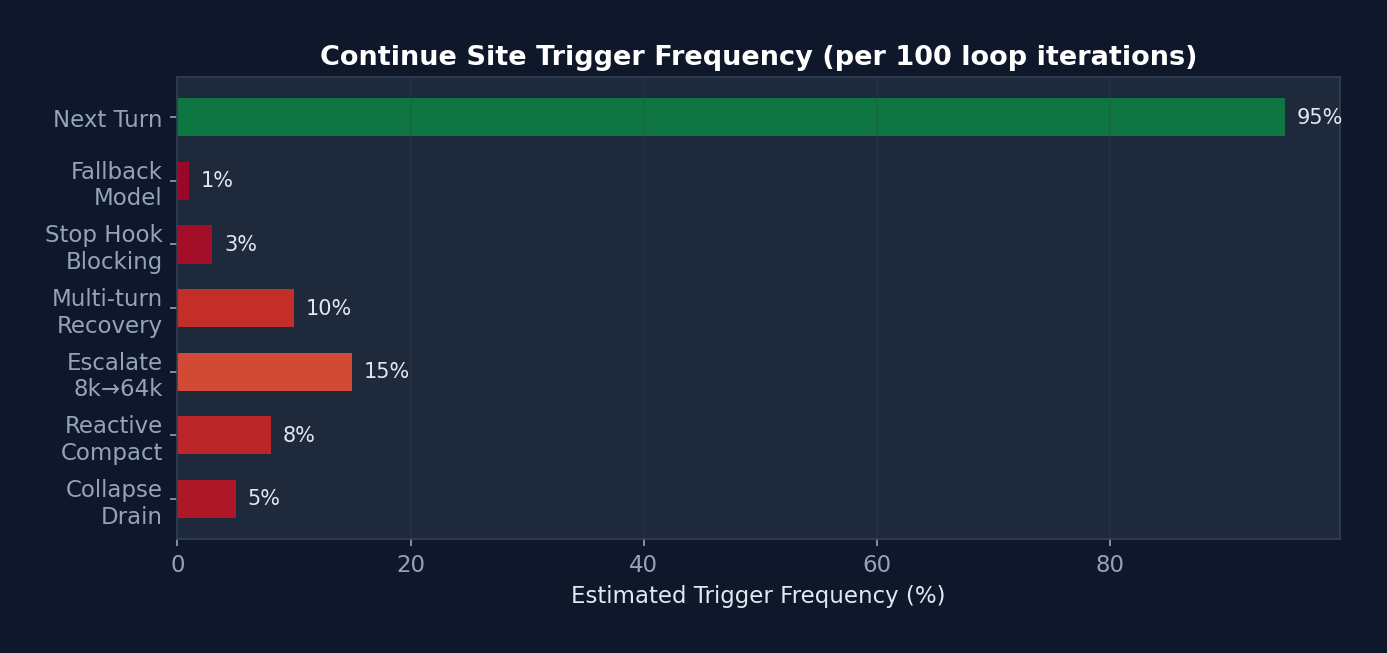 Figure 3-3: Estimated trigger frequency of the 7 continue sites — "Next Turn" (normal progression) accounts for 95%. Error recovery sites collectively account for approximately 5%, yet it is precisely this 5% of the code (approximately 500 lines) that prevents session interruptions and cost overruns.
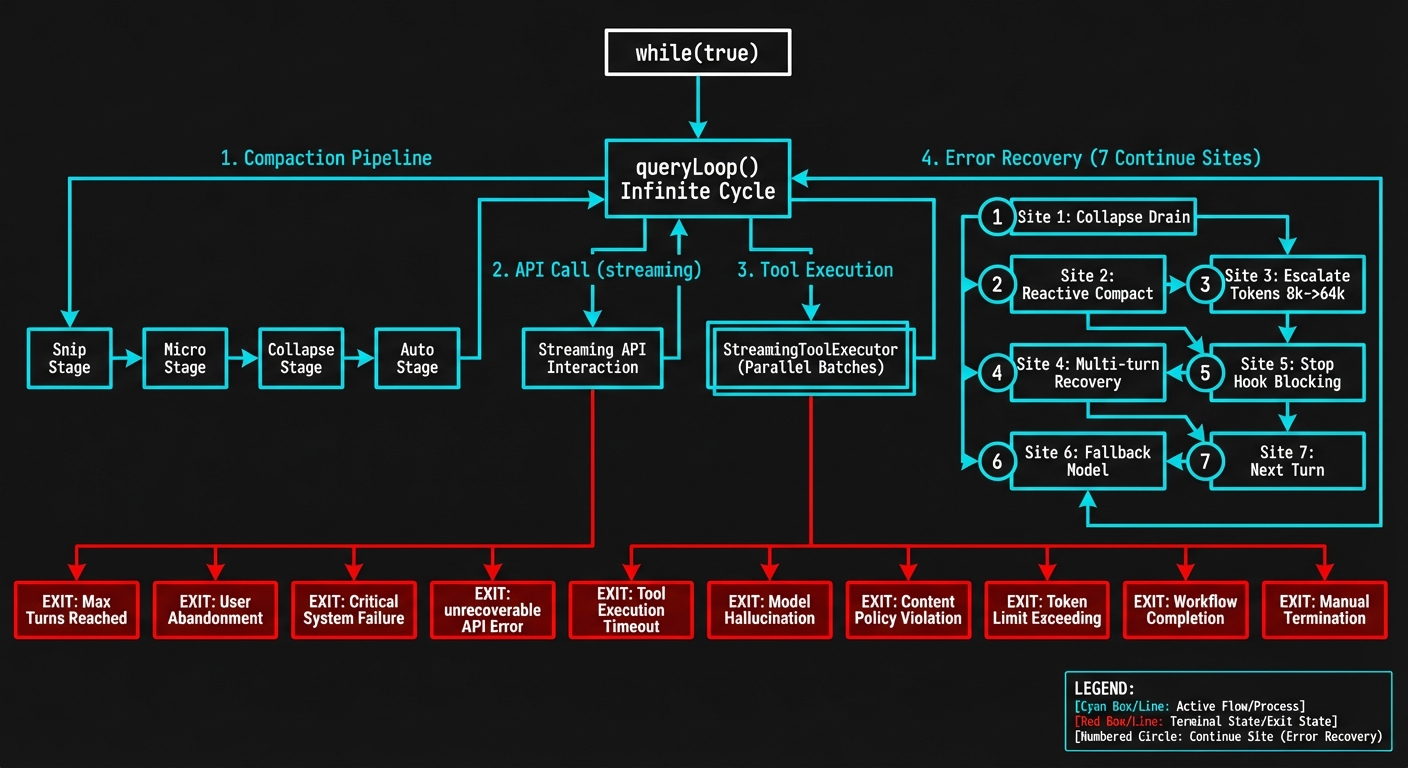 Figure 3-1: The queryLoop() state machine — showing the complete flow of 7 continue sites, the 4-level compaction pipeline, StreamingToolExecutor parallel execution, and 10 termination reasons.
3.7 Quantitative Analysis: Complexity Metrics of the Agent Loop
To quantify the gap between a "minimal Agent Loop" and a "production Agent Loop," we conducted a code metrics analysis of src/query.ts:
| Metric | Minimal Implementation (s01) | Claude Code Production Implementation |
|---|---|---|
| Lines of Code | 30 lines | 1,800+ lines |
| Continue Sites | 1 | 7 |
| Termination Reasons | 1 (completed) | 10 |
| Error Recovery Paths | 0 | 5 cascading recoveries |
| Compaction Strategies | 0 levels | 4-level pipeline |
| Concurrency Modes | Serial | 2 (Streaming + Sequential) |
| State Fields | 1 (messages) | 10 (State type) |
| Analytics Instrumentation Points | 0 | 15+ |
| Feature Gates | 0 | 8+ |
Complexity Growth Analysis: The growth from 30 lines to 1,800 lines represents a 60x increase. But this is not "over-engineering" — every line corresponds to a real production problem. For example: - The
hasAttemptedReactiveCompactflag is only 1 line, yet it prevents an infinite-loop bug that could consume thousands of dollars in API costs. - ThetaskBudgetRemainingtracking logic is approximately 20 lines, yet it is the only mechanism capable of correctly computing token consumption across compaction boundaries. - The StreamingToolExecutor is approximately 200 lines, yet it reduces multi-tool execution latency from O(n) to O(1) (the time of the slowest tool).
3.8 Summary of Agent Loop Design Philosophy
- Resilience over rigidity: 7+ continue sites enable recovery from nearly any error
- Progressive degradation: Each error type first attempts the lightest recovery, escalating gradually
- Streaming-first: The Async Generator makes every intermediate state observable
- Explicit state: A single State object with no implicit global state
- Built-in observability: Every recovery point includes analytics and profiling
Chapter 4: Tool System — The Agent's Hands
The Agent Loop is the engine, while the tool system is the steering wheel and throttle. No matter how powerful the engine, the vehicle cannot reach its destination without the ability to steer and modulate speed.
In Claude Code, the model (LLM) itself cannot read files, run commands, or search code. Its sole capability is generating text. Through the tool system, however, these text outputs are translated into real operations — reading a file, editing a line of code, running a test.
In this chapter we examine how Claude Code designs a system of 43+ tools, each independently self-contained yet uniformly managed. These design patterns can be directly reused in your own Agent projects.
The tool system is the sole channel through which the Agent interacts with the external world in the Harness. Claude Code implements a system of 43+ tools, each a self-contained module.
4.1 Tool Interface Definition
Located in src/Tool.ts, this is the base type for all tools:
type Tool<
  Input extends AnyObject = AnyObject,
  Output = unknown,
  P extends ToolProgressData = ToolProgressData,
> = {
  // ===== 核心标识 =====
  name: string;                    // 工具名称(主标识符)
  aliases?: string[];              // 别名(向后兼容)
  userFacingName(): string;        // 显示名称

  // ===== Schema & 验证 =====
  inputSchema: ZodType<Input>;     // Zod 输入验证
  inputJSONSchema?: JSONSchema;    // 可选 JSON Schema(MCP 工具)
  outputSchema?: ZodType<Output>;  // 可选输出类型
  validateInput(input): Promise<ValidationResult>;

  // ===== 执行 =====
  call(
    args: Input,
    context: ToolUseContext,
    canUseTool: CanUseTool,
    parentMessage: AssistantMessage,
    progressCallback?: ProgressCallback<P>,
  ): Promise<ToolResult<Output>>;

  // ===== 权限 & 安全 =====
  checkPermissions(args, context): Promise<PermissionDecision>;
  isConcurrencySafe(args): boolean;      // 能否并行执行
  isDestructive(args): boolean;          // 不可逆操作?
  isReadOnly(): boolean;                 // 只读操作?
  preparePermissionMatcher(args): string; // Hook 模式匹配

  // ===== 行为 =====
  isEnabled(): boolean;                  // 特性门控检查
  interruptBehavior(): 'cancel' | 'block';
  requiresUserInteraction(): boolean;

  // ===== 渲染 =====
  renderToolUseMessage(args): ReactElement;
  renderToolResultMessage(result): ReactElement;
  renderToolUseProgressMessage(progress): ReactElement;

  // ===== 搜索 & 折叠 =====
  searchHint: string;                    // ToolSearch 的 3-10 词关键词
  shouldDefer: boolean;                  // 延迟加载
  alwaysLoad: boolean;                   // 永不延迟

  // ===== 描述(动态生成)=====
  description(isNonInteractive?: boolean): string;
  prompt(context): string;               // 系统提示片段
};
Design Philosophy:
- Self-describing: Each tool carries its own schema, description, permission logic, and rendering functions
- Dual schema support: Zod (internal validation) + JSON Schema (MCP interoperability)
- Dynamic descriptions:
description()accepts an interaction mode parameter; UI-related explanations can be omitted in non-interactive mode - Lazy loading:
shouldDeferensures infrequently used tools are not loaded into the model context on the first turn, conserving tokens
Common Beginner Misconception: Many people focus exclusively on the
call()method when designing tool systems — "what can the tool do." In production, however, permission checking, input validation, and progress rendering account for 80% of tool code. A well-designed tool interface is not merely about "execution" but about "executing safely, observably, and interruptibly."
4.2 Tool Registry
Located in src/tools.ts:
// 唯一的工具真实来源
function getAllBaseTools(): Tool[] {
  return [
    // === 始终加载 ===
    AgentTool,
    TaskOutputTool,
    BashTool,
    FileReadTool,
    FileEditTool,
    FileWriteTool,
    WebFetchTool,
    WebSearchTool,
    AskUserQuestionTool,
    SkillTool,
    // ...更多始终可用的工具

    // === 特性门控 ===
    ...(feature('PROACTIVE') ? [SleepTool] : []),
    ...(feature('AGENT_TRIGGERS') ? [ScheduleCronTool] : []),
    ...(feature('COORDINATOR_MODE') ? [TeamCreateTool, TeamDeleteTool] : []),
    ...(isReplModeEnabled() ? [REPLTool] : []),
    // ...更多条件工具
  ];
}
Dead Code Elimination:
// Bun 的 bun:bundle 在编译时评估 feature() 调用
// 如果 feature('PROACTIVE') 编译为 false:
...(false ? [SleepTool] : [])
// → SleepTool 的全部代码被 tree-shake 移除
// 包括其引用的所有字符串和依赖
This is a key design pattern in Claude Code: compile-time feature gating. External distributions can remove entire subsystems by setting feature flags, without the need to manually delete code.
4.3 Tool Pool Assembly
function assembleToolPool(builtInTools: Tool[], mcpTools: Tool[]): Tool[] {
  // 1. 过滤被 deny 规则禁止的 MCP 工具
  const filteredMcp = mcpTools.filter(t => !getDenyRuleForTool(t));

  // 2. 分别排序(保持 prompt cache 稳定性)
  const sortedBuiltIn = sortBy(builtInTools, t => t.name);
  const sortedMcp = sortBy(filteredMcp, t => t.name);

  // 3. 连接:内置工具在前(作为缓存前缀)
  const combined = [...sortedBuiltIn, ...sortedMcp];

  // 4. 去重(内置优先)
  return uniqBy(combined, t => t.name);
}
Cache Stability Design:
Built-in tools, sorted by name, form a stable cache prefix. When MCP tools are added or removed, the prefix remains unchanged, and the Anthropic API's prompt cache is not invalidated. This is a subtle but important performance optimization.
4.4 Tool Execution Lifecycle
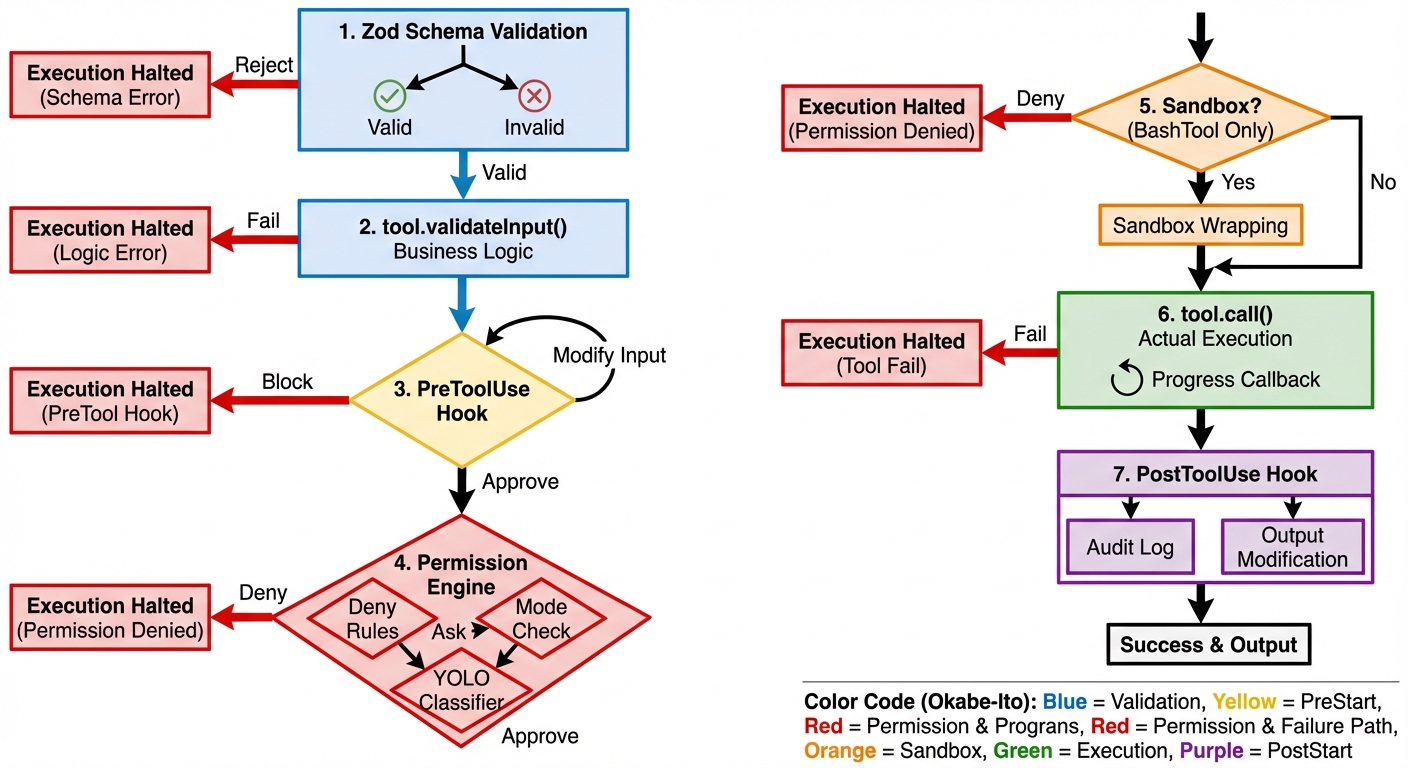 Figure 4-1: The 7-step tool execution pipeline — from Zod Schema validation to the PostToolUse Hook, each step can alter the tool's behavior or block its execution.
The sequence diagram below illustrates the complete path of a tool from request to execution — note how Hooks intervene at critical junctures:
sequenceDiagram
    participant M as Model
    participant V as Validator
    participant PH as PreToolUse Hook
    participant P as Permission Engine
    participant S as Sandbox
    participant T as Tool.call()
    participant AH as PostToolUse Hook

    M->>V: tool_use block
    V->>V: Zod Schema 验证
    alt 验证失败
        V-->>M: 格式错误消息
    end
    V->>V: tool.validateInput()
    alt 验证失败
        V-->>M: 业务逻辑错误
    end
    V->>PH: 输入 JSON
    PH->>PH: 条件匹配 (if 字段)
    alt Hook 阻止
        PH-->>M: blocking error
    else Hook 修改输入
        PH->>P: updatedInput
    else Hook 批准
        PH->>P: allow (但不绕过 deny 规则)
    end
    P->>P: deny规则 → ask规则 → 模式检查
    alt 权限拒绝
        P-->>M: 拒绝消息 + 建议
    end
    P->>S: 命令包装 (仅 BashTool)
    S->>S: wrapWithSandbox()
    S->>T: 沙盒化命令
    T->>T: 实际执行
    T->>AH: 执行结果
    AH->>AH: 审计日志 / 输出修改
    AH-->>M: 最终 tool_result
The same process illustrated as a traditional flowchart:
用户/模型请求工具调用
    │
    v
┌─────────────────────────┐
│ 1. validateInput()       │  结构验证(必填字段、范围)
│    使用 Zod Schema       │
└────────┬────────────────┘
         │ 通过
         v
┌─────────────────────────┐
│ 2. checkPermissions()    │  工具特定的权限逻辑
│    返回 allow/ask/deny   │
└────────┬────────────────┘
         │ 未被拒绝
         v
┌─────────────────────────┐
│ 3. Rule-Based Perms      │  设置中的 allow/deny/ask 规则
│    checkRuleBasedPerms() │
└────────┬────────────────┘
         │ 未被拒绝
         v
┌─────────────────────────┐
│ 4. PreToolUse Hooks      │  用户定义的 Hook
│    可批准或阻止           │
└────────┬────────────────┘
         │ 未被阻止
         v
┌─────────────────────────┐
│ 5. User Prompt/Classifier│  最终审批(或自动分类器)
│    auto 模式:YOLO 分类器│
└────────┬────────────────┘
         │ 批准
         v
┌─────────────────────────┐
│ 6. call()                │  实际执行工具
│    返回 ToolResult       │
└────────┬────────────────┘
         │
         v
┌─────────────────────────┐
│ 7. PostToolUse Hooks     │  执行后回调
│    审计日志、通知等       │
└─────────────────────────┘
4.5 Tool Execution Pipeline (with Real Code Including Hook Integration)
Tool execution involves far more than simply calling tool.call() — it is a multi-step pipeline where each step can alter behavior:
// src/services/tools/toolExecution.ts — 真实的执行管道
async function checkPermissionsAndCallTool(
  tool: Tool,
  toolUseID: string,
  input: Record<string, unknown>,
  toolUseContext: ToolUseContext,
  canUseTool: CanUseToolFn,
  assistantMessage: AssistantMessage,
  onToolProgress: (progress: ToolProgress) => void,
): Promise<MessageUpdate[]> {

  // ===== 步骤 1: Zod Schema 验证 =====
  const parsedInput = tool.inputSchema.safeParse(input)
  if (!parsedInput.success) {
    return [{ message: createUserMessage({
      content: formatZodValidationError(tool.name, parsedInput.error),
    }) }]
  }

  // ===== 步骤 2: 工具特定验证 =====
  const isValidCall = await tool.validateInput?.(parsedInput.data, toolUseContext)
  if (isValidCall?.result === false) {
    return [{ message: createUserMessage({
      content: isValidCall.message,
    }) }]
  }

  // ===== 步骤 3: PreToolUse Hook =====
  // Hook 可以:批准、阻止、修改输入、注入上下文
  let processedInput = parsedInput.data
  let hookPermissionResult: PermissionResult | undefined
  for await (const result of runPreToolUseHooks(...)) {
    switch (result.type) {
      case 'hookPermissionResult':
        hookPermissionResult = result.hookPermissionResult
        break
      case 'hookUpdatedInput':
        processedInput = result.updatedInput  // Hook 修改了输入!
        break
    }
  }

  // ===== 步骤 4: 权限解析(Hook + Rules 交互)=====
  // 关键设计:Hook 的 'allow' 不绕过 settings.json 的 deny/ask 规则
  const { decision, input: callInput } = await resolveHookPermissionDecision(
    hookPermissionResult, tool, processedInput,
    toolUseContext, canUseTool, assistantMessage, toolUseID,
  )
  if (decision.behavior !== 'allow') {
    return [/* 权限被拒绝的消息 */]
  }

  // ===== 步骤 5: 实际执行工具 =====
  let toolResult = await tool.call(
    callInput, toolUseContext, canUseTool,
    assistantMessage, onToolProgress,
  )

  // ===== 步骤 6: PostToolUse Hook =====
  // Hook 可以:修改 MCP 工具输出、注入额外上下文
  for await (const result of runPostToolUseHooks(...)) {
    if (result.updatedMCPToolOutput) {
      toolResult = { ...toolResult, data: result.updatedMCPToolOutput }
    }
  }

  // ===== 步骤 7: 转换为 API 格式并返回 =====
  return resultingMessages
}
Hook Permission Decision Resolution (this is the most nuanced part):
// src/services/tools/toolHooks.ts — 真实代码
export async function resolveHookPermissionDecision(
  hookPermissionResult, tool, input, toolUseContext,
  canUseTool, assistantMessage, toolUseID,
) {
  if (hookPermissionResult?.behavior === 'allow') {
    // Hook 说"允许"——但这不是最终判决!
    // deny/ask 规则仍然适用(安全不可变量)

    // 如果工具需要用户交互,且 Hook 提供了 updatedInput,
    // 那么 Hook 就是"用户交互"(如 headless 包装器)
    const interactionSatisfied =
      tool.requiresUserInteraction?.() &&
      hookPermissionResult.updatedInput !== undefined

    // 即使 Hook 允许,仍检查规则
    const ruleCheck = await checkRuleBasedPermissions(tool, input, toolUseContext)
    if (ruleCheck?.behavior === 'deny') {
      // Deny 规则覆盖 Hook 的 allow!
      return { decision: ruleCheck, input }
    }
    if (ruleCheck?.behavior === 'ask') {
      // Ask 规则仍需要对话框
      return { decision: await canUseTool(...), input }
    }

    // 无规则阻止 → Hook 的 allow 生效
    return { decision: hookPermissionResult, input }
  }
  // ... deny 和 ask 处理
}
Core Security Invariant: deny > settings rules > hook allow. Even if a Hook approves an operation, deny rules in settings.json still block it. This prevents malicious Hooks from circumventing security policies.
Why can't a Hook allow override deny rules? This is a real security consideration. Imagine you install a third-party MCP server that provides a PreToolUse Hook returning
allowfor all operations. If Hook allows could override deny rules, this third-party code would gain permissions exceeding your security policy — it could enable the Agent to perform operations you have explicitly forbidden. Claude Code's design guarantees: deny rules you write in settings.json constitute an inviolable baseline, regardless of any Hook intervention.
4.6 FileEditTool String Replacement Algorithm
The FileEditTool's core algorithm merits separate analysis — it handles smart quote matching, a genuine engineering challenge:
// src/tools/FileEditTool/utils.ts — 真实代码

// 问题:模型有时生成 "curly quotes"(智能引号)
// 但文件中是 "straight quotes"(直引号),或反之
const LEFT_DOUBLE_CURLY_QUOTE = '\u201C'   // "
const RIGHT_DOUBLE_CURLY_QUOTE = '\u201D'  // "

function normalizeQuotes(str: string): string {
  return str
    .replaceAll('\u2018', "'")   // ' → '
    .replaceAll('\u2019', "'")   // ' → '
    .replaceAll('\u201C', '"')   // " → "
    .replaceAll('\u201D', '"')   // " → "
}

// 三阶段查找算法
function findActualString(fileContent: string, searchString: string): string | null {
  // 阶段 1: 精确匹配
  if (fileContent.includes(searchString)) return searchString

  // 阶段 2: 引号规范化匹配
  const normalizedSearch = normalizeQuotes(searchString)
  const normalizedFile = normalizeQuotes(fileContent)
  const searchIndex = normalizedFile.indexOf(normalizedSearch)
  if (searchIndex !== -1) {
    // 返回文件中的 **原始** 字符串(保留原始引号风格)
    return fileContent.substring(searchIndex, searchIndex + searchString.length)
  }

  return null
}

// 替换算法
function applyEditToFile(
  originalContent: string,
  oldString: string,
  newString: string,
  replaceAll: boolean = false,
): string {
  const f = replaceAll
    ? (content, search, replace) => content.replaceAll(search, () => replace)
    : (content, search, replace) => content.replace(search, () => replace)

  if (newString !== '') return f(originalContent, oldString, newString)

  // 边界情况:删除操作
  // 如果 oldString 不以换行结尾,但文件中 oldString 后面紧跟换行,
  // 同时删除那个换行(防止留下空行)
  const stripTrailingNewline =
    !oldString.endsWith('\n') && originalContent.includes(oldString + '\n')

  return stripTrailingNewline
    ? f(originalContent, oldString + '\n', newString)
    : f(originalContent, oldString, newString)
}
Design Wisdom: The use of () => replace rather than passing replace directly prevents special patterns such as $1 and $& in the replacement string from being misinterpreted by JavaScript's regex replacement engine. A subtle but critical safeguard.
4.7 Quantitative Analysis: Tool Execution Performance Characteristics
| Execution Mode | Scenario | Latency Model | Actual Performance |
|---|---|---|---|
| StreamingToolExecutor concurrent | 10 Read tools | O(max(t_i)) | ~50ms (slowest file read time) |
| StreamingToolExecutor serial | 1 Write then 1 Read | O(sum of t_i) | ~80ms (write+read sequential) |
| runTools concurrent batch | 5 Read + 1 Write + 3 Read | O(max(5)) + O(1) + O(max(3)) | ~130ms |
| Internal callback Hook fast path | PostToolUse (all internal Hooks) | O(n) but very fast | ~1.8us (after optimization) |
| External Hook execution | PreToolUse command Hook | O(hook_timeout) | 5-30s (depends on script) |
Source Code Annotation: Regarding the internal Hook fast path, the source code comments: "Fast-path: all hooks are internal callbacks (sessionFileAccessHooks, attributionHooks). These return {} and don't use the abort signal... Measured: 6.01us -> ~1.8us per PostToolUse hit (-70%)." This 70% performance improvement comes from skipping span/progress/abortSignal/JSON parsing — for PostToolUse Hooks triggered on every tool call, such micro-optimizations produce significant cumulative effects.
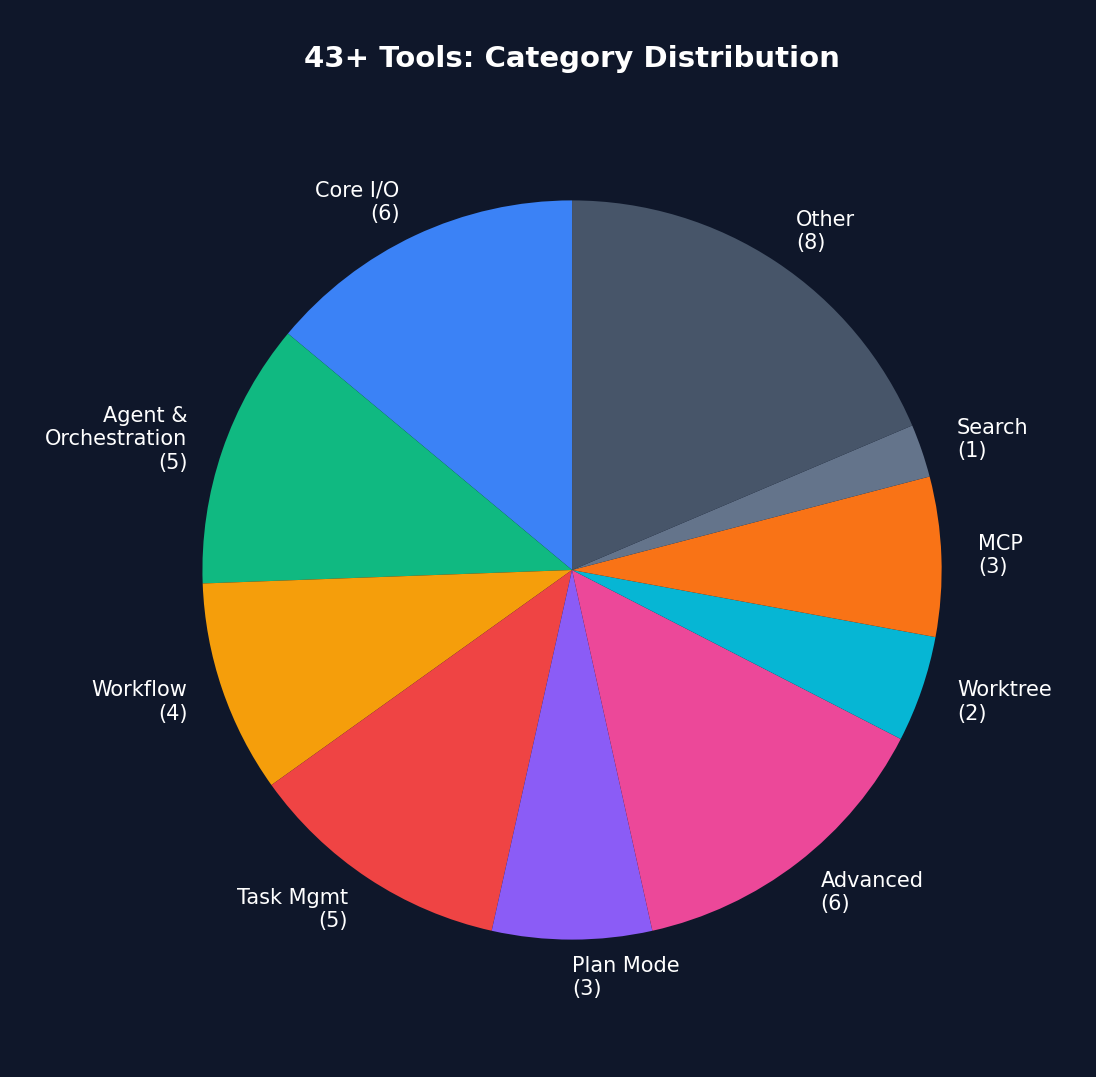 Figure 4-2: Category distribution of 43+ tools — Core I/O (6 tools) has the highest usage frequency, while Advanced (6 tools) are loaded on demand via feature gates.
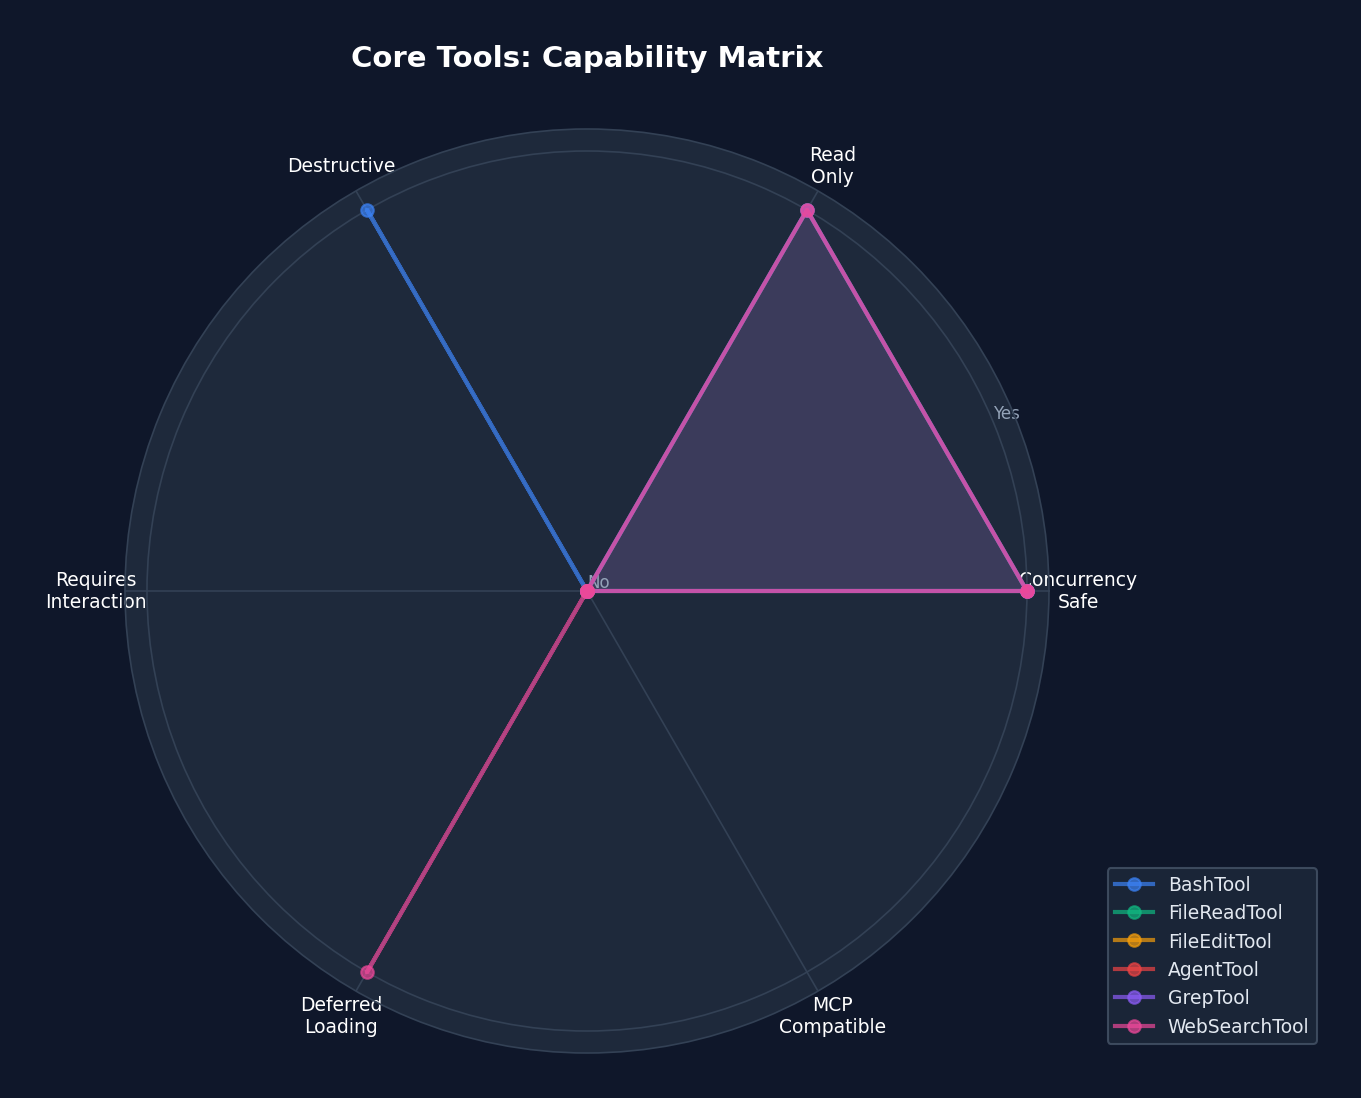 Figure 4-3: Core tool capability radar chart — showing dimensions such as concurrency safety, read-only status, and destructiveness. FileReadTool and GrepTool are the "safest" tools (concurrency safe + read-only), while BashTool is the "most dangerous" (potentially destructive + non-read-only + not concurrency safe).
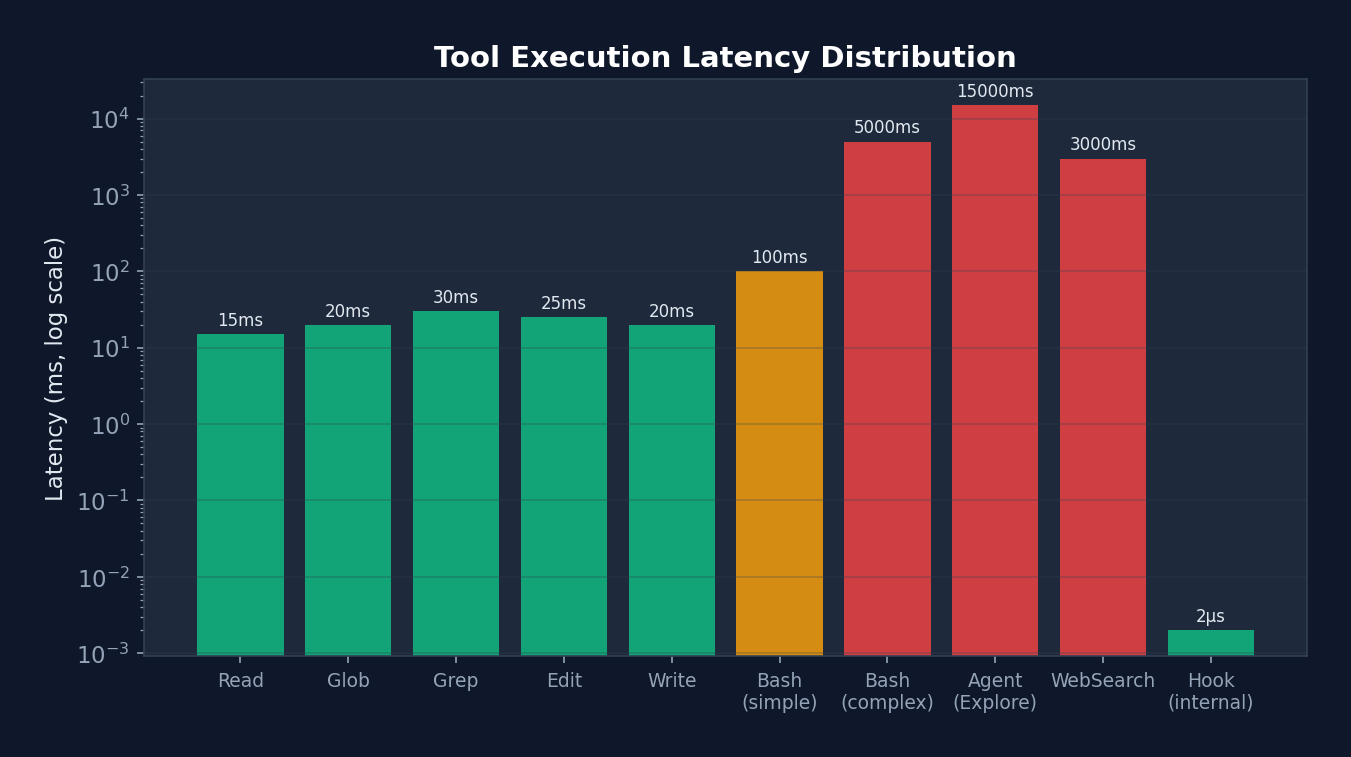 Figure 4-4: Tool execution latency distribution (logarithmic scale) — ranging from 2us for internal Hooks to 15 seconds for Agent Explore, latencies span 7 orders of magnitude. This explains why StreamingToolExecutor's concurrency optimization is so important — in multi-tool scenarios, it reduces total latency from the sum of all tools to the time of the slowest tool.
4.8 Tool Classification
| Category | Tools | Characteristics |
|---|---|---|
| Core I/O | BashTool, FileReadTool, FileWriteTool, FileEditTool, GlobTool, GrepTool | Always loaded |
| Agent | AgentTool, SendMessageTool, TeamCreateTool, TeamDeleteTool | Sub-Agent creation and management |
| Workflow | WebFetchTool, WebSearchTool, NotebookEditTool | External resource access |
| Task | TaskCreateTool, TaskUpdateTool, TaskListTool, TaskOutputTool, TaskStopTool | Task management |
| Planning | EnterPlanModeTool, ExitPlanModeTool, TodoWriteTool | Plan mode |
| Advanced | ScheduleCronTool, SleepTool, MonitorTool, REPLTool | Feature-gated |
| Worktree | EnterWorktreeTool, ExitWorktreeTool | Git worktree isolation |
| MCP | MCPTool, ListMcpResourcesTool, ReadMcpResourceTool | MCP protocol |
| Search | ToolSearchTool | Deferred tool discovery |
4.6 Tool Deferral (Lazy Loading)
// 并非所有工具都在第一轮加载
// shouldDefer = true 的工具不发送给模型
// 直到 ToolSearchTool 被调用发现它们

// 例:NotebookEditTool
{
  name: 'NotebookEdit',
  shouldDefer: true,        // 第一轮不加载
  searchHint: 'jupyter notebook cell edit insert',
  alwaysLoad: false,
}

// 例:BashTool
{
  name: 'Bash',
  shouldDefer: false,       // 始终加载
  alwaysLoad: true,         // 永不延迟
}
Design Philosophy:
Model tool definitions consume from the token budget. Loading all 43+ tools simultaneously would consume a substantial portion of the context window. Through lazy loading, only core tools (~15) are loaded on the first turn, with the remainder discovered on demand via ToolSearch. This is a canonical application of context engineering.
Chapter 5: Permission Model — Constraint Architecture
Recall the "taming a horse" metaphor from Chapter 1. By now, our horse (Agent) has an engine (Loop) and a control system (Tools). But what if it can gallop freely and trample the crops? We need fences — this is the permission model.
This represents the most essential "constraint" pillar of Harness Engineering. A well-designed permission model does not "restrict" the Agent — it "reduces the Agent's probability of making mistakes." Claude Code's permission system is among the most mature implementations in the industry, revealing a counterintuitive truth: the more precise the constraints, the freer the Agent becomes. Because when you can precisely control risk, you dare to let the Agent do more.
The permission model is the Harness's "safety valve." It determines what the Agent can do, cannot do, and must ask about.
5.1 Five Permission Modes
type PermissionMode =
  | 'default'            // 敏感操作始终询问
  | 'acceptEdits'        // 自动批准文件编辑,其他询问
  | 'bypassPermissions'  // 自动批准一切(危险)
  | 'dontAsk'           // 自动拒绝需要询问的操作
  | 'plan'              // 计划模式限制(只读 + 计划文件)
  | 'auto'              // AI 分类器自动审批(实验性)
  | 'bubble';           // 冒泡到父 Agent(子 Agent 用)
Design Philosophy:
Modes are not binary (allow/deny) but form a spectrum. default is the safest, suitable for new users; bypassPermissions is appropriate for trusted automation environments; auto is the most interesting — it uses a two-stage AI classifier to determine whether an operation is safe.
Analogy: Permission modes are akin to driving assistance systems.
defaultis like novice mode — every lane change requires confirmation.acceptEditsis like adaptive cruise control — driving straight is automatic, turns are manual.bypassPermissionsis like full self-driving — you place complete trust in the system.autois the most interesting — an AI driver is behind the wheel, but it has its own "safety supervisor" (the YOLO classifier) monitoring it.
5.2 Three-Level Rule System
type PermissionRule = {
  source: PermissionRuleSource;  // 规则来源
  ruleBehavior: 'allow' | 'deny' | 'ask';
  ruleValue: {
    toolName: string;       // 例: "Bash", "Write", "mcp__server"
    ruleContent?: string;   // 例: "git *", "*.ts", "prefix:npm *"
  };
};
Rule syntax examples:
# 允许所有 git 命令
Bash(git *)

# 允许写入 TypeScript 文件
Write(*.ts)

# 拒绝所有 MCP 服务器工具
mcp__*

# 允许读取任何文件
Read

# 拒绝 rm -rf 命令
Bash(rm -rf *)

# 允许特定 MCP 服务器的所有工具
mcp__my-server(*)
5.3 Defense-in-Depth Model
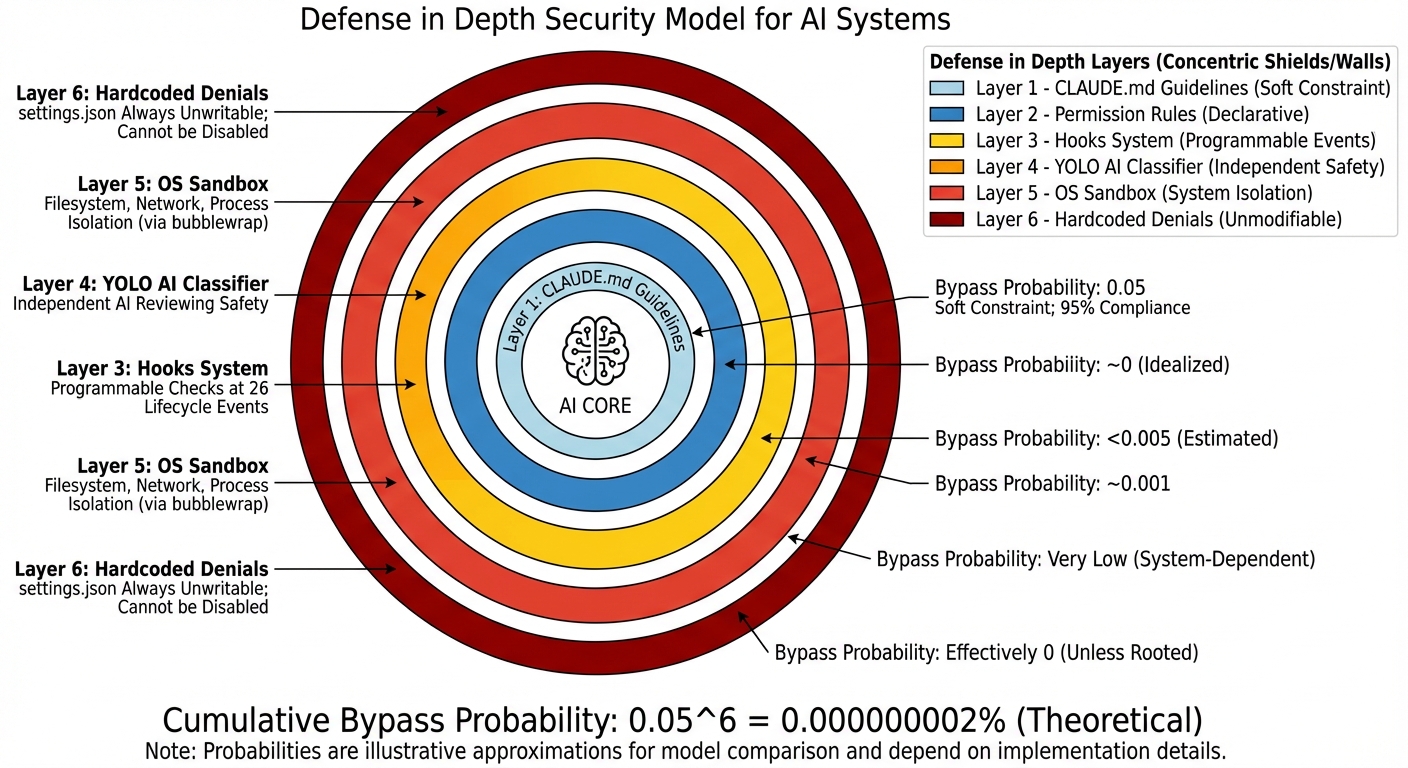 Figure 5-1: The six-layer defense-in-depth security model — from soft constraints (CLAUDE.md, ~95% compliance rate) to hard constraints (hardcoded denials, 100% unbypassable). The cumulative stacking of layers drives the overall bypass probability toward zero.
Before delving into specific permission rules, it is important to first understand Claude Code's six-layer security architecture from a macro perspective. This is one of the most important design patterns in the entire Harness:
flowchart TB
    subgraph Layer1["第 1 层: CLAUDE.md(指导性约束)"]
        direction LR
        L1["告诉 Agent '不要修改 migrations/ 目录'"]
    end
    subgraph Layer2["第 2 层: Permission Rules(声明性约束)"]
        direction LR
        L2["settings.json 中的 allow/deny/ask 规则"]
    end
    subgraph Layer3["第 3 层: Hooks(可编程约束)"]
        direction LR
        L3["PreToolUse 脚本检查操作合法性"]
    end
    subgraph Layer4["第 4 层: YOLO Classifier(AI 约束)"]
        direction LR
        L4["独立 AI 模型审查操作安全性"]
    end
    subgraph Layer5["第 5 层: Sandbox(系统级约束)"]
        direction LR
        L5["操作系统级文件/网络隔离"]
    end
    subgraph Layer6["第 6 层: Hardcoded Denials(不可覆盖约束)"]
        direction LR
        L6["settings.json 始终不可写,无法通过配置禁用"]
    end

    Layer1 --> Layer2 --> Layer3 --> Layer4 --> Layer5 --> Layer6

    classDef soft fill:#dbeafe,stroke:#2563eb,color:#1e3a5f
    classDef medium fill:#fef9c3,stroke:#ca8a04,color:#713f12
    classDef hard fill:#fee2e2,stroke:#dc2626,color:#7f1d1d

    class Layer1 soft
    class Layer2,Layer3 medium
    class Layer4 medium
    class Layer5,Layer6 hard
Analysis: Note the color gradient — from blue (soft constraints, can be ignored) to yellow (medium constraints, can be overridden via configuration) to red (hard constraints, unbypassable). In engineering practice, Layer 1 (CLAUDE.md) has a compliance rate of approximately 95% — the model occasionally "forgets." But Layer 6's compliance rate is 100%, since it is hardcoded. This gradient design means: you do not need every layer to be perfect; you only need the cumulative bypass probability to be sufficiently low. If each layer has a 5% bypass rate, six layers stacked yield a bypass probability of 0.05^6, which is approximately 0.000000002%.
5.4 Settings Hierarchy (7 Priority Levels)
Rules originate from multiple sources, ordered from highest to lowest priority:
Highest priority
    ↓
1. CLI arguments (cliArg)              — Command-line overrides
2. Session commands (command)           — /permissions command
3. Flag settings (flagSettings)         — CLAUDE_CODE_FLAG_SETTINGS
4. Policy settings (policySettings)     — Organization policy
5. Local settings (localSettings)       — .claude/settings.json.local
6. Project settings (projectSettings)   — .claude/settings.json
7. User settings (userSettings)         — ~/.claude/settings.json
    ↓
Lowest priority
With enterprise managed settings:
Managed Settings (MDM/Enterprise):
├── /managed/managed-settings.json        — Base managed settings
├── /managed/managed-settings.d/*.json    — Drop-in overrides
└── macOS plutil / Windows Registry       — OS-level MDM
Design Philosophy:
The hierarchical settings system allows organization-level policy enforcement without modifying user settings. Enterprise administrators can lock down certain permissions via MDM (Mobile Device Management), project maintainers can define sensible defaults in project settings, and individual users can fine-tune on top of these.
flowchart BT
    U["用户设置\n~/.claude/settings.json\n优先级最低"] --> P["项目设置\n.claude/settings.json"]
    P --> L["本地设置\n.claude/settings.json.local\n不提交 git"]
    L --> Po["策略设置\n组织策略"]
    Po --> M["管理设置\nMDM/企业\n可锁定"]
    M --> F["Flag 设置\n环境变量"]
    F --> C["CLI 参数\n优先级最高"]

    classDef low fill:#dcfce7,stroke:#16a34a,color:#14532d
    classDef mid fill:#fef9c3,stroke:#ca8a04,color:#713f12
    classDef high fill:#fee2e2,stroke:#dc2626,color:#7f1d1d

    class U,P low
    class L,Po mid
    class M,F,C high
Analysis: Trust Hierarchy and Override Direction
Note that the arrows point from bottom to top — lowest priority at the bottom, highest priority at the top. This is not accidental: the closer a setting is to "runtime," the higher its priority. User settings are the "most distant" (edited once, used long-term), while CLI arguments are the "most immediate" (can differ on each run). This design lets you temporarily override any setting via CLI arguments without modifying files.
Another key design:
lockedByPolicy: trueallows administrators to lock sandbox settings so that users cannot disable them. The source code comments note this was "Added to unblock NVIDIA enterprise rollout" — a feature driven by a real enterprise customer requirement.
5.4 Permission Decision Pipeline (Real Source Code)
The following is the real permission pipeline from src/utils/permissions/permissions.ts, with comments revealing the rationale behind each decision:
// src/utils/permissions/permissions.ts — 真实代码
async function hasPermissionsToUseToolInner(
  tool: Tool, input: Record<string, unknown>, context: ToolUseContext,
): Promise<PermissionDecision> {

  if (context.abortController.signal.aborted) throw new AbortError()

  let appState = context.getAppState()

  // ===== 1a. 整个工具被 Deny =====
  const denyRule = getDenyRuleForTool(appState.toolPermissionContext, tool)
  if (denyRule) {
    return { behavior: 'deny', decisionReason: { type: 'rule', rule: denyRule },
      message: `Permission to use ${tool.name} has been denied.` }
  }

  // ===== 1b. 整个工具被 Ask =====
  const askRule = getAskRuleForTool(appState.toolPermissionContext, tool)
  if (askRule) {
    // 特殊情况:沙盒自动允许
    // 当 autoAllowBashIfSandboxed 开启时,沙盒化的命令跳过 ask 规则
    // 不会沙盒化的命令(排除命令、dangerouslyDisableSandbox)仍遵守 ask
    const canSandboxAutoAllow =
      tool.name === BASH_TOOL_NAME &&
      SandboxManager.isSandboxingEnabled() &&
      SandboxManager.isAutoAllowBashIfSandboxedEnabled() &&
      shouldUseSandbox(input)
    if (!canSandboxAutoAllow) {
      return { behavior: 'ask', decisionReason: { type: 'rule', rule: askRule } }
    }
    // 落入下方让 Bash 的 checkPermissions 处理命令级规则
  }

  // ===== 1c. 工具特定权限检查 =====
  let toolPermissionResult: PermissionResult = { behavior: 'passthrough' }
  try {
    const parsedInput = tool.inputSchema.parse(input)
    toolPermissionResult = await tool.checkPermissions(parsedInput, context)
  } catch (e) {
    if (e instanceof AbortError) throw e
    logError(e)
  }

  // ===== 1d. 工具实现拒绝 =====
  if (toolPermissionResult?.behavior === 'deny') return toolPermissionResult

  // ===== 1e. 需要用户交互的工具 =====
  if (tool.requiresUserInteraction?.() && toolPermissionResult?.behavior === 'ask') {
    return toolPermissionResult
  }

  // ===== 1f. 内容级 ask 规则(重要!)=====
  // 当用户配置了内容级 ask 规则如 Bash(npm publish:*),
  // tool.checkPermissions 返回 {behavior:'ask', decisionReason:{type:'rule', ruleBehavior:'ask'}}
  // 这必须被尊重,即使在 bypassPermissions 模式下!
  if (toolPermissionResult?.behavior === 'ask' &&
      toolPermissionResult.decisionReason?.type === 'rule' &&
      toolPermissionResult.decisionReason.rule.ruleBehavior === 'ask') {
    return toolPermissionResult
  }

  // ===== 1g. 安全检查(不可绕过)=====
  // .git/, .claude/, .vscode/, shell 配置等路径
  // 即使 bypassPermissions 模式也必须提示
  if (toolPermissionResult?.behavior === 'ask' &&
      toolPermissionResult.decisionReason?.type === 'safetyCheck') {
    return toolPermissionResult
  }

  // ===== 2a. 模式检查 =====
  appState = context.getAppState()  // 重新获取最新状态
  const shouldBypassPermissions =
    appState.toolPermissionContext.mode === 'bypassPermissions' ||
    (appState.toolPermissionContext.mode === 'plan' &&
     appState.toolPermissionContext.isBypassPermissionsModeAvailable)
  if (shouldBypassPermissions) {
    return { behavior: 'allow', decisionReason: { type: 'mode', mode: '...' } }
  }

  // ===== 2b. 整个工具被 Allow =====
  const allowRule = toolAlwaysAllowedRule(appState.toolPermissionContext, tool)
  if (allowRule) {
    return { behavior: 'allow', decisionReason: { type: 'rule', rule: allowRule } }
  }

  // ===== 3. passthrough → ask =====
  return toolPermissionResult.behavior === 'passthrough'
    ? { ...toolPermissionResult, behavior: 'ask' }
    : toolPermissionResult
}

// ===== 外层包装:模式转换 =====
export const hasPermissionsToUseTool: CanUseToolFn = async (...) => {
  const result = await hasPermissionsToUseToolInner(...)

  // 允许 → 重置连续拒绝计数器
  if (result.behavior === 'allow') {
    if (feature('TRANSCRIPT_CLASSIFIER') && context.mode === 'auto') {
      persistDenialState(context, recordSuccess(currentDenialState))
    }
    return result
  }

  // ask → 模式转换
  if (result.behavior === 'ask') {
    if (appState.toolPermissionContext.mode === 'dontAsk') {
      return { behavior: 'deny', decisionReason: { type: 'mode', mode: 'dontAsk' } }
    }
    // auto 模式 → AI 分类器(见 5.5 节)
  }
  return result
}
Permission Decision Order Diagram:
                    工具调用请求
                        │
          ┌─────────────┼─────────────┐
          │             │             │
     Deny 规则?    Ask 规则?     Allow 规则?
       │ 是            │ 是           │ 是
       v              │             v
     拒绝          沙盒可以        允许
                  自动允许?
                   │ 否
                   v
               tool.checkPermissions()
                   │
          ┌────────┼────────┐
          │        │        │
        deny     ask      allow/
          │        │      passthrough
          v        │        │
        拒绝    内容级规则?   │
                 │ 是       │
                 v         │
               拒绝/询问   │
                           │
                 安全检查?──┤
                  │ 是     │
                  v        │
                 询问      │
                           │
              bypassPermissions?
                  │ 是     │ 否
                  v        v
                允许    Allow 规则?
                         │ 是  │ 否
                         v     v
                       允许   ask → 模式转换
                              ├─ dontAsk → deny
                              ├─ auto → AI 分类器
                              └─ default → 用户提示
5.5 Permission Rule Parser (Real Source Code)
Parsing rule strings is more complex than it appears — escaped parentheses must be handled:
// src/utils/permissions/permissionRuleParser.ts — 真实代码

// 输入: "Bash(python -c \"print\\(1\\)\")"
// 输出: { toolName: "Bash", ruleContent: "python -c \"print(1)\"" }
export function permissionRuleValueFromString(ruleString: string): PermissionRuleValue {
  // 找到第一个 **未转义** 的左括号
  const openParenIndex = findFirstUnescapedChar(ruleString, '(')
  if (openParenIndex === -1) {
    return { toolName: normalizeLegacyToolName(ruleString) }
  }

  // 找到最后一个 **未转义** 的右括号
  const closeParenIndex = findLastUnescapedChar(ruleString, ')')
  if (closeParenIndex === -1 || closeParenIndex <= openParenIndex) {
    return { toolName: normalizeLegacyToolName(ruleString) }
  }

  // 右括号必须在末尾
  if (closeParenIndex !== ruleString.length - 1) {
    return { toolName: normalizeLegacyToolName(ruleString) }
  }

  const toolName = ruleString.substring(0, openParenIndex)
  const rawContent = ruleString.substring(openParenIndex + 1, closeParenIndex)

  // 空内容 "Bash()" 或通配符 "Bash(*)" → 工具级规则
  if (rawContent === '' || rawContent === '*') {
    return { toolName: normalizeLegacyToolName(toolName) }
  }

  // 反转义: \\( → (, \\) → ), \\\\ → \\
  const ruleContent = unescapeRuleContent(rawContent)
  return { toolName: normalizeLegacyToolName(toolName), ruleContent }
}

// 判断字符是否被转义(前面有奇数个反斜杠)
function findFirstUnescapedChar(str: string, char: string): number {
  for (let i = 0; i < str.length; i++) {
    if (str[i] === char) {
      let backslashCount = 0
      let j = i - 1
      while (j >= 0 && str[j] === '\\') { backslashCount++; j-- }
      if (backslashCount % 2 === 0) return i  // 偶数个反斜杠 = 未转义
    }
  }
  return -1
}
MCP Server-Level Rule Matching:
// 规则 "mcp__server1" 匹配工具 "mcp__server1__tool1"
// 规则 "mcp__server1__*" 匹配 server1 的所有工具
function toolMatchesRule(tool, rule): boolean {
  if (rule.ruleValue.ruleContent !== undefined) return false  // 内容规则不匹配整个工具

  const nameForRuleMatch = getToolNameForPermissionCheck(tool)
  if (rule.ruleValue.toolName === nameForRuleMatch) return true

  // MCP 服务器级匹配
  const ruleInfo = mcpInfoFromString(rule.ruleValue.toolName)
  const toolInfo = mcpInfoFromString(nameForRuleMatch)
  return ruleInfo !== null && toolInfo !== null &&
    (ruleInfo.toolName === undefined || ruleInfo.toolName === '*') &&
    ruleInfo.serverName === toolInfo.serverName
}
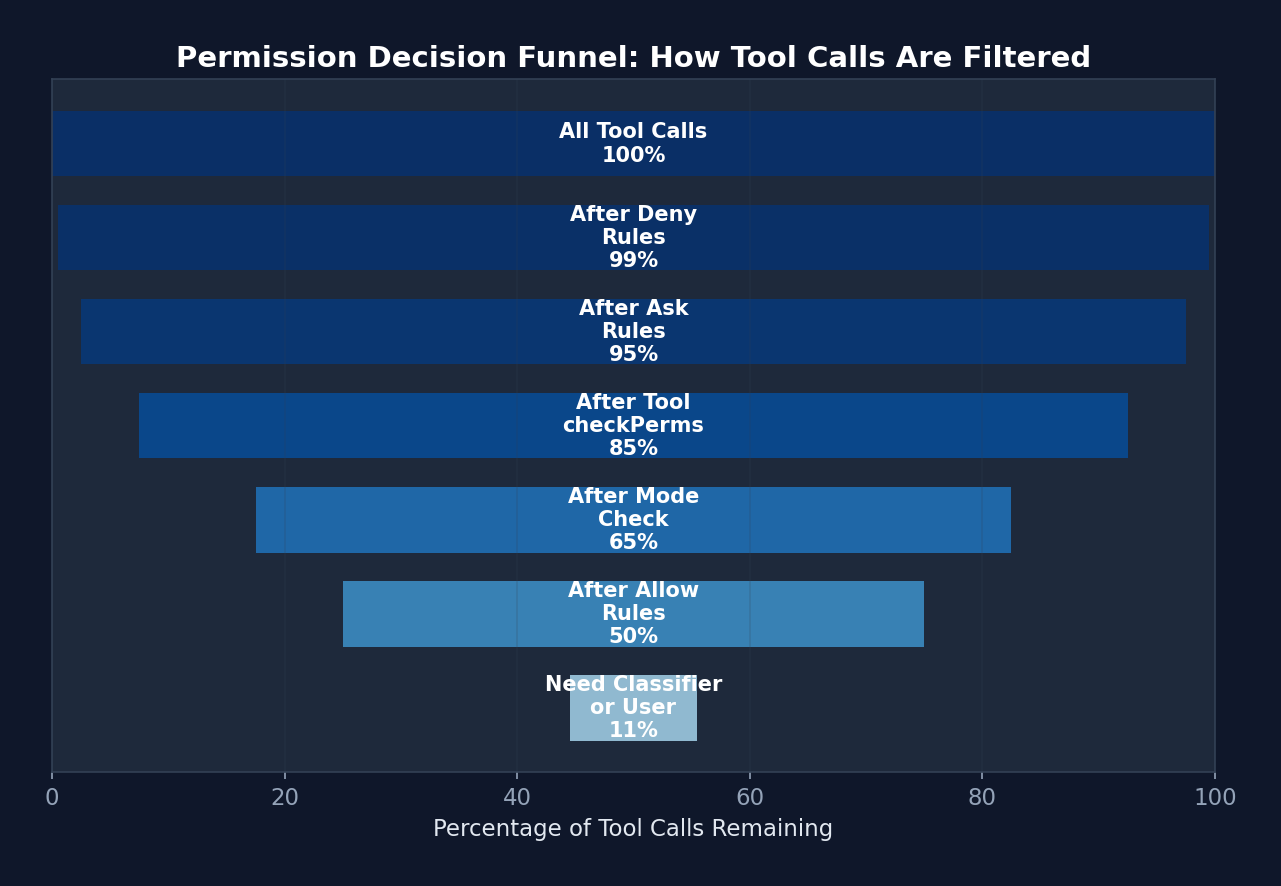 Figure 5-2: The permission decision funnel — 100% of tool calls pass through successive filter layers. Ultimately, only approximately 11% require an expensive classifier or user confirmation. The first 4 steps filter out 89% of calls, all via zero-cost rule matching.
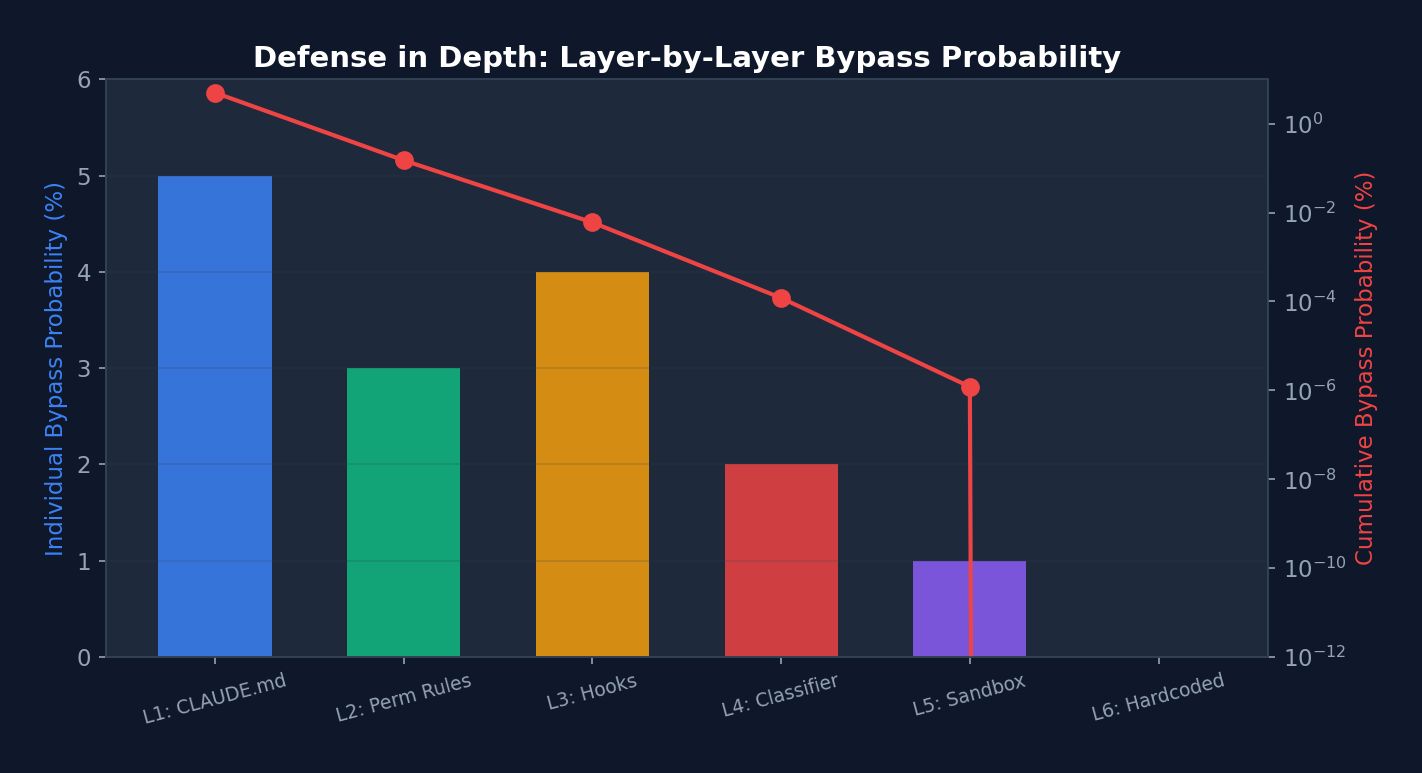 Figure 5-3: Layer-by-layer bypass probability in the defense-in-depth model (blue bars: per-layer probability; red line: cumulative probability, logarithmic scale) — After stacking 6 layers, the cumulative bypass probability approaches zero. Note that Layer 6 (hardcoded denials) has a per-layer probability of 0, reducing the cumulative probability to zero.
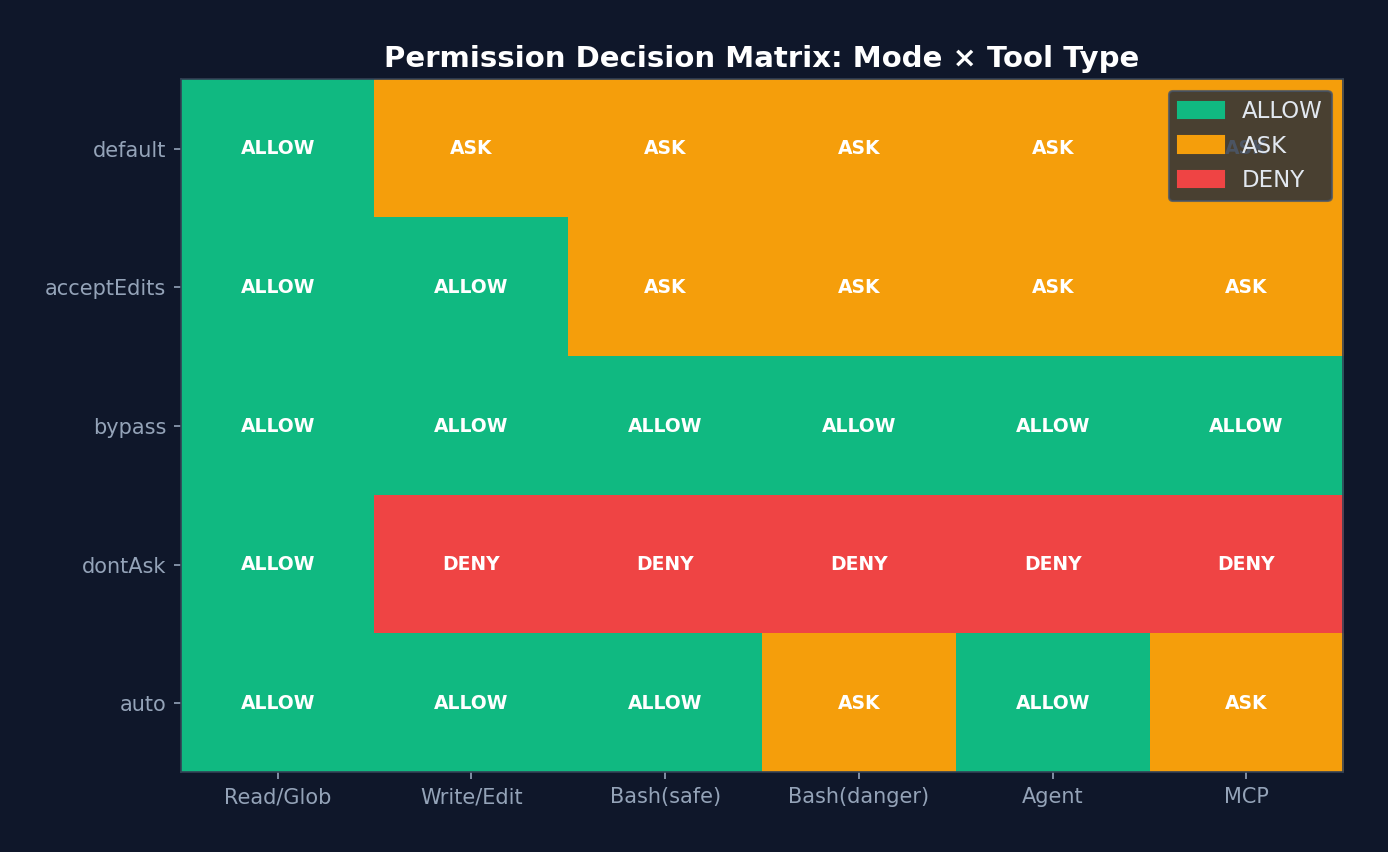 Figure 5-4: Permission decision matrix heatmap — 5 permission modes x 6 tool types. Green=ALLOW, orange=ASK, red=DENY. Note that under
 auto mode, Bash(danger) remains ASK — the classifier adopts a conservative strategy for high-risk operations.
5.6 Quantitative Analysis: Distribution of Permission Decisions
Based on analytics instrumentation points and comments in the Claude Code source code, we can infer the typical distribution of permission decisions:
| Decision Path | Estimated Share | Latency | Cost |
|---|---|---|---|
| Rule-based Allow (entire tool) | ~40% | <1ms | 0 |
| Mode-based Allow (bypassPermissions) | ~20% | <1ms | 0 |
| Safe-tool Allowlist (auto mode) | ~15% | <1ms | 0 |
| Tool checkPermissions Allow | ~10% | 1-5ms | 0 |
| YOLO Classifier Allow (fast stage) | ~8% | 50-200ms | ~$0.001 |
| YOLO Classifier Allow (thinking stage) | ~3% | 500ms-2s | ~$0.01 |
| User Prompt (interactive) | ~3% | 1-30s | 0 (waiting for user) |
| Deny (rule or classifier) | ~1% | varies | varies |
Source Code Annotation: Regarding classifier optimization, the source code comments: "Before running the auto mode classifier, check if acceptEdits mode would allow this action. This avoids expensive classifier API calls for safe operations like file edits." This fast-path check is estimated to skip approximately 35% of classifier calls. Another comment notes: "Allowlisted tools are safe and don't need YOLO classification." This skips an additional ~15%. Combined, only about 11% of tool calls actually require a classifier API call.
Performance Implications: The average latency for permission checking is approximately 5-10ms (weighted average), but variance is extremely high. Rule-based paths incur virtually no latency, while classifier paths may require 2 seconds. This is why Claude Code implements speculative prefetching in
toolExecution.ts— it starts the Bash classifier check in parallel with PreToolUse Hook execution. The source code comments: "Speculatively start the bash allow classifier check early so it runs in parallel with pre-tool hooks."
5.7 YOLO Classifier (Auto Mode)
The auto mode uses a two-stage AI classifier to automatically approve tool calls:
Stage 1: Fast Classifier
├─ Uses a smaller/faster model
├─ Checks: Is this operation safe?
├─ Returns confidence: high/medium/low
├─ If high confidence + shouldBlock=false → approve directly
└─ If uncertain → proceed to Stage 2

Stage 2: Thinking Classifier
├─ Uses a larger, more deliberative model
├─ Analyzes full context (conversation history + tool input)
├─ Returns final judgment
└─ If still uncertain → fall back to user prompt

Safe Tool Fast Path:
├─ Read, Glob, Grep and other read-only tools
├─ Skips API call (saving latency and cost)
└─ Returns allow directly

Consecutive Denial Tracking:
├─ If the classifier denies multiple times consecutively
├─ Falls back to user prompt
└─ Prevents the classifier from getting stuck when being overly conservative
Design Philosophy:
The YOLO classifier embodies a core tenet of Harness engineering — do not trust the model to judge whether its own operations are safe. Even if the primary model considers an operation correct, an independent "gatekeeper" model performs a secondary review. The two-stage design strikes a balance between speed and safety.
5.6 Permission Decision Reason Tracking
Every permission decision includes a detailed reason, used for auditing and debugging:
type PermissionDecisionReason =
  | { type: 'rule'; rule: PermissionRule }
  | { type: 'mode'; mode: PermissionMode }
  | { type: 'classifier'; classifier: string; reason: string }
  | { type: 'hook'; hookName: string; reason?: string }
  | { type: 'safetyCheck'; reason: string; classifierApprovable: boolean }
  // ... 更多变体
Chapter 6: Hooks System — Lifecycle Extensibility
The permission model tells the Agent "whether it can act," while Hooks let you inject your own logic "before" and "after" the Agent acts.
Think of Hooks as airport security checkpoints. Passengers (tool calls) pass through security screening (PreToolUse Hook), may be tagged after passing (PostToolUse Hook), and are stopped if their luggage is problematic (blocking error). Security personnel can be human (command Hook), AI-powered (agent Hook), or even remote (http Hook).
Claude Code defines 26 Hook events and 4 Hook types — the most complete Agent lifecycle extension system visible in open source to date. Understanding it gives you the key to making a Harness "customizable."
Hooks are the Harness's extension points. They allow users to inject custom logic at critical moments in the Agent lifecycle.
6.1 The 26 Hook Events
// src/types/hooks.ts — 完整的 Hook 事件列表
type HookEvent =
  // 工具相关
  | 'PreToolUse'        // 工具执行前
  | 'PostToolUse'       // 工具执行后
  | 'PostToolUseFailure'// 工具执行失败后

  // 权限
  | 'PermissionRequest' // 权限请求
  | 'PermissionDenied'  // 权限被拒绝

  // 会话
  | 'SessionStart'      // 会话开始
  | 'SessionEnd'        // 会话结束
  | 'Stop'              // 模型停止
  | 'StopFailure'       // 停止失败

  // 用户输入
  | 'UserPromptSubmit'  // 用户提交提示

  // Agent
  | 'SubagentStart'     // 子 Agent 启动
  | 'SubagentStop'      // 子 Agent 停止
  | 'TeammateIdle'      // 队友空闲

  // 任务
  | 'TaskCreated'       // 任务创建
  | 'TaskCompleted'     // 任务完成

  // 压缩
  | 'PreCompact'        // 压缩前
  | 'PostCompact'       // 压缩后

  // 其他
  | 'Setup'             // 初始设置
  | 'Notification'      // 通知
  | 'Elicitation'       // 信息请求
  | 'ElicitationResult' // 信息请求结果
  | 'ConfigChange'      // 配置变更
  | 'CwdChanged'        // 工作目录变更
  | 'FileChanged'       // 文件变更
  | 'WorktreeCreate'    // Worktree 创建
  | 'WorktreeRemove'    // Worktree 移除
  | 'InstructionsLoaded'; // 指令加载完成
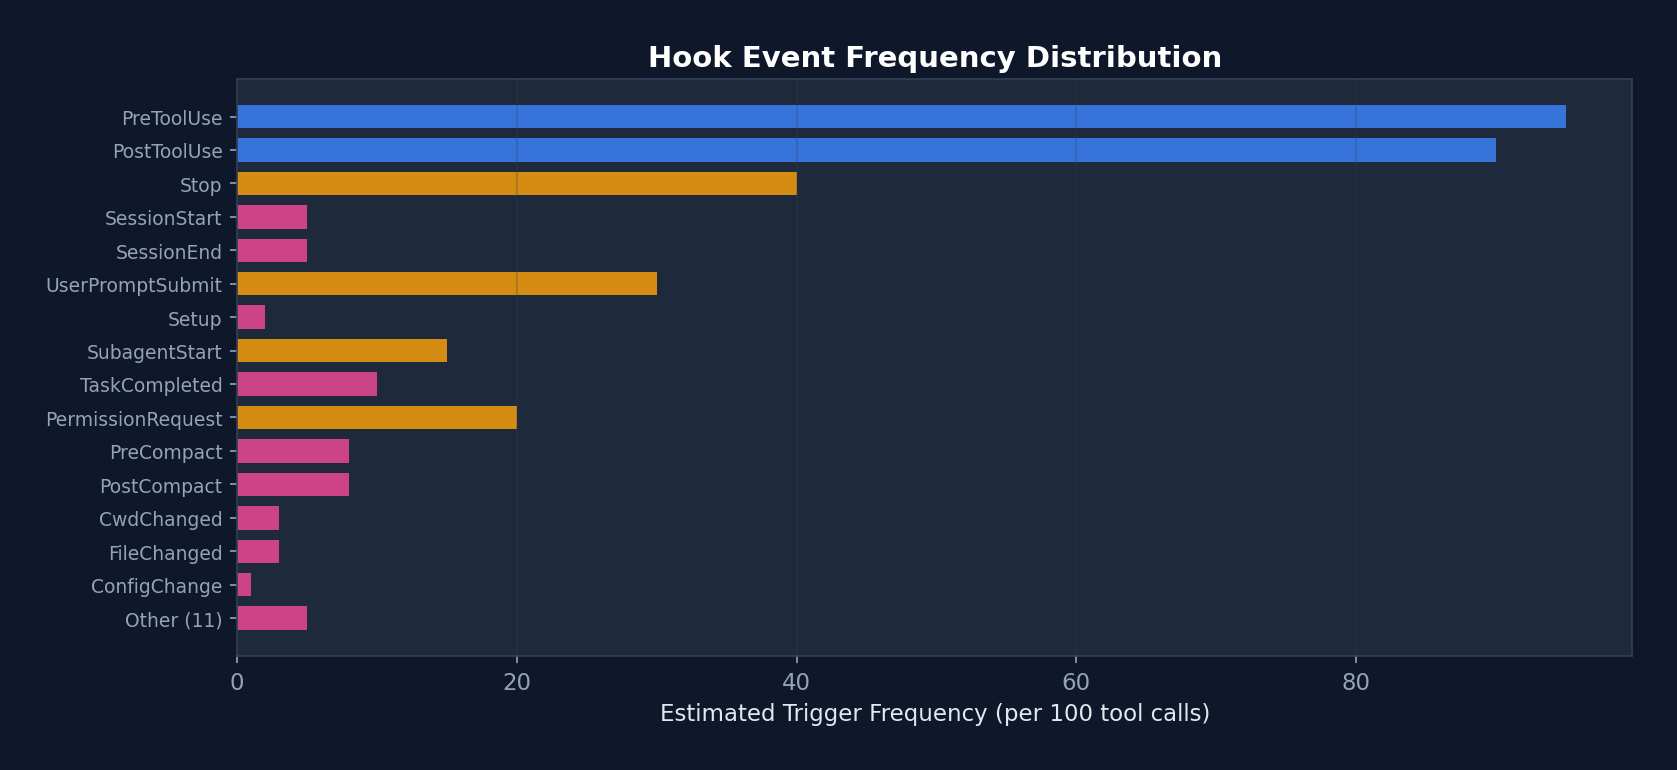 Figure 6-1: Estimated trigger frequency of the 26 Hook events — PreToolUse and PostToolUse are the most frequent events (triggered on every tool call), while SessionStart/End fire only at session boundaries. This explains why PostToolUse's internal Hooks have a dedicated fast-path optimization (-70% latency).
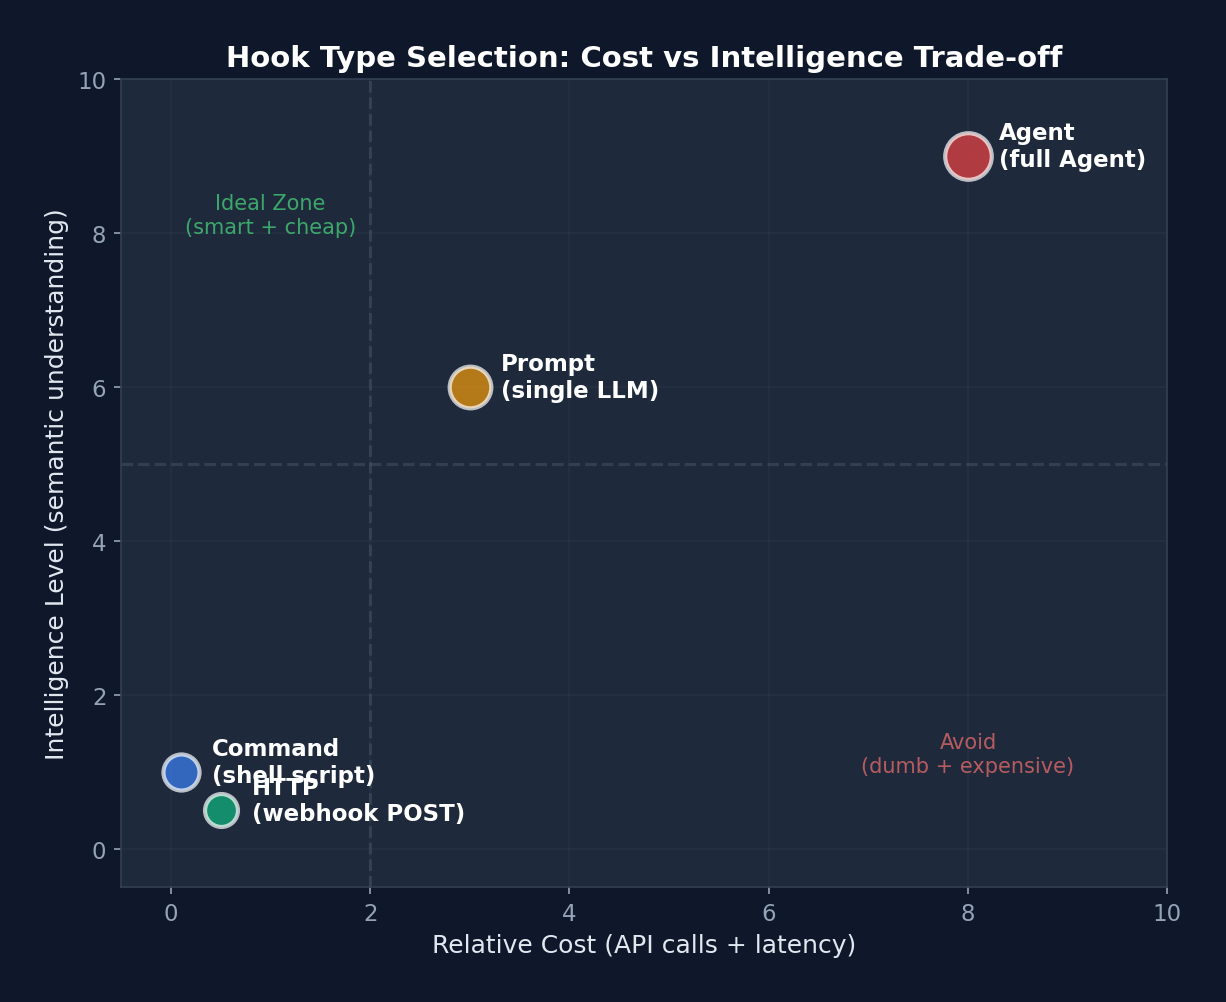 Figure 6-2: Cost-intelligence scatter plot of Hook types — Command Hook in the lower left (cheap but simple), Agent Hook in the upper right (expensive but intelligent). The dashed line divides four quadrants: upper left is the "ideal zone" (intelligent and cheap), lower right is the "avoid zone" (unintelligent and expensive).
6.2 Hook Lifecycle and Type Selection
Choosing the correct Hook type is a critical decision in Harness customization. The following chart aids selection based on the scenario:
quadrantChart
    title Hook 类型选择矩阵
    x-axis "低成本" --> "高成本"
    y-axis "低智能" --> "高智能"
    quadrant-1 "Agent Hook"
    quadrant-2 "Prompt Hook"
    quadrant-3 "Command Hook"
    quadrant-4 "HTTP Hook"
    "规则检查": [0.15, 0.2]
    "Lint 运行": [0.25, 0.15]
    "安全审查": [0.6, 0.85]
    "测试验证": [0.75, 0.9]
    "Slack 通知": [0.7, 0.1]
    "审计日志": [0.65, 0.15]
    "代码质量评分": [0.45, 0.7]
    "合规检查": [0.5, 0.6]
Interpretation: The lower-left corner is Command Hook territory — simple, cheap, and deterministic (e.g., lint, grep checks). The upper-right corner is Agent Hook territory — the smartest but most expensive (requiring a full Claude call to understand code semantics). HTTP Hooks occupy the lower right — moderate cost (network latency) but low intelligence (merely POSTing data). Prompt Hooks sit in the upper middle — a single LLM judgment, cheaper than an Agent but smarter than a script.
Four Hook Types
Type 1: Command Hook (Shell Command)
{
  "type": "command",
  "command": "npm test -- --bail",
  "if": "Bash(npm *)",
  "shell": "bash",
  "timeout": 30,
  "statusMessage": "Running tests...",
  "once": false,
  "async": false,
  "asyncRewake": false
}
Execution flow:
1. Path conversion (Windows: C:\Users\foo -> /c/Users/foo)
2. Variable substitution (${CLAUDE_PROJECT_DIR}, ${CLAUDE_PLUGIN_ROOT})
3. Shell selection (Bash or PowerShell)
4. JSON input written to stdin
5. Line-by-line stdout parsing (detecting async signals and prompt requests)
6. Exit code determines result
Exit code semantics:
- 0: Success; stdout content optionally displayed
- 2: Blocking error; stderr shown to both the model and the user
- Other: Non-blocking error; stderr shown only to the user
Type 2: Prompt Hook (LLM Evaluation)
{
  "type": "prompt",
  "prompt": "Review this code change for security vulnerabilities: $ARGUMENTS",
  "model": "claude-sonnet-4-6",
  "timeout": 60
}
Uses an independent LLM call to evaluate Hook input. Suitable for checks requiring semantic understanding (e.g., code security review).
Type 3: HTTP Hook (External Service)
{
  "type": "http",
  "url": "https://hooks.slack.com/triggers/...",
  "headers": {
    "Authorization": "Bearer $SLACK_TOKEN"
  },
  "allowedEnvVars": ["SLACK_TOKEN"],
  "timeout": 10
}
POSTs JSON to an external URL. The $VAR_NAME syntax in headers interpolates from whitelisted environment variables. allowedEnvVars restricts accessible environment variables, preventing accidental leakage.
Type 4: Agent Hook (Agent Validator)
{
  "type": "agent",
  "prompt": "Verify that the test suite passes and no regressions were introduced",
  "model": "claude-sonnet-4-6",
  "timeout": 120
}
Uses a full Claude Agent (with tool access) to validate operations. The most expensive but most powerful — the Agent can read files, run tests, and check results.
6.3 Hook Configuration Structure
// ~/.claude/settings.json
{
  "hooks": {
    "PreToolUse": [
      {
        "matcher": "Write",
        "hooks": [
          {
            "type": "command",
            "command": "eslint --stdin --stdin-filename=$TOOL_INPUT_FILE_PATH",
            "if": "Write(*.ts)"
          }
        ]
      },
      {
        "matcher": "Bash",
        "hooks": [
          {
            "type": "command",
            "command": "echo '{\"decision\": \"block\", \"reason\": \"sudo is not allowed\"}' ",
            "if": "Bash(sudo *)"
          }
        ]
      }
    ],
    "PostToolUse": [
      {
        "hooks": [
          {
            "type": "http",
            "url": "https://audit.company.com/log",
            "headers": { "Authorization": "Bearer $AUDIT_TOKEN" },
            "allowedEnvVars": ["AUDIT_TOKEN"]
          }
        ]
      }
    ],
    "SessionEnd": [
      {
        "hooks": [
          {
            "type": "command",
            "command": "git stash",
            "timeout": 10
          }
        ]
      }
    ]
  }
}
6.4 Hook Input/Output Protocol
Input (JSON passed via stdin):
// 所有 Hook 的基础字段
{
  session_id: string,
  transcript_path: string,
  cwd: string,
  permission_mode?: string,
  agent_id?: string,
  agent_type?: string,
}

// PreToolUse 特有字段
{
  tool_name: "Write",
  tool_input: { file_path: "/src/index.ts", content: "..." },
  tool_use_id: "toolu_xxx",
}

// PostToolUse 特有字段
{
  tool_name: "Bash",
  tool_input: { command: "npm test" },
  tool_response: { stdout: "...", exit_code: 0 },
  tool_use_id: "toolu_xxx",
}

// UserPromptSubmit
{
  prompt_text: "Fix the bug in login.ts",
}

// SessionStart
{
  source: "startup" | "resume" | "clear" | "compact",
}
Output (JSON returned via stdout):
type HookJSONOutput = {
  // 全局控制
  continue?: boolean;           // false = 停止对话
  stopReason?: string;
  decision?: 'approve' | 'block';
  reason?: string;
  systemMessage?: string;       // 注入系统消息
  suppressOutput?: boolean;

  // 权限相关
  permissionDecision?: 'allow' | 'deny' | 'ask';

  // 事件特定
  hookSpecificOutput?: {
    updatedInput?: object;           // 修改工具输入(PreToolUse)
    additionalContext?: string;       // 注入额外上下文
    watchPaths?: string[];           // 注册文件监视器
    updatedMCPToolOutput?: unknown;  // 修改 MCP 工具输出
    action?: 'accept' | 'decline' | 'cancel';
  }
};
6.5 In-Depth Analysis of the Hook Execution Engine
The following is the real implementation of the Hook execution engine from src/utils/hooks.ts:
// src/utils/hooks.ts — 真实代码(简化但保留关键逻辑)
async function* executeHooks({
  hookInput, toolUseID, matchQuery, signal, timeoutMs,
  toolUseContext, messages, forceSyncExecution, requestPrompt,
}) {
  // 安全检查 1: 全局禁用
  if (shouldDisableAllHooksIncludingManaged()) return
  if (isEnvTruthy(process.env.CLAUDE_CODE_SIMPLE)) return

  // 安全检查 2: 工作空间信任
  // 所有 Hook 都需要工作空间信任(防止 RCE 漏洞)
  if (shouldSkipHookDueToTrust()) return

  // 查找匹配的 Hook
  const matchingHooks = await getMatchingHooks(
    appState, sessionId, hookEvent, hookInput, tools,
  )
  if (matchingHooks.length === 0) return

  // ===== 快速路径优化 =====
  // 如果所有 Hook 都是内部回调(如 sessionFileAccessHooks、attributionHooks)
  // 跳过 span/progress/abortSignal/JSON处理 → 性能提升 70%
  const userHooks = matchingHooks.filter(h => !isInternalHook(h))
  if (userHooks.length === 0) {
    // 6.01µs → ~1.8µs per PostToolUse hit (-70%)
    for (const { hook } of matchingHooks) {
      if (hook.type === 'callback') {
        await hook.callback(hookInput, toolUseID, signal, context)
      }
    }
    return
  }

  // ===== 并行执行所有 Hook =====
  // 每个 Hook 有独立的超时
  // ... 聚合结果 ...
}
Shell Execution of Command Hooks
// src/utils/hooks.ts — execCommandHook 的关键细节
async function execCommandHook(hook, hookEvent, hookName, jsonInput, signal, ...) {
  // 1. Shell 选择
  // PowerShell: pwsh -NoProfile -NonInteractive -Command
  // Bash: spawn(command, [], { shell: gitBashPath | true })

  // 2. 变量替换
  // ${CLAUDE_PROJECT_DIR} → 项目目录
  // ${CLAUDE_PLUGIN_ROOT} → 插件目录
  // ${CLAUDE_PLUGIN_DATA} → 插件数据目录
  // ${user_config.X} → 插件配置值

  // 3. stdin 写入(UTF-8 编码)
  child.stdin.write(jsonInput + '\n', 'utf8')

  // 4. stdout 逐行解析
  child.stdout.on('data', data => {
    stdout += data

    // ===== Prompt Request 协议 =====
    // Hook 可以请求用户输入!
    // 输出行格式: {"prompt": {"type": "text", "message": "Enter value:"}}
    if (requestPrompt) {
      for (const line of lines) {
        const parsed = jsonParse(line.trim())
        const validation = promptRequestSchema().safeParse(parsed)
        if (validation.success) {
          // 序列化异步 prompt 处理
          promptChain = promptChain.then(async () => {
            const response = await requestPrompt(validation.data)
            child.stdin.write(jsonStringify(response) + '\n', 'utf8')
          })
          continue
        }
      }
    }

    // ===== 异步检测 =====
    // 第一行输出如果是 {"async": true, ...}
    // → 将进程转入后台,主线程继续
    if (!initialResponseChecked) {
      const firstLine = firstLineOf(stdout).trim()
      const parsed = jsonParse(firstLine)
      if (isAsyncHookJSONOutput(parsed) && !forceSyncExecution) {
        executeInBackground({ processId, hookId, ... })
        shellCommandTransferred = true
        resolve({ stdout, stderr, output, status: 0 })
      }
    }
  })

  // 5. 等待完成
  // 关键:等待 stdout 和 stderr 流结束后再认为输出完成
  // 防止 'close' 事件在所有 'data' 事件处理前触发的竞态条件
  await Promise.all([stdoutEndPromise, stderrEndPromise])

  // 6. 剥离已处理的 prompt 请求行
  // 使用内容匹配而非索引,防止索引漂移导致的 prompt JSON 泄露
  const finalStdout = processedPromptLines.size === 0 ? stdout :
    stdout.split('\n').filter(line => !processedPromptLines.has(line.trim())).join('\n')

  return { stdout: finalStdout, stderr, output, status: exitCode }
}
Hook JSON Output Processing:
// Hook 输出被解析为 JSON,提取决策和副作用
function processHookJSONOutput({ json, ... }) {
  const result = {}

  // 全局控制
  if (json.continue === false) result.preventContinuation = true

  // 决策
  if (json.decision === 'approve') result.permissionBehavior = 'allow'
  if (json.decision === 'block') {
    result.permissionBehavior = 'deny'
    result.blockingError = { blockingError: json.reason || 'Blocked by hook' }
  }

  // 事件特定字段
  if (json.hookSpecificOutput?.hookEventName === 'PreToolUse') {
    if (json.hookSpecificOutput.updatedInput) {
      result.updatedInput = json.hookSpecificOutput.updatedInput  // 修改工具输入
    }
    result.additionalContext = json.hookSpecificOutput.additionalContext
  }

  if (json.hookSpecificOutput?.hookEventName === 'PostToolUse') {
    if (json.hookSpecificOutput.updatedMCPToolOutput) {
      result.updatedMCPToolOutput = json.hookSpecificOutput.updatedMCPToolOutput
    }
  }

  return result
}
6.6 Async Hook Protocol
// Hook 可以通过第一行 JSON 信号异步执行:
// stdout 第一行: {"async": true, "asyncTimeout": 60000}
// 此后 Hook 在后台运行

// 或通过配置:
{ type: 'command', command: '...', async: true, asyncRewake: true }

// asyncRewake: 如果退出码为 2,排入通知队列唤醒模型
// 用例:后台运行测试套件,失败时通知 Agent
6.6 Conditional Execution (the if Field)
The if field of Hooks uses the same syntax as permission rules:
// 只对 git 命令运行
{ "if": "Bash(git *)" }

// 只对 TypeScript 文件写入运行
{ "if": "Write(*.ts)" }

// 只对 npm 命令运行
{ "if": "Bash(prefix:npm)" }

// 匹配所有 Bash 调用
{ "if": "Bash" }
Design Philosophy:
The Hook system follows the principle of "data-driven extensibility." Rather than requiring users to modify source code, all customization is accomplished through declarative configuration in settings.json. The four Hook types cover the full spectrum from simple shell scripts to full Agent validation, with unified and straightforward exit code semantics.
Practical Advice: If you are using Hooks for the first time, start with the simplest approach — a PreToolUse command hook that prints the tool name and input. Once you are comfortable with the input/output protocol, try conditional execution (the
iffield) and HTTP callbacks. Agent hooks are the most powerful but also the most expensive (each invocation requires a complete Agent execution); reserve them for scenarios where you genuinely need to "understand code semantics."Common Pitfall: Avoid heavy operations in Stop hooks. If your Stop hook injects a large number of tokens (such as an entire test report), it may trigger a prompt-too-long error. The prompt-too-long recovery skips Stop hooks (to prevent a death spiral), causing your logic to be silently bypassed. Keep Stop hooks lightweight — if you need to convey large amounts of information, write it to a file and let the Agent read it.
Chapter 7: Sandbox & Security — The Safety Net
If the permission model is the fence and Hooks are the security checkpoints, then the sandbox is the physical isolation barrier. The first two operate at the logical level — they depend on software executing correctly. But software can have bugs, and logic can be circumvented. The sandbox enforces isolation at the operating system level: even if the Agent's code has a vulnerability, it cannot access files or networks it should not touch.
This is the classic "Defense in Depth" principle of security engineering: never stake security on a single mechanism; instead, layer defenses. Claude Code has six defensive layers, with the sandbox being the second-to-last (the final layer is hardcoded denials).
The sandbox is the Harness's last line of defense. Even if the permission model and Hooks are both bypassed, the sandbox still limits what the Agent can do.
7.1 Sandbox Architecture
┌─────────────────────────────────────────────────┐
│                 Claude Code                      │
│                                                  │
│  BashTool.call()                                │
│      │                                           │
│      v                                           │
│  shouldUseSandbox()                              │
│      │                                           │
│      ├─ 沙盒是否启用?                            │
│      ├─ dangerouslyDisableSandbox 是否允许?       │
│      ├─ 命令是否在排除列表中?                     │
│      │                                           │
│      v                                           │
│  SandboxManager.wrapWithSandbox(command)         │
│      │                                           │
│      v                                           │
│  @anthropic-ai/sandbox-runtime                   │
│      │                                           │
│      ├─ 文件系统限制                              │
│      ├─ 网络限制                                  │
│      └─ 进程限制                                  │
│                                                  │
└─────────────────────────────────────────────────┘
 Figure 7-1: Sandbox coverage — Settings Files, Skills Dir, and Git Config are 100% restricted (hardcoded DENY) and cannot be opened via configuration. Filesystem Write restriction is at 85% (most paths are restricted; only the project directory is permitted). Process Spawn has the lowest restriction rate (50%), since certain commands (such as Docker) need to bypass the sandbox.
7.2 Three Restriction Dimensions
Filesystem Restrictions
interface FsReadRestrictionConfig {
  allowRead: string[];   // 允许读取的路径模式
  denyRead: string[];    // 禁止读取的路径模式
}

interface FsWriteRestrictionConfig {
  allowWrite: string[];  // 允许写入的路径模式
  denyWrite: string[];   // 禁止写入的路径模式
}

// 路径语法:
// "/path"   — 相对于设置根路径
// "//path"  — 绝对路径(从根目录开始)
// "~/path"  — 用户主目录
// "./path"  — 当前工作目录
// "*.ext"   — 通配符模式
Security Hardcoding:
- .claude/settings*.json is always deny write (preventing sandbox escape)
- .claude/skills, .claude/commands are always deny write (preventing malicious code injection)
- Detects bare repository files (HEAD, objects, refs) and clears them after command execution
Network Restrictions
interface NetworkRestrictionConfig {
  allowedDomains: string[];     // 允许的域名模式
  deniedDomains: string[];      // 禁止的域名模式
  allowUnixSockets?: boolean;   // Unix socket 访问
  allowLocalBinding?: boolean;  // 本地端口绑定
}
Command Exclusions
// settings.sandbox.excludedCommands
// 匹配模式:
//   "cmd:"    — 前缀匹配
//   "cmd"     — 精确匹配
//   "cmd*"    — 通配符

// 注意: 这 **不是** 安全边界
// 仅为便利功能(跳过沙盒以避免兼容性问题)
7.3 Path Resolution (Claude Code-Specific Conventions)
Claude Code uses special path prefix conventions distinct from sandbox-runtime's standard paths:
// src/utils/sandbox/sandbox-adapter.ts — 真实代码
export function resolvePathPatternForSandbox(
  pattern: string, source: SettingSource,
): string {
  // "//" 前缀 → 从文件系统根目录开始的绝对路径
  // "//.aws/**" → "/.aws/**"
  if (pattern.startsWith('//')) {
    return pattern.slice(1)
  }

  // "/" 前缀 → 相对于设置文件目录
  // 权限规则中 "/foo/**" → "${settings_root}/foo/**"
  if (pattern.startsWith('/') && !pattern.startsWith('//')) {
    const root = getSettingsRootPathForSource(source)
    return resolve(root, pattern.slice(1))
  }

  // 其他模式(~/path, ./path, path)直接传递
  // sandbox-runtime 的 normalizePathForSandbox 会处理
  return pattern
}
Sandbox Initialization Flow:
// 沙盒初始化是异步的,但必须在第一个命令执行前完成
async function initialize(sandboxAskCallback?) {
  if (initializationPromise) return initializationPromise
  if (!isSandboxingEnabled()) return

  // 包装回调以强制执行 allowManagedDomainsOnly 策略
  const wrappedCallback = sandboxAskCallback ? async (hostPattern) => {
    if (shouldAllowManagedSandboxDomainsOnly()) {
      logForDebugging(`Blocked: ${hostPattern.host} (allowManagedDomainsOnly)`)
      return false
    }
    return sandboxAskCallback(hostPattern)
  } : undefined

  // 创建 Promise(在任何 await 之前同步创建,防止竞态条件)
  initializationPromise = (async () => {
    // 检测 worktree 主仓库路径(会话期间不变,缓存)
    if (worktreeMainRepoPath === undefined) {
      worktreeMainRepoPath = await detectWorktreeMainRepoPath(getCwdState())
    }

    const settings = getSettings_DEPRECATED()
    const runtimeConfig = convertToSandboxRuntimeConfig(settings)
    await BaseSandboxManager.initialize(runtimeConfig, wrappedCallback)

    // 订阅设置变更,动态更新沙盒配置
    settingsSubscriptionCleanup = settingsChangeDetector.subscribe(() => {
      const newConfig = convertToSandboxRuntimeConfig(getSettings_DEPRECATED())
      BaseSandboxManager.updateConfig(newConfig)
    })
  })()

  return initializationPromise
}
7.4 Converting Permission Rules to Sandbox Configuration
Claude Code converts its permission rule syntax into the sandbox-runtime configuration format:
// 权限规则 → 沙盒路径转换
// Edit(/path/to/dir/*) → sandbox.filesystem.allowWrite
// Read(/patterns)      → sandbox.filesystem.allowRead
// WebFetch(domain:example.com) → sandbox.network.allowedDomains

function convertToSandboxConfig(
  permissionRules: PermissionRule[],
  sandboxSettings: SandboxSettings,
): SandboxRuntimeConfig {
  // 合并权限规则和沙盒设置
  // 权限规则中的 allow 规则 → sandbox 的 allow 列表
  // 沙盒设置直接映射
  // deny 规则始终包含安全硬编码
}
7.4 Sandbox Enablement Check
function isSandboxingEnabled(): boolean {
  return isSupportedPlatform()           // macOS, Linux, WSL2+
    && checkDependencies().errors.length === 0  // bubblewrap, socat
    && isPlatformInEnabledList()         // sandbox.enabledPlatforms
    && getSandboxEnabledSetting();       // 用户设置
}

// 依赖检查(带缓存)
function checkDependencies(): { errors: string[], warnings: string[] } {
  // 检查: bubblewrap 可执行文件
  // 检查: socat 可执行文件
  // 检查: cap_setfcap capability
}
7.5 dangerouslyDisableSandbox
// BashTool 的输入参数
{
  command: "docker build .",
  dangerouslyDisableSandbox: true  // 跳过沙盒
}

// 仅当设置允许时生效:
// settings.sandbox.allowUnsandboxedCommands = true

// 设计意图: 某些命令(如 Docker)不兼容沙盒
// 但必须显式请求并记录在案
Design Philosophy:
The sandbox design follows the Defense in Depth principle. Even if the permission model allows an operation, the sandbox still limits that operation's "blast radius." Critical security files (settings, skills) are hardcoded as non-writable — a security guarantee that does not depend on configuration.
Why are settings files hardcoded as non-writable? Imagine this scenario: the Agent discovers that the sandbox is restricting its operations, so it "cleverly" modifies
settings.jsonto disable the sandbox, then proceeds. This constitutes a sandbox escape attack. Claude Code prevents this by hardcoding deny write for.claude/settings*.json— even if all other security layers are bypassed, this rule remains in effect. This embodies the security engineering principle that "untrusted code must not be able to modify trust boundaries."
Chapter 8: Context Engineering — The Art of Information Management
The preceding five chapters addressed "what the Agent does" and "what the Agent cannot do." This chapter shifts perspective — "what the Agent knows."
Imagine you are a new employee on your first day. If nobody tells you the company's coding standards, architectural decisions, and known bugs, the code you write will most likely fail to meet expectations. Agents face the same challenge — their performance is directly determined by the information they can "see."
Context Engineering is the discipline of managing the Agent's "field of vision." It answers three questions: 1. What should the Agent know? (CLAUDE.md, memory system) 2. When should it be told? (On-demand loading, prefetching) 3. What happens when there is too much information? (Four-level compaction pipeline)
Claude Code's design in this area is particularly sophisticated — a 200-line memory index, a four-level compaction pipeline, and a parallel prefetch mechanism together constitute the most refined Agent context management system in the industry.
Context Engineering is the first pillar of Harness Engineering. It manages what information enters the model's context window, when, and in what form.
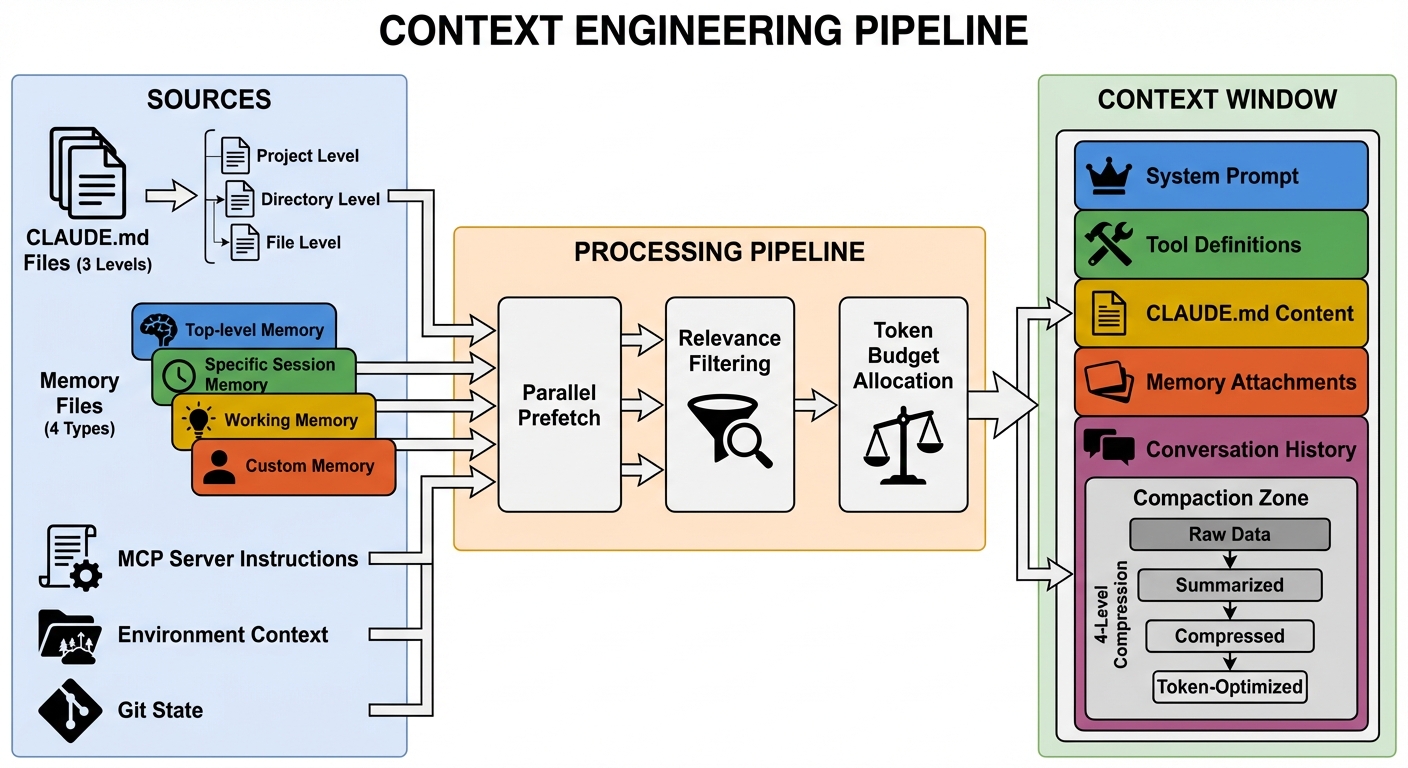 Figure 8-1: The context engineering pipeline — Information flows from multiple sources (CLAUDE.md, memory files, MCP instructions, environmental context) into the model's context window, passing through parallel prefetching, relevance filtering, and token budget allocation. The right side shows the composition of the context window and the four compaction zones.
8.1 Quantitative Analysis: Context Window Budget Allocation
The typical budget allocation for Claude Code's context window (assuming 200K tokens):
| Component | Estimated Token Share | Size | Compacted? |
|---|---|---|---|
| System prompt (base) | ~5-8% | 10-16K | No (cache prefix) |
| Tool definitions (15 core + N MCP) | ~8-15% | 16-30K | No (cache prefix) |
| CLAUDE.md content | ~2-5% | 4-10K | No |
| MCP server instructions | ~1-3% | 2-6K | No |
| Memory attachments | ~1-2% | 2-4K | No (attached on demand) |
| Conversation history | ~60-80% | 120-160K | Yes (four-level pipeline) |
| Reserved space (model output) | ~5-10% | 10-20K | N/A |
Key Insight: Conversation history occupies 60-80% of the context space, which is precisely why the compaction pipeline is so important. System prompt and tool definitions occupy 13-23% — this is also why tool lazy loading (ToolSearch) is valuable: loading 15 out of 43 tools saves approximately 8% of context space, equivalent to an additional 16K tokens of conversation history in long conversations.
Cache Economics: The system prompt and tool definitions serve as the cache prefix (~30-46K tokens). Anthropic API's prompt cache does not charge input fees for the matched prefix portion. At $3/M input tokens, this saves approximately $0.0001-0.00014 per API call. A typical session involves 20-50 API calls, yielding total savings of approximately $0.002-0.007/session. At scale (millions of daily active users), this becomes a significant cost optimization.
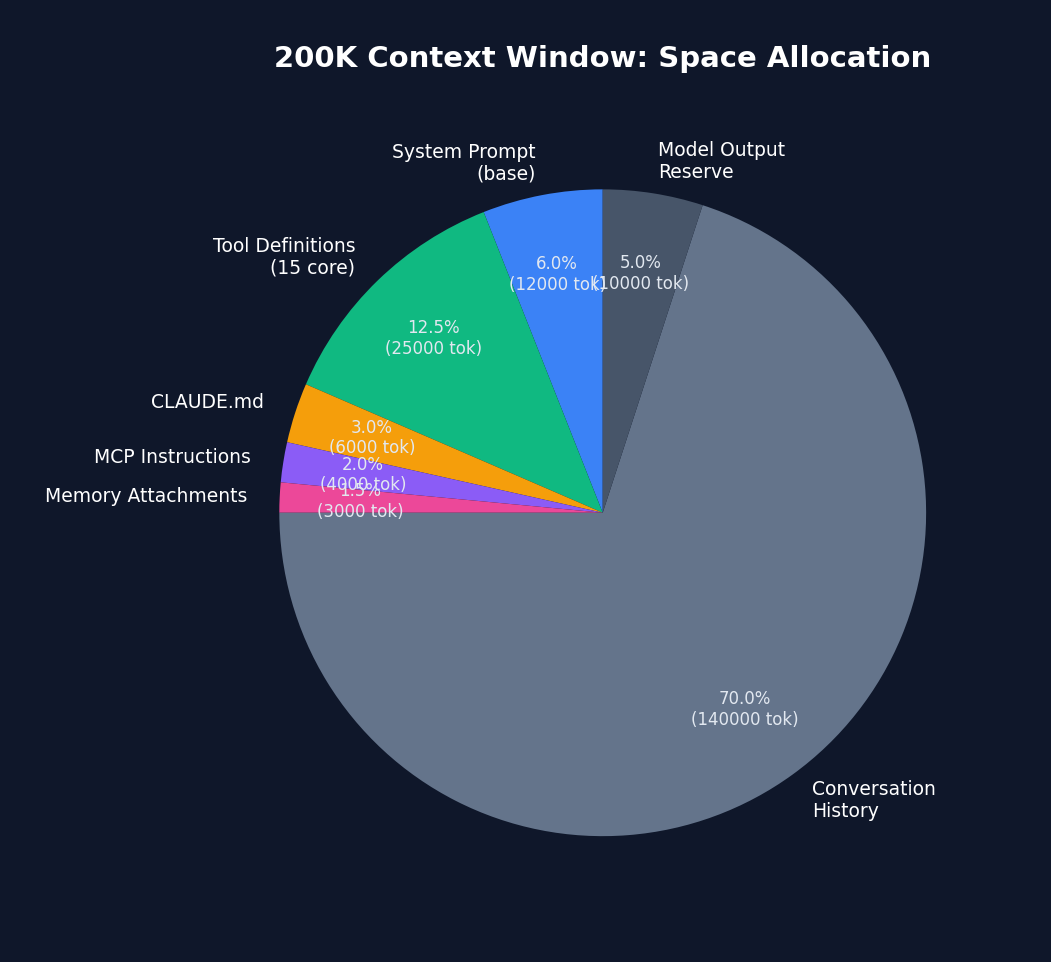 Figure 8-2: Space allocation in the 200K context window — conversation history occupies 70% (140K tokens) and is the primary target of the compaction pipeline. System prompt + tool definitions total approximately 18.5%, which is the primary beneficiary area of the prompt cache.
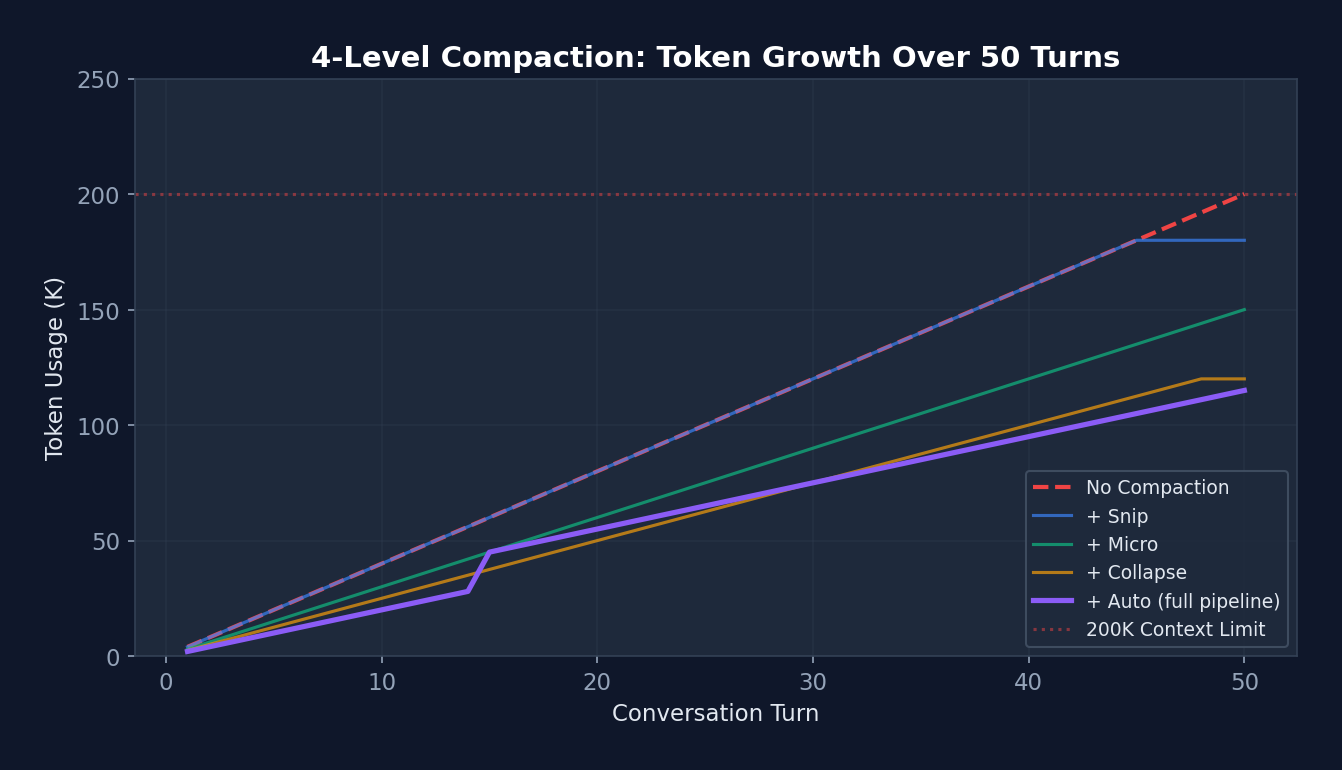 Figure 8-3: Token growth curve of the four-level compaction pipeline (over 50 turns) — The red dashed line shows that without compaction, the 200K limit is breached at turn 45. The purple line (full pipeline) shows that tokens drop to 45K after Autocompact triggers at turn 15, then grow slowly. This enables Claude Code to handle 100+ turn conversations without interruption.
8.2 CLAUDE.md — Project-Level Persistent Context
CLAUDE.md is Claude Code's core context mechanism. It is a Markdown file that provides project-level persistent context:
# CLAUDE.md

## 项目概述
这是一个 Next.js 14 应用,使用 TypeScript + Tailwind CSS。

## 架构约束
- 组件放在 src/components/
- API 路由放在 src/app/api/
- 不要使用 class 组件
- 所有 API 调用必须使用 fetch,不要用 axios

## 命名规范
- 组件:PascalCase
- 工具函数:camelCase
- 常量:UPPER_SNAKE_CASE

## 测试
- 运行测试: npm test
- 测试框架: Jest + React Testing Library
- 覆盖率要求: >80%

## 已知问题
- #123: 登录页面在 Safari 下有布局问题
- 不要修改 legacy/ 目录下的文件
Loading hierarchy:
~/.claude/CLAUDE.md              # Global (all projects)
.claude/CLAUDE.md                # Project-level
.claude/CLAUDE.md.local          # Local override (not committed to git)
subdirectory/CLAUDE.md           # Directory-level (loaded when entering)
8.2 System Prompt Construction Pipeline
// src/QueryEngine.ts — 系统提示构建
function buildSystemPrompt(): SystemPrompt {
  const parts = [];

  // 1. 基础系统提示(工具描述、行为指南)
  parts.push(getBaseSystemPrompt());

  // 2. 工具定义
  for (const tool of tools) {
    parts.push(tool.prompt(context));
  }

  // 3. CLAUDE.md 内容
  parts.push(loadClaudeMd());

  // 4. MCP 服务器指令
  for (const mcp of mcpClients) {
    parts.push(mcp.instructions);
  }

  // 5. 自定义系统提示(用户覆盖)
  if (customPrompt) parts.push(customPrompt);

  // 6. 记忆机制提示(如有记忆系统)
  if (memoryEnabled) parts.push(memoryMechanicsPrompt);

  return asSystemPrompt(parts.join('\n'));
}
8.3 Memory System
Claude Code implements a file-based persistent memory system, located in src/memdir/.
Four Memory Types
type MemoryType =
  | 'user'       // 用户角色、偏好、知识水平
  | 'feedback'   // 工作方法指导(什么可做/避免)
  | 'project'    // 正在进行的工作、目标、倒计时
  | 'reference'; // 外部系统指针
Memory File Format
---
name: user-prefers-terse-responses
description: 用户不喜欢冗长的总结,希望简洁直接的回复
type: feedback
---

不要在每次回复末尾总结刚做的事情——用户可以自己读 diff。

**Why:** 用户明确表示不喜欢尾部总结。
**How to apply:** 所有回复保持简洁,不加尾部总结段落。
Memory Index (MEMORY.md)
- [User Role](user_role.md) — 高级 Go 工程师,React 新手
- [Terse Responses](feedback_terse.md) — 不要尾部总结
- [Auth Rewrite](project_auth.md) — 合规驱动的认证中间件重写
- [Bug Tracker](reference_linear.md) — 管道 bug 在 Linear INGEST 项目
Memory Scanning and Attachment
// src/memdir/memoryScan.ts
function scanMemories(memoryDir: string): MemoryHeader[] {
  // 扫描 ~/.claude/memory/ 目录
  // 读取每个 .md 文件的 frontmatter
  // 按修改时间排序(最新优先)
  // 上限: MAX_MEMORY_FILES = 200
  return headers;
}

// 与查询循环集成
// 1. 在流式响应期间开始记忆扫描(预取)
startRelevantMemoryPrefetch();

// 2. 过滤相关记忆并创建附件消息
const attachments = getAttachmentMessages(memories, userMessage);

// 3. 附加到用户消息
messages.push(...attachments);
Real Implementation of Memory Scanning
// src/memdir/memoryScan.ts — 真实代码
// 单次遍历:stat + read 合并(减少系统调用)
// 对于常见情况(N ≤ 200),相比先 stat 排序再 read,系统调用减半
export async function scanMemoryFiles(
  memoryDir: string, signal: AbortSignal,
): Promise<MemoryHeader[]> {
  try {
    const entries = await readdir(memoryDir, { recursive: true })
    const mdFiles = entries.filter(
      f => f.endsWith('.md') && basename(f) !== 'MEMORY.md',
    )

    const headerResults = await Promise.allSettled(
      mdFiles.map(async (relativePath): Promise<MemoryHeader> => {
        const filePath = join(memoryDir, relativePath)
        // 只读取前 FRONTMATTER_MAX_LINES 行(优化大文件)
        const { content, mtimeMs } = await readFileInRange(
          filePath, 0, FRONTMATTER_MAX_LINES, undefined, signal,
        )
        const { frontmatter } = parseFrontmatter(content, filePath)
        return {
          filename: relativePath,
          filePath,
          mtimeMs,
          description: frontmatter.description || null,
          type: parseMemoryType(frontmatter.type),
        }
      }),
    )

    return headerResults
      .filter((r): r is PromiseFulfilledResult<MemoryHeader> =>
        r.status === 'fulfilled')
      .map(r => r.value)
      .sort((a, b) => b.mtimeMs - a.mtimeMs)  // 最新优先
      .slice(0, MAX_MEMORY_FILES)  // 上限 200
  } catch {
    return []  // 目录不存在时优雅降级
  }
}
Memory Manifest Formatting:
// 用于记忆选择提示和提取 Agent 提示
export function formatMemoryManifest(memories: MemoryHeader[]): string {
  return memories.map(m => {
    const tag = m.type ? `[${m.type}] ` : ''
    const ts = new Date(m.mtimeMs).toISOString()
    return m.description
      ? `- ${tag}${m.filename} (${ts}): ${m.description}`
      : `- ${tag}${m.filename} (${ts})`
  }).join('\n')
}
Design Philosophy:
The memory system follows the explicit over implicit principle. Memories are structured Markdown files (not a database) with explicit types and metadata. The MEMORY.md index is capped at 200 entries to prevent memory bloat. Memory scanning runs in parallel with API calls (prefetching), adding no latency.
Promise.allSettled (rather than Promise.all) ensures that a single corrupted memory file does not cause the entire scan to fail — this is defensive programming as applied within the Harness.
8.4 Context Compaction Strategies
(See Section 3.3 for the four-level compaction pipeline)
Key additions:
Full Transcript Save Strategy:
├─ Saves the complete transcript to disk before every autocompact
├─ Path: ~/.claude/history/<session_id>/
├─ Purpose: --resume recovery, auditing, debugging
└─ Does not participate in compaction decisions (backup only)

Budget Tracking Across Compaction:
├─ taskBudgetRemaining is captured before compaction
├─ Accumulated across multiple compaction events
└─ Ensures total spend does not exceed budget
8.5 Dynamic Context
// src/context.ts — 环境上下文收集
function collectContext(): UserContext {
  return {
    currentDate: new Date(),
    platform: process.platform,
    shell: process.env.SHELL,
    osVersion: getOSVersion(),
    modelInfo: getModelInfo(),
    cwd: process.cwd(),
    gitState: getGitState(),        // 分支、状态、远程
    terminalSize: getTerminalSize(),
    // ...更多环境信息
  };
}
Chapter 9: Settings & Configuration — Harness Tunability
So far we have seen the loop, tools, permissions, Hooks, sandbox, and context — all of these components have tunable parameters. But where are those parameters stored? Whose settings take priority? Can enterprise administrators lock down certain settings?
The settings system is the Harness's "control panel." A well-designed control panel must let newcomers work out of the box, allow advanced users to fine-tune precisely, and enable enterprise administrators to enforce policy. Claude Code solves this perfectly with a 7-level hierarchical settings system.
The settings system determines how the Harness's behavior is adjusted and customized.
9.1 settings.json Structure
{
  // ===== 权限 =====
  "permissions": {
    "allow": ["Read", "Glob", "Grep", "Bash(git *)"],
    "deny": ["Bash(sudo *)", "Bash(rm -rf *)"],
    "ask": ["Write(*.env)", "Bash(npm publish)"],
    "defaultMode": "default",
    "additionalDirectories": ["/shared/libs"],
    "disableBypassPermissionsMode": "disable",
    "disableAutoMode": "disable"
  },

  // ===== Hooks =====
  "hooks": {
    "PreToolUse": [
      {
        "matcher": "Bash",
        "hooks": [
          {
            "type": "command",
            "command": "check-safety.sh",
            "if": "Bash(rm *)"
          }
        ]
      }
    ]
  },

  // ===== 沙盒 =====
  "sandbox": {
    "enabled": true,
    "autoAllowBashIfSandboxed": true,
    "allowUnsandboxedCommands": false,
    "fsRead": { "allow": ["**"], "deny": ["/etc/shadow"] },
    "fsWrite": { "allow": ["./**"], "deny": [".env", "*.key"] },
    "network": {
      "allowedDomains": ["*.github.com", "registry.npmjs.org"],
      "deniedDomains": ["*.malware.com"]
    },
    "excludedCommands": ["docker", "podman"],
    "lockedByPolicy": false
  },

  // ===== 其他 =====
  "model": "claude-sonnet-4-6",
  "env": {
    "NODE_ENV": "development"
  },
  "attribution": "Co-Authored-By: Claude",
  "cleanupPeriodDays": 30,
  "defaultShell": "bash",
  "allowedMcpServers": ["@anthropic/mcp-*"],
  "deniedMcpServers": ["*-untrusted"]
}
9.2 Hierarchical Loading
// src/utils/settings/settings.ts
function loadSettings(): MergedSettings {
  // 按优先级从低到高合并
  const layers = [
    loadUserSettings(),          // ~/.claude/settings.json
    loadProjectSettings(),       // .claude/settings.json
    loadLocalSettings(),         // .claude/settings.json.local
    loadPolicySettings(),        // 组织策略
    loadManagedSettings(),       // MDM/企业
    loadFlagSettings(),          // 环境变量
    loadCliArgSettings(),        // 命令行参数
  ];

  return deepMerge(layers);  // 后者覆盖前者
}
Enterprise Managed Settings:
/managed/managed-settings.json
├─ Base managed settings
├─ Distributed by MDM (Jamf, Intune, etc.)
└─ Can lock sandbox: { "sandbox": { "lockedByPolicy": true } }

/managed/managed-settings.d/
├─ security-policy.json      # Security policy drop-in
├─ compliance-rules.json     # Compliance rules drop-in
└─ (loaded in alphabetical order; later files override earlier ones)
9.3 Schema Validation
// src/schemas/ — Zod 验证
const SettingsSchema = z.object({
  permissions: PermissionsSchema.optional(),
  hooks: HooksSchema.optional(),
  sandbox: SandboxSchema.optional(),
  model: z.string().optional(),
  env: z.record(z.string()).optional(),
  // ...
}).passthrough();  // 保留未知字段(向后兼容)
.passthrough() is a critical design decision: older settings files may contain fields unrecognized by newer versions. passthrough() preserves these fields without raising errors, ensuring backward compatibility.
9.4 In-Depth Analysis: Settings Merge Algorithm
Settings merging appears simple but involves carefully crafted custom logic:
// src/utils/settings/settings.ts — 真实代码
// 数组合并策略:连接 + 去重(而非替换)
function settingsMergeCustomizer(objValue, srcValue) {
  if (Array.isArray(objValue) && Array.isArray(srcValue)) {
    return mergeArrays(objValue, srcValue)  // concat + uniq
  }
  // 非数组:标量覆盖,对象递归合并
}
Why concatenate arrays rather than replace? Consider permission rules: an enterprise policy defines
deny: ["Bash(sudo *)"], and the project settings definedeny: ["Bash(rm -rf *)"]. With replacement, the project's deny would overwrite the enterprise deny. Through concatenation and deduplication, the final deny list contains both rules — which is the correct security behavior.
9.5 Managed Settings Drop-in Pattern
// 类似 systemd 的 drop-in 目录模式:
// managed-settings.json        ← 基础(最低优先级)
// managed-settings.d/
//   10-otel.json               ← 可观测性团队的配置
//   20-security.json           ← 安全团队的配置
//   30-compliance.json         ← 合规团队的配置
// 按字母序排序合并,后者覆盖前者
Why drop-in rather than a single file? In large enterprises, different teams manage different configuration dimensions. The security team is responsible for deny rules, the platform team for MCP whitelists, and the compliance team for data retention policies. The drop-in pattern lets each team independently manage their own configuration fragments without coordinating edits on a single file — consistent with Linux system administration best practices.
9.6 Defensive Cache Cloning
// 真实代码:缓存读取时返回克隆副本
// 原因:lodash 的 mergeWith() 会修改第一个参数
// 如果直接返回缓存对象,调用者的合并操作会污染缓存
// 下一个读取者会看到被修改的数据——一个极难调试的 bug
const cached = getCachedParsedFile(path)
return cached ? structuredClone(cached) : loadAndCache(path)
Design Pattern Analysis: Postel's Law (Be Liberal in What You Accept)
This exemplifies the classic internet engineering principle — "be conservative in what you send, be liberal in what you accept." Settings files are edited by users and may contain typos, outdated fields, or experimental configuration.
passthrough()ensures Claude Code does not crash when encountering such "imperfect" input, silently ignoring unrecognized fields. This is particularly important in Harness Engineering because settings files persist across versions — old settings should not be rejected by new versions when a user upgrades Claude Code.
Chapter 10: MCP Integration — Extending the Harness Boundary
Claude Code ships with 43+ built-in tools, but real-world needs are infinite — someone needs to query a database, someone else needs to operate Kubernetes, and another needs to send Slack messages. Anthropic cannot anticipate every need.
MCP (Model Context Protocol) is the solution: a standard protocol that allows anyone to write a "tool server," which Claude Code automatically discovers and uses. This is analogous to the USB protocol — you do not need to redesign the computer for each peripheral; you need only a unified interface.
In this chapter we examine how Claude Code connects to MCP servers via 6 transport protocols and how it seamlessly integrates external tools into its permission and Hook systems.
MCP (Model Context Protocol) allows Claude Code to connect to external tool servers, vastly extending the Harness's capabilities.
10.1 Six Transport Protocols
flowchart LR
    CC[Claude Code] --> stdio["Stdio\n子进程 stdin/stdout"]
    CC --> sse["SSE\nServer-Sent Events"]
    CC --> http["Streamable HTTP\nHTTP 流"]
    CC --> ws["WebSocket\nTLS/代理支持"]
    CC --> inproc["InProcess\n内存 TS 模块"]
    CC --> sdk["SdkControl\nSDK daemon"]

    stdio --> local["本地 MCP 服务器\n(filesystem, git)"]
    sse --> remote["远程 MCP 服务器\n(Slack, Linear)"]
    http --> remote
    ws --> remote
    inproc --> chrome["Chrome/Computer Use\n避免 325MB 子进程"]
    sdk --> daemon["SDK Daemon\n控制面"]

    classDef transport fill:#dbeafe,stroke:#2563eb,color:#1e3a5f
    classDef server fill:#dcfce7,stroke:#16a34a,color:#14532d

    class stdio,sse,http,ws,inproc,sdk transport
    class local,remote,chrome,daemon server
Source Code Annotation Analysis: A key comment in the MCP client implementation reads: "Run Chrome MCP server in-process to avoid spawning ~325MB subprocess." This reveals the true reason InProcess transport exists: certain MCP servers (such as Chrome browser control) incur excessive memory overhead when started as independent processes. Through InProcess transport, they run within the Claude Code process, sharing memory space.
// src/services/mcp/client.ts — 六种传输类型
type MCPTransport =
  | StdioClientTransport       // 子进程(stdin/stdout)
  | SSEClientTransport         // Server-Sent Events
  | StreamableHTTPTransport    // HTTP 流
  | WebSocketTransport         // WebSocket(支持 TLS/代理)
  | InProcessTransport         // 内存(TypeScript 模块)
  | SdkControlTransport;       // SDK daemon 控制
10.2 MCP Configuration
// ~/.claude/mcp.json(全局)
{
  "mcpServers": {
    "filesystem": {
      "command": "npx",
      "args": ["-y", "@modelcontextprotocol/server-filesystem", "/path/to/dir"],
      "env": {}
    },
    "github": {
      "command": "npx",
      "args": ["-y", "@modelcontextprotocol/server-github"],
      "env": { "GITHUB_TOKEN": "ghp_..." }
    }
  }
}

// .claude/mcp.json(项目级,与 mcp.json 合并)
{
  "mcpServers": {
    "database": {
      "command": "python",
      "args": ["mcp_db_server.py"],
      "env": { "DB_URL": "postgresql://..." }
    }
  }
}
10.3 MCP Tool Execution
// MCP 工具执行流程
async function callMcpTool(
  server: MCPClient,
  toolName: string,
  input: object,
): Promise<ToolResult> {
  // 1. 调用 MCP 服务器
  const result = await server.callTool(toolName, input);

  // 2. 处理流式进度
  if (result.isStreaming) {
    for await (const progress of result.stream) {
      yield progress;
    }
  }

  // 3. 结果截断和验证
  const truncated = truncateIfNeeded(result);

  // 4. OAuth token 刷新(如需要)
  if (result.error?.type === 'auth_error') {
    await refreshOAuthToken(server);
    return callMcpTool(server, toolName, input);  // 重试
  }

  // 5. 二进制内容持久化(大输出)
  if (isBinaryContent(result)) {
    await persistBinaryContent(result);
  }

  return truncated;
}
10.4 In-Depth Analysis: MCP Connection Lifecycle
// src/services/mcp/client.ts — 真实的连接编排
// getMcpToolsCommandsAndResources() 的核心逻辑:

// 1. 按传输类型分区,不同并发度
//    本地服务器(stdio): 低并发(batch ~3),避免进程生成争用
//    远程服务器(sse/http/ws): 高并发(batch ~20),仅网络连接

// 2. 三级过滤
//    Level 1: 禁用检查(settings 中标记为 disabled)
//    Level 2: 认证缓存检查(15 分钟 TTL 的失败缓存)
//    Level 3: 实际连接尝试(memoized by name + config hash)

// 3. 流式结果回调(不等所有服务器连接完毕)
//    每个服务器连接完成后立即回调 onConnectionAttempt()
//    UI 可以增量渲染已连接的服务器
Race condition guard for auth cache: The source code comments: "Serialize cache writes through a promise chain to prevent concurrent read-modify-write races when multiple servers return 401 in the same batch." This is a classic concurrency problem — 10 MCP servers returning 401 simultaneously would corrupt the cache file if writes were not serialized. The solution: serialize all write operations through a Promise chain, with read operations sharing the same memoized Promise.
10.5 MCP Configuration Deduplication Strategy
Configuration source priority:
  Manual config > Plugin auto-discovery > Claude.ai browser connector

Deduplication rules ("same server" determination):
  stdio servers: command array exactly identical
  remote servers: URL exactly identical
  Name conflicts: later overrides earlier

Enterprise policies:
  allowlist + denylist with three matching modes:
    Name match: exact server name
    Command match: stdio server's command array
    URL match: wildcard patterns (https://*/api/* → regex)
  denylist merged from all sources (always in effect)
  allowlist controlled by shouldAllowManagedMcpServersOnly() policy
10.6 MCP Tool Integration with Built-in Tools
// MCP 工具与内置工具共享同一个工具池
// assembleToolPool() 将两者合并

// 去重规则: 内置工具优先
// 如果 MCP 服务器提供了同名工具,内置版本被保留

// Deny 规则同样适用于 MCP 工具
// 可以在 settings.json 中:
{
  "permissions": {
    "deny": ["mcp__untrusted-server"]  // 禁止整个 MCP 服务器
  },
  "allowedMcpServers": ["@official/*"],
  "deniedMcpServers": ["*-untrusted"]
}
10.5 MCP Skills Discovery
// 可选特性: MCP_SKILLS
// 从 MCP 服务器发现并注册 Skills
// skills/mcpSkills.ts

// MCP 服务器可以暴露 Skills(不仅是 Tools)
// Skills 是更高级的工作流抽象
// 通过 skills builder 模式注册
Chapter 11: Sub-Agent System — Multi-Agent Orchestration
Up to this point, our Harness has only one Agent. But for complex tasks, a single Agent is often insufficient — it may need to search different parts of the codebase simultaneously, or have a dedicated "reviewer" check the code it wrote.
This is analogous to a company: the CEO cannot do everything personally and needs to delegate tasks to team members. But delegation is not simply "go do this" — it requires clear permission scopes (which resources can you access), information isolation (do not let noise from one subtask pollute another), and result reporting (give me only the summary, not the raw data).
Claude Code's sub-Agent system is designed precisely according to this approach. Each sub-Agent has its own message history, tool set, permission mode, and token budget — fully isolated, returning only a summary upon completion.
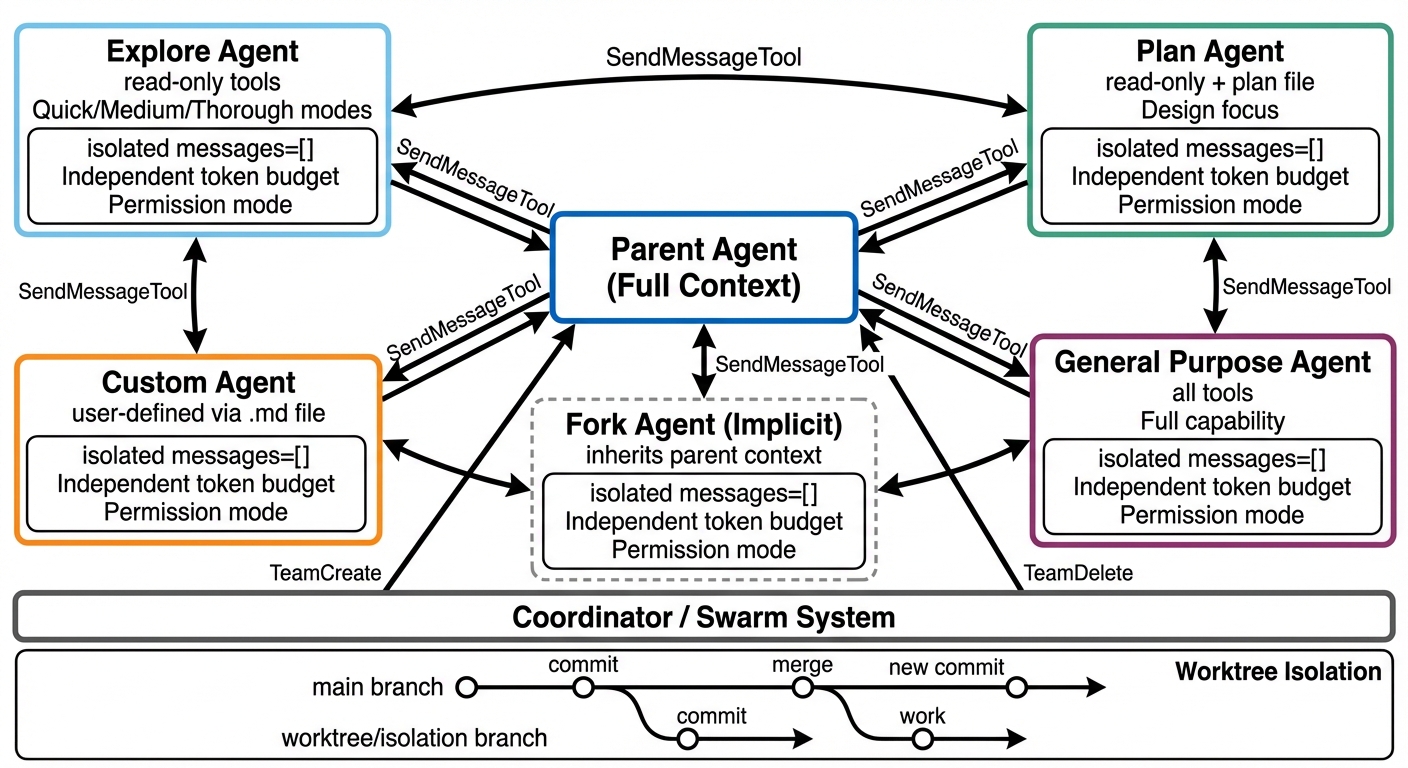 Figure 11-1: Multi-Agent orchestration architecture — The parent Agent spawns isolated sub-Agents (Explore/Plan/General/Custom/Fork) via AgentTool, each with independent message history, token budget, and permission mode. The bottom shows the Coordinator/Swarm system and Worktree isolation.
11.1 Agent Tool
Agent Tool is Claude Code's sub-Agent spawning mechanism, located in src/tools/AgentTool/.
// Agent 定义结构
interface AgentDefinition {
  agentType: string;           // 例: "Explore", "Plan", "general-purpose"
  description: string;         // 用途描述
  whenToUse: string;           // 何时使用
  tools: string[] | '*';       // 可用工具('*' = 所有)
  maxTurns?: number;           // 最大轮次限制
  model?: string | 'inherit';  // 模型选择
  permissionMode?: PermissionMode;  // 权限模式
  getSystemPrompt(): string;   // 系统提示生成
}
11.2 Agent Types
┌──────────────────────────────────────────────────┐
│                Agent Types                        │
│                                                   │
│  general-purpose (General-Purpose Agent)          │
│  ├─ Tools: all (*)                               │
│  ├─ Use case: complex multi-step tasks           │
│  └─ Model: inherits from parent                  │
│                                                   │
│  Explore (Exploration Agent)                      │
│  ├─ Tools: read-only (Read, Glob, Grep,          │
│  │         WebFetch, ...)                         │
│  ├─ Use case: codebase exploration, search        │
│  ├─ Cannot: edit, write, run commands            │
│  └─ Three depth levels: quick, medium,           │
│     very thorough                                 │
│                                                   │
│  Plan (Planning Agent)                            │
│  ├─ Tools: read-only + Plan file writing         │
│  ├─ Use case: designing implementation plans     │
│  └─ Cannot: execute actual code changes          │
│                                                   │
│  custom (Custom Agent)                            │
│  ├─ Definition: ~/.claude/agents/<name>.md       │
│  ├─ Frontmatter: tools, model, maxTurns          │
│  └─ System prompt: Markdown body                 │
│                                                   │
│  Fork (Implicit Fork Agent)                       │
│  ├─ Experimental feature                         │
│  ├─ Automatically forks from parent context      │
│  └─ Inherits parent's tools and permissions      │
│                                                   │
└──────────────────────────────────────────────────┘
11.3 Sub-Agent Spawning Flow
sequenceDiagram
    participant P as 父 Agent
    participant AT as AgentTool
    participant MCP as MCP 服务器
    participant C as 子 Agent
    participant T as 子 Agent 工具集

    P->>AT: Agent(type:"Explore", prompt:"...")
    AT->>AT: 加载 Agent 定义
    AT->>MCP: 检查 MCP 服务器就绪
    alt MCP 未就绪
        loop 每 500ms 轮询 (最多 30s)
            AT->>MCP: 连接状态?
        end
    end
    AT->>C: 创建隔离上下文
    Note over C: messages = []<br/>独立 Token 预算<br/>独立压缩管道
    AT->>T: 组装工具集 (定义指定或继承)
    C->>C: 独立 queryLoop()
    loop Agent 执行
        C->>T: 工具调用
        T-->>C: 工具结果
    end
    C-->>AT: 返回摘要
    AT-->>P: 摘要 (不含子 Agent 完整历史)
Source Code Annotation Analysis: A key comment in the AgentTool source code reads: "Fork children keep the Agent tool in their pool for cache-identical tool defs, so reject fork attempts at call time." This means Fork sub-Agents retain the Agent tool in their tool pool (to maintain cache-identical tool definitions with the parent) but reject recursive Fork attempts at runtime. The primary checking mechanism is
querySource(unaffected by compaction), with message scanning as a fallback. This prevents the runaway scenario of "Agents infinitely spawning Agents."
父 Agent 请求: Agent(type: "Explore", prompt: "...")
    │
    v
AgentTool.call()
    │
    ├─ 1. 加载 Agent 定义(内置或自定义)
    ├─ 2. 构建隔离的消息数组(messages = [])
    ├─ 3. 选择工具集(定义中指定或继承)
    ├─ 4. 设置权限模式(bubble / default / 继承)
    ├─ 5. 启动独立的查询循环
    │     └─ 子 Agent 有自己的:
    │        ├─ 消息历史
    │        ├─ 工具上下文
    │        ├─ 压缩管道
    │        └─ Token 预算
    ├─ 6. 收集输出
    └─ 7. 返回摘要给父 Agent
Design Philosophy:
The core design of sub-Agents is context isolation. Each sub-Agent begins with a blank message list and returns only a summary upon completion. This prevents: - Subtask noise from polluting the parent context - Token budgets from being exhausted by exploratory queries - Permission leakage (the sub-Agent's tool set can be more restricted)
11.4 Custom Agents
<!-- ~/.claude/agents/code-reviewer.md -->
---
name: code-reviewer
description: Specialized agent for code review
tools: [Read, Grep, Glob]
model: claude-sonnet-4-6
maxTurns: 50
---

You are a code reviewer. Your job is to:
1. Read the changed files
2. Check for bugs, security issues, and style violations
3. Provide actionable feedback

You are READ-ONLY. You cannot modify any files.

Focus on:
- Security vulnerabilities (injection, XSS, etc.)
- Performance issues (N+1 queries, memory leaks)
- Code quality (naming, SRP, test coverage)
11.5 Coordinator / Swarm System
┌─────────────────────────────────────────────┐
│            Coordinator System                │
│                                              │
│  src/coordinator/                            │
│  ├─ Multi-Agent orchestration               │
│  ├─ Team creation/deletion                  │
│  ├─ Task assignment                         │
│  └─ State synchronization                   │
│                                              │
│  utils/swarm/                                │
│  ├─ Coordination logic                      │
│  ├─ Teammate tools                          │
│  └─ Communication protocol                  │
│                                              │
│  Tools:                                      │
│  ├─ TeamCreateTool  — Create team Agents    │
│  ├─ TeamDeleteTool  — Delete team Agents    │
│  ├─ SendMessageTool — Inter-Agent messaging │
│  └─ TaskStopTool    — Stop tasks            │
│                                              │
│  Services:                                   │
│  ├─ teamMemorySync/ — Multi-Agent memory    │
│  │                    sync                   │
│  ├─ AgentSummary/   — Agent state summaries │
│  └─ swarm/          — Swarm permission      │
│                       polling                │
│                                              │
└─────────────────────────────────────────────┘
11.6 Quantitative Analysis: Sub-Agent Isolation Overhead and Benefits
| Metric | Without Sub-Agents (Single Agent) | With Sub-Agents (Isolated) |
|---|---|---|
| Context pollution risk | High (all exploration noise remains in history) | Low (sub-Agent history discarded) |
| Token consumption | O(exploration tokens + work tokens) | O(summary tokens + work tokens) |
| Exploring 10 files scenario | ~50K tokens (all retained in context) | ~2K tokens (only summary returned) |
| Token savings rate | — | ~96% (in the above example) |
| Startup overhead | 0 | ~5-10K tokens (system prompt duplication) |
| MCP readiness wait | 0 | 0-30s (initial connection) |
Source Code Annotation: Regarding MCP readiness waiting, the source code comments: "Avoids a race condition where the agent is invoked before MCP servers finish connecting. Early exit if any required server has already failed — no point waiting if the check will fail anyway." The 30-second timeout and 500ms polling interval are empirical values balancing wait cost and connection reliability.
Regarding Fork Agent cache optimization, the comments note: "Fork path: child inherits the PARENT's system prompt (not FORK_AGENT's) for CACHE-IDENTICAL API request prefixes." This means Fork sub-Agents reuse the parent's prompt cache, and the first API call does not need to rebuild the cache — saving approximately 30-46K tokens of cache creation cost.
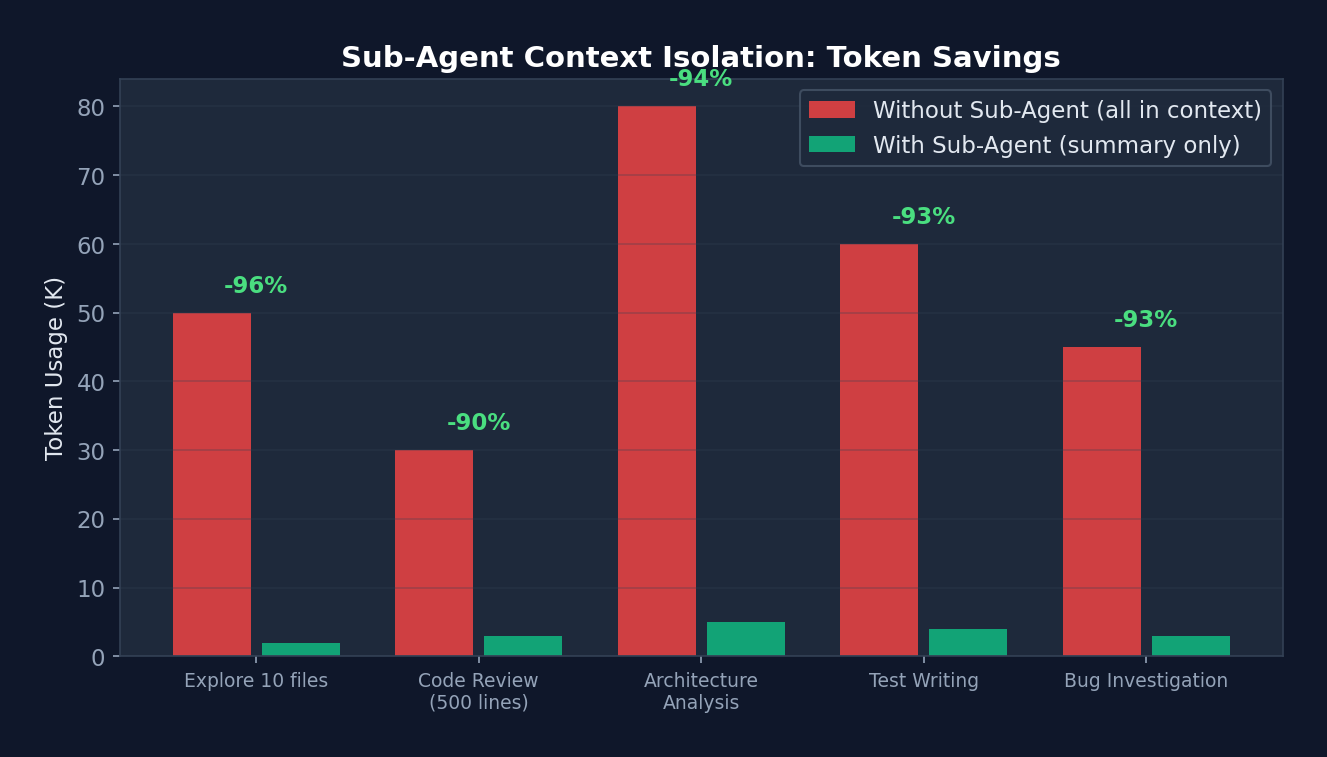 Figure 11-2: Token savings from sub-Agent context isolation — In the "explore 10 files" scenario, operating without sub-Agents requires 50K tokens (all retained in context), while using sub-Agents requires only 2K tokens (summary only), a 96% saving. These savings compound significantly over long conversations.
11.7 Task System
// src/Task.ts — 任务类型
type TaskType =
  | 'local_bash'          // Bash 命令执行
  | 'local_agent'         // 本地 Agent
  | 'remote_agent'        // 远程 Agent(CCR)
  | 'in_process_teammate' // 进程内队友(assistant 模式)
  | 'local_workflow'      // 工作流脚本
  | 'monitor_mcp'         // MCP 监控
  | 'dream';              // Dream 模式任务

interface TaskState {
  id: string;             // 前缀 + 8 位随机字符(base36)
  type: TaskType;
  status: 'pending' | 'running' | 'completed' | 'failed' | 'killed';
  description: string;
  toolUseId?: string;
  startTime: number;
  endTime?: number;
  totalPausedMs: number;
  outputFile: string;     // 磁盘上的输出文件
  outputOffset: number;
  notified: boolean;
}
11.7 Worktree Isolation
Git Worktree Isolation Mode:
├─ Each sub-Agent works in an independent git worktree
├─ Prevents file conflicts (multiple Agents editing the same file simultaneously)
├─ Tools: EnterWorktreeTool / ExitWorktreeTool
├─ Upon completion:
│   ├─ If changes exist: retain worktree, return path and branch
│   └─ If no changes: automatically clean up worktree
└─ Sandbox integration: worktree path added to sandbox allowWrite
Chapter 12: Skills & Plugins — The Extension Ecosystem
Tools are atomic operations (read a file, run a command), while Skills are workflows ("do a code review for me," "deploy to staging"). If Tools are LEGO bricks, Skills are pre-built models — you can use them as-is or disassemble and recombine them.
Claude Code's Skills system is what transforms it from a "coding tool" into a "workflow platform." A single
.mdfile can define a new workflow — no TypeScript required, no recompilation needed.
12.1 Skills System
Skills are reusable workflow definitions, analogous to "advanced macros."
Built-in Skills
// src/skills/bundled/index.ts
function initBundledSkills(): void {
  registerUpdateConfigSkill();   // /update-config
  registerKeybindingsSkill();    // /keybindings-help
  registerDebugSkill();          // /debug
  registerSimplifySkill();       // /simplify
  registerBatchSkill();          // /batch

  // 特性门控 Skills
  if (feature('AGENT_TRIGGERS_REMOTE')) {
    registerScheduleSkill();     // /schedule
  }
  if (feature('AGENT_TRIGGERS')) {
    registerLoopSkill();         // /loop
  }
  if (feature('BUILDING_CLAUDE_APPS')) {
    registerClaudeApiSkill();    // /claude-api
  }
}
Custom Skills
<!-- ~/.claude/skills/my-deploy.md -->
---
name: deploy
description: Deploy the application to staging
args: environment
---

# Deploy Skill

When invoked with /deploy <environment>:

1. Run the test suite: `npm test`
2. Build the application: `npm run build`
3. Deploy to the specified environment:
   - staging: `aws deploy --env staging`
   - production: `aws deploy --env production` (requires confirmation)
4. Verify deployment health check
5. Report results
Skill Loading
// src/skills/loadSkillsDir.ts
function loadSkillsDir(dir: string): SkillDefinition[] {
  // 1. 扫描 ~/.claude/skills/ 目录
  // 2. 读取每个 .md 文件
  // 3. 解析 frontmatter(name, description, args)
  // 4. 创建 SkillDefinition
  // 5. 注册为可用命令
}
12.2 In-Depth Analysis: Skill Loading Pipeline
// src/skills/loadSkillsDir.ts — Skill 前置数据解析
// 25+ 个 frontmatter 字段:

// 身份: name, description, version, when_to_use
// 执行: model, disable-model-invocation, user-invocable, context('fork')
// 工具: allowed-tools, disallowed-tools
// 参数: arguments (数组/逗号分隔), argument-hint
// Hooks: 通过 HooksSchema() 验证
// 路径: parseSkillPaths() (与 CLAUDE.md 规则相同格式)

// 两种目录格式:
// 新格式: /skills/skill-name/SKILL.md (每个 skill 一个目录)
// 旧格式: /commands/namespace/file.md (扁平 markdown)
// 旧格式的命名空间: /commands/auth/login/SKILL.md → "auth:login"

// 安全限制:
// MCP skills (远程/不可信) 禁止执行内联 Shell 命令
// 本地 skills 可以用 `!command` 语法执行 Shell
Skill's
context: 'fork'mode: When a skill specifiescontext: 'fork', it executes in a forked sub-Agent with its own independent message history and context window. This means the Skill's execution does not pollute the main conversation's context — the skill returns only result text upon completion. This is Context Engineering as applied within the Skill system.
12.3 Built-in Skills Registry
Always loaded (11):
  updateConfig, keybindings, verify, debug, loremIpsum,
  skillify, remember, simplify, batch, stuck

Feature-gated (7):
  dream         ← KAIROS/KAIROS_DREAM (background memory consolidation)
  hunter        ← REVIEW_ARTIFACT
  loop          ← AGENT_TRIGGERS (loop execution)
  schedule      ← AGENT_TRIGGERS_REMOTE (remote scheduling)
  claudeApi     ← BUILDING_CLAUDE_APPS
  claudeInChrome← auto-detected
  skillGenerator← RUN_SKILL_GENERATOR
12.4 Plugin System
src/plugins/          — Plugin system core
src/services/plugins/ — Plugin loading, version management, marketplace
src/utils/plugins/    — Plugin utilities, caching

Plugin features:
├─ Version management (SemVer)
├─ Cache system (reduces redundant loading)
├─ Marketplace integration
├─ Plugin-level Hook injection
├─ Independent data directory (${CLAUDE_PLUGIN_DATA})
└─ Configuration isolation (${user_config.X})
Chapter 13: Building Your Own Harness — A Practical Guide
The preceding 12 chapters have dissected Claude Code as a "reference implementation." Now it is time to get hands-on.
Do not attempt to build a 500,000-line Harness in one go — that is the result of dozens of Anthropic engineers working over several years. A good Harness grows organically; it is not designed top-down. Start with the minimum viable configuration, adding constraints and capabilities incrementally as you encounter real problems.
The three levels below are not "pick one" — they form a progressive path. Spend 1 hour building a Level 1, use it for a few weeks. Then, based on real pain points, upgrade to Level 2 and use it for several months. Only consider Level 3 when your organization requires it.
 Figure 13-1: Three-tier Harness maturity radar chart — Level 1 (green) has basic capabilities in Context Management and Permission Control but lacks Multi-Agent, MCP, and enterprise MDM. Level 3 (purple) approaches full marks across all 8 dimensions. Note that Level 2 (yellow) is the "sweet spot" for most teams — moderate investment with broad coverage.
13.1 Level 1: Personal Harness (1-2 Hours)
Step 1: Create CLAUDE.md
# CLAUDE.md

## 项目架构
- src/: 源代码
- tests/: 测试文件
- docs/: 文档

## 开发规范
- 语言: TypeScript strict mode
- 测试: vitest
- 格式化: prettier
- 提交: conventional commits

## 重要约束
- 不要修改 migrations/ 目录(已部署的迁移不可变)
- 所有 API 端点必须有认证中间件
- 不要使用 any 类型
Step 2: Configure Basic Permissions
// .claude/settings.json
{
  "permissions": {
    "allow": [
      "Read",
      "Glob",
      "Grep",
      "Bash(npm test *)",
      "Bash(npm run *)",
      "Bash(git status)",
      "Bash(git diff *)",
      "Bash(git log *)"
    ],
    "deny": [
      "Bash(sudo *)",
      "Bash(rm -rf *)",
      "Bash(git push --force *)",
      "Bash(git reset --hard *)"
    ]
  }
}
Step 3: Add Basic Hooks
// .claude/settings.json(hooks 部分)
{
  "hooks": {
    "PreToolUse": [
      {
        "matcher": "Write",
        "hooks": [
          {
            "type": "command",
            "command": "echo 'Writing file: '$(echo $HOOK_INPUT | jq -r '.tool_input.file_path')",
            "if": "Write(*.ts)"
          }
        ]
      }
    ],
    "PostToolUse": [
      {
        "matcher": "Bash",
        "hooks": [
          {
            "type": "command",
            "command": "npm run lint -- --quiet 2>/dev/null || true",
            "if": "Bash(npm *)",
            "async": true
          }
        ]
      }
    ]
  }
}
13.2 Level 2: Team Harness (1-2 Days)
Step 1: Shared Settings
// .claude/settings.json(提交到 git)
{
  "permissions": {
    "allow": [
      "Bash(npm test *)",
      "Bash(npm run lint *)",
      "Bash(git *)"
    ],
    "deny": [
      "Bash(sudo *)",
      "Bash(rm -rf /)",
      "Bash(npm publish *)",
      "Write(*.env*)",
      "Write(*.key)",
      "Write(*.pem)"
    ],
    "defaultMode": "default"
  },
  "sandbox": {
    "enabled": true,
    "fsWrite": {
      "deny": [".env", ".env.*", "*.key", "*.pem", "secrets/"]
    },
    "network": {
      "allowedDomains": [
        "*.github.com",
        "registry.npmjs.org",
        "api.anthropic.com"
      ]
    }
  }
}
Step 2: Define Team Agents
<!-- .claude/agents/architect.md -->
---
name: architect
description: Reviews architecture decisions and suggests improvements
tools: [Read, Grep, Glob]
model: claude-opus-4-6
maxTurns: 30
---

You are an architecture reviewer. Analyze the codebase and provide:
1. Dependency analysis
2. Coupling/cohesion assessment
3. SOLID principle compliance
4. Suggestions for improvement

Focus on high-level design, not line-by-line code review.
<!-- .claude/agents/test-writer.md -->
---
name: test-writer
description: Writes comprehensive tests for existing code
tools: [Read, Write, Edit, Bash, Glob, Grep]
model: claude-sonnet-4-6
maxTurns: 100
---

You are a test engineer. For any given code:
1. Analyze the code and identify test cases
2. Write comprehensive tests (unit + integration)
3. Run the tests to verify they pass
4. Ensure >80% coverage for touched files
Step 3: Configure MCP Servers
// .claude/mcp.json
{
  "mcpServers": {
    "github": {
      "command": "npx",
      "args": ["-y", "@modelcontextprotocol/server-github"],
      "env": { "GITHUB_TOKEN": "${GITHUB_TOKEN}" }
    },
    "postgres": {
      "command": "npx",
      "args": ["-y", "@modelcontextprotocol/server-postgres"],
      "env": { "DATABASE_URL": "${DATABASE_URL}" }
    }
  }
}
Step 4: Create Team Skills
<!-- .claude/skills/review-pr.md -->
---
name: review-pr
description: Comprehensive PR review workflow
args: pr_number
---

# PR Review Workflow

1. Fetch the PR diff: `gh pr diff $ARGUMENTS`
2. Read all changed files
3. For each file:
   - Check for security issues
   - Check for performance concerns
   - Check for test coverage
   - Check for style consistency
4. Generate a structured review comment
5. Post the review: `gh pr review $ARGUMENTS --comment --body "..."`
13.3 Level 3: Organization-Level Harness (1-2 Weeks)
Step 1: Enterprise MDM Settings
// /managed/managed-settings.json
{
  "permissions": {
    "deny": [
      "Bash(sudo *)",
      "Bash(curl * | bash)",
      "Bash(wget * | bash)",
      "Write(*.env*)",
      "Write(*.pem)",
      "Write(*.key)"
    ],
    "disableBypassPermissionsMode": "disable"
  },
  "sandbox": {
    "enabled": true,
    "lockedByPolicy": true,
    "network": {
      "deniedDomains": ["*.malware.com", "*.phishing.net"]
    }
  },
  "deniedMcpServers": ["*-untrusted", "*-experimental"]
}
Step 2: Audit Hooks
// /managed/managed-settings.d/audit.json
{
  "hooks": {
    "PostToolUse": [
      {
        "hooks": [
          {
            "type": "http",
            "url": "https://audit.company.com/api/agent-actions",
            "headers": {
              "Authorization": "Bearer $AUDIT_API_KEY",
              "Content-Type": "application/json"
            },
            "allowedEnvVars": ["AUDIT_API_KEY"],
            "async": true
          }
        ]
      }
    ],
    "SessionStart": [
      {
        "hooks": [
          {
            "type": "command",
            "command": "echo '{\"session_started\": true}' | curl -s -X POST -d @- https://audit.company.com/api/sessions",
            "async": true
          }
        ]
      }
    ]
  }
}
Step 3: Implement the Plan-Work-Review Cycle
Reference the 13 guard rules from the claude-code-harness project:
R01: Block sudo commands
R02: Forbid writing to .git/, .env, SSH keys
R03: Forbid Shell writing to protected files
R04: Writing outside project root requires confirmation
R05: rm -rf requires confirmation
R06: Forbid git push --force
R07-R09: Mode-specific guards (work/codex/breezing)
R10: Forbid --no-verify, --no-gpg-sign
R11: Forbid git reset --hard main/master
R12: Warn on direct push to main/master
R13: Warn on editing protected files
Implemented as a PreToolUse Hook:
{
  "hooks": {
    "PreToolUse": [
      {
        "matcher": "Bash",
        "hooks": [
          {
            "type": "command",
            "command": "node guard-rules.js",
            "timeout": 5
          }
        ]
      }
    ]
  }
}
Chapter 14: Advanced Patterns and Design Philosophy
This is the final content chapter and arguably the most important. The preceding chapters covered "how Claude Code does things." This chapter addresses "why it does things this way."
Tools and frameworks become obsolete, but design philosophies do not. If you retain only one chapter from this book, it should be this one — these principles apply to any Agent Harness, not just Claude Code.
14.1 Ten Design Philosophies of Claude Code
1. Async Generator Streaming Architecture
不是: function query() → Promise<FinalResult>
而是: async function* query() → AsyncGenerator<StreamEvent>

为什么: 客户端可以在模型思考时就开始渲染
         用户可以随时中断
         进度对用户可见
2. State Machine via Continue Sites
不是: 显式状态枚举 + switch/case
而是: while(true) + 7 个 continue 站点

为什么: 恢复路径是自然的(continue = 重试)
         状态转换是局部的(只需更新 State 对象)
         新恢复路径可以添加而不重构
3. Compile-Time Feature Gating
不是: if (config.feature_x) { ... }
而是: if (feature('FEATURE_X')) { ... }  // bun:bundle 编译时求值

为什么: 外部发行版不包含任何内部特性代码(连字符串都没有)
         不存在运行时分支预测开销
         代码大小最小化
4. Cache Prefix Stability
不是: 将内置工具和 MCP 工具混合排序
而是: 内置工具排序后作为稳定前缀,MCP 工具排序后追加

为什么: Anthropic API 的 prompt cache 基于前缀匹配
         MCP 工具变化时,内置工具前缀不变 → 缓存不失效
         大幅降低 API 成本
5. Defense in Depth
Layer 1: CLAUDE.md(指导性约束)
Layer 2: Permission Rules(声明性约束)
Layer 3: Hooks(可编程约束)
Layer 4: YOLO Classifier(AI 约束)
Layer 5: Sandbox(系统级约束)
Layer 6: Hardcoded Denials(不可覆盖约束)

为什么: 每一层都可能被绕过
         多层叠加使绕过概率指数下降
         最内层(硬编码)无法通过配置禁用
6. Data-Driven Extensibility
不是: 修改源码添加新功能
而是: settings.json + agents/*.md + skills/*.md + hooks

为什么: 非工程师也能定制 Harness
         定制与核心代码解耦
         升级时不丢失定制
7. Context as a Scarce Resource
设计: 工具延迟加载、记忆按需附加、四级压缩管道
       ToolSearch 发现机制、Microcompact 老化策略

为什么: 上下文窗口有限(即使 1M token)
         无关信息降低模型性能
         成本与 token 使用量成正比
8. Hierarchical Configuration Overrides
7 级设置: CLI > Flag > Policy > Managed > Local > Project > User

为什么: 不同层级有不同的信任级别
         企业管理员可以强制策略
         项目维护者可以设定合理默认
         用户可以个人微调
9. Isolated Sub-Agent Context
设计: 子 Agent 从空白消息列表开始
       完成后只返回摘要
       父级上下文不被污染

为什么: 探索性任务可能产生大量噪音
         子 Agent 的失败不应影响父级
         Token 预算隔离
10. Reversibility-First
设计: 文件编辑通过 Edit(替换字符串),不是 Write(覆盖)
       每个工具调用有 undo 能力
       自动快照(文件历史)

为什么: Agent 会犯错
         用户需要轻松回滚
         "先行动后审查"比"先审查后行动"更高效
14.2 Entropy Management Patterns
┌──────────────────────────────────────────────┐
│         Entropy Management Patterns           │
│                                               │
│  1. Periodic Cleanup Agent                    │
│     /loop 1h "Check for dead code, unused     │
│               imports, expired TODOs,          │
│               inconsistent naming"             │
│                                               │
│  2. Documentation Validation Agent            │
│     SessionEnd Hook → Check whether CLAUDE.md │
│     is consistent with actual code state      │
│                                               │
│  3. Dependency Audit Agent                    │
│     /schedule "Every Monday 0:00" →           │
│     "Check for outdated dependencies,         │
│      security vulnerabilities, license        │
│      compliance"                              │
│                                               │
│  4. Test Coverage Guard                       │
│     PostToolUse Hook (Write *.ts) →           │
│     "Run coverage check; warn if decreased"   │
│                                               │
└──────────────────────────────────────────────┘
14.3 Bridge System — IDE Integration
src/bridge/
├── bridgeMain.ts             — Main loop
├── bridgeMessaging.ts        — Messaging protocol
├── bridgePermissionCallbacks.ts — Permission handling
├── replBridge.ts             — REPL bridge
├── jwtUtils.ts               — JWT authentication
└── sessionRunner.ts          — Session execution

Supports:
├── VS Code extension
├── JetBrains extension
├── Bidirectional communication (IDE ↔ Claude Code)
├── Permission synchronization
└── Session state synchronization
14.4 Plan Mode V2
5-Phase Workflow:

Phase 1: Interview
├─ Gather requirements
├─ Understand context
└─ Launch up to 3 Explore Agents (in parallel)

Phase 2: Design
├─ Launch Plan Agent
├─ Generate implementation plan
└─ May launch multiple to explore different directions

Phase 3: Review
├─ Read key files to verify the plan
├─ Ensure alignment with user intent
└─ Clarify via AskUserQuestion

Phase 4: Final Plan
├─ Write to ~/.claude/plans/<name>.md
├─ Include context, steps, file paths
└─ Verification section describes how to test

Phase 5: Exit Plan Mode
├─ Invoke ExitPlanMode
├─ Wait for user approval
└─ Begin execution upon approval
14.5 Remote Triggers and Cron Scheduling
// 特性门控: AGENT_TRIGGERS + AGENT_TRIGGERS_REMOTE

// ScheduleCronTool — 创建定时 Agent
{
  schedule: "0 9 * * MON",   // 每周一早 9 点
  prompt: "Review open PRs and post summary to Slack",
  model: "claude-sonnet-4-6",
}

// RemoteTriggerTool — 远程触发
{
  trigger: "deploy-check",
  prompt: "Verify deployment health",
}
14.6 Voice Integration
src/voice/                   — Voice input
src/services/voice.ts        — Voice/STT integration
src/services/voiceStreamSTT.ts — Streaming speech-to-text

Feature gate: VOICE_MODE
Supports:
├── Voice input transcription
├── Streaming processing (real-time recognition)
└── Integration into the main query loop
14.7 The "Rippable Harness" Principle
Core idea: The Harness should simplify as model capabilities improve

Examples:
├── Today: Need 13 guard rules to prevent dangerous operations
│   └── Future, better models may not need half of them
│
├── Today: Four-level compaction pipeline for limited context
│   └── Future, larger context windows may require only one level
│
├── Today: YOLO classifier needs two-stage checking
│   └── Future, primary models may have better built-in safety awareness
│
└── Design implications:
    ├── Each Harness component should be independently disableable
    ├── Settings overrides preferred over hardcoding
    ├── Simplify rather than stack as models improve
    └── "The best Harness is the one you eventually don't need"
Appendix C: Complete ToolUseContext Type Definition
ToolUseContext is the "request context" that threads through the entire execution pipeline — understanding it means understanding the Harness's information flow:
// src/Tool.ts — 真实代码(精简注释版)
export type ToolUseContext = {
  // ===== 配置(只读)=====
  options: {
    commands: Command[]           // 可用的 Slash 命令
    debug: boolean                // 调试模式
    mainLoopModel: string         // 主循环使用的模型
    tools: Tools                  // 可用工具列表
    verbose: boolean              // 详细输出
    thinkingConfig: ThinkingConfig// 思考模式配置
    mcpClients: MCPServerConnection[]  // MCP 服务器连接
    mcpResources: Record<string, ServerResource[]>  // MCP 资源
    isNonInteractiveSession: boolean   // 非交互式会话
    agentDefinitions: AgentDefinitionsResult  // Agent 定义
    maxBudgetUsd?: number         // 最大预算(美元)
    customSystemPrompt?: string   // 自定义系统提示
    appendSystemPrompt?: string   // 追加系统提示
    querySource?: QuerySource     // 查询来源标识
    refreshTools?: () => Tools    // 工具列表刷新函数
  }

  // ===== 控制 =====
  abortController: AbortController  // 取消信号
  messages: Message[]               // 当前消息历史

  // ===== 状态读写 =====
  readFileState: FileStateCache     // 文件状态缓存
  getAppState(): AppState           // 获取应用状态
  setAppState(f: (prev) => AppState): void  // 更新应用状态

  // ===== 回调 =====
  setToolJSX?: SetToolJSXFn         // 设置工具 UI
  addNotification?: (n: Notification) => void  // 添加通知
  sendOSNotification?: (opts) => void          // 发送系统通知
  setInProgressToolUseIDs: (f) => void         // 跟踪进行中的工具
  setResponseLength: (f) => void               // 跟踪响应长度
  updateFileHistoryState: (updater) => void    // 更新文件历史
  updateAttributionState: (updater) => void    // 更新归因状态

  // ===== Agent 相关 =====
  agentId?: AgentId                 // Agent 标识
  agentType?: string                // Agent 类型
  requireCanUseTool?: boolean       // 是否需要权限检查

  // ===== 动态 Skill/Memory =====
  nestedMemoryAttachmentTriggers?: Set<string>  // 嵌套记忆触发器
  loadedNestedMemoryPaths?: Set<string>         // 已加载的记忆路径
  dynamicSkillDirTriggers?: Set<string>         // 动态 Skill 目录触发器
  discoveredSkillNames?: Set<string>            // 已发现的 Skill 名称

  // ===== 权限 =====
  localDenialTracking?: DenialTrackingState     // 本地拒绝跟踪
  toolDecisions?: Map<string, {...}>            // 工具决策记录
  contentReplacementState?: ContentReplacementState  // 内容替换状态

  // ===== 高级 =====
  requestPrompt?: (sourceName, summary?) =>     // Hook prompt 请求
    (request: PromptRequest) => Promise<PromptResponse>
  handleElicitation?: (serverName, params, signal) =>  // MCP elicitation
    Promise<ElicitResult>
  onCompactProgress?: (event) => void           // 压缩进度回调
  criticalSystemReminder_EXPERIMENTAL?: string  // 关键系统提醒
}
Design Analysis: ToolUseContext is a large context object, analogous to a Request object in web frameworks. It carries everything needed for tool execution — configuration, state, callbacks, and permissions. Although the 50+ fields may appear complex, this design avoids: 1. Global state (each query has its own context) 2. Parameter explosion (no need to pass arguments individually) 3. Tight coupling (tools use only the fields they need)
Appendix D: 13 Guard Rules Reference Model
The claude-code-harness project defines 13 declarative guard rules, implemented as PreToolUse Hooks:
// 来自 claude-code-harness/core/src/guardrails/

// R01: 阻止 sudo — 永远不允许提权
{ rule: 'R01', test: (input) => /^sudo\s/.test(input.command),
  action: 'deny', reason: 'sudo commands are not allowed' }

// R02: 禁止写入敏感路径
{ rule: 'R02', test: (input) => SENSITIVE_PATHS.some(p => input.file_path?.startsWith(p)),
  action: 'deny', paths: ['.git/', '.env', '~/.ssh/'] }

// R03: 禁止 Shell 写入受保护文件
{ rule: 'R03', test: (input) => isShellWriteToProtectedFile(input),
  action: 'deny' }

// R04: 项目根目录外写入需确认
{ rule: 'R04', test: (input) => !isWithinProjectRoot(input.file_path),
  action: 'ask', reason: 'Writing outside project root' }

// R05: rm -rf 需确认
{ rule: 'R05', test: (input) => /rm\s+(-rf|-r\s+-f|-f\s+-r)/.test(input.command),
  action: 'ask', reason: 'Recursive delete detected' }

// R06: 禁止 force push
{ rule: 'R06', test: (input) => /git\s+push\s+.*--force/.test(input.command),
  action: 'deny', reason: 'Force push is not allowed' }

// R07-R09: 模式特定防护
{ rule: 'R07', mode: 'work', ... }   // Work 模式限制
{ rule: 'R08', mode: 'codex', ... }  // Codex 集成限制
{ rule: 'R09', mode: 'breezing', ... } // Breezing 模式限制

// R10: 禁止跳过安全钩子
{ rule: 'R10', test: (input) => /--no-verify|--no-gpg-sign/.test(input.command),
  action: 'deny', reason: 'Skipping safety hooks is not allowed' }

// R11: 禁止 hard reset 到 main
{ rule: 'R11', test: (input) => /git\s+reset\s+--hard\s+(main|master)/.test(input.command),
  action: 'deny' }

// R12: 警告直接推送到 main
{ rule: 'R12', test: (input) => isDirectPushToMain(input),
  action: 'warn' }

// R13: 警告编辑受保护文件
{ rule: 'R13', test: (input) => PROTECTED_FILES.includes(input.file_path),
  action: 'warn', files: ['package-lock.json', 'yarn.lock', 'Cargo.lock'] }
These rules can be fully implemented using Claude Code's native Hook system:
{
  "hooks": {
    "PreToolUse": [
      {
        "matcher": "Bash",
        "hooks": [{
          "type": "command",
          "command": "node guard-rules.js",
          "if": "Bash(sudo *)"
        }]
      }
    ]
  }
}
Chapter 15: Building a Mini Harness from Scratch (Hands-on Lab)
The preceding 14 chapters dissected Claude Code's 512K lines of source code. Now it is time to build — we will construct a 200-line Mini Harness in Python from scratch, implementing Claude Code's core design patterns.
15.1 Goal: A Minimal Harness Running in 30 Minutes
#!/usr/bin/env python3
"""mini_harness.py — 一个 200 行的 Claude Code 式 Agent Harness"""
import anthropic, json, os, subprocess, re
from pathlib import Path

client = anthropic.Anthropic()
MODEL = "claude-sonnet-4-6"

# ====================================================
# Layer 1: Tool System (对应 Claude Code 的 src/Tool.ts)
# ====================================================
TOOLS = [
    {
        "name": "bash",
        "description": "Run a shell command. Returns stdout and exit code.",
        "input_schema": {
            "type": "object",
            "properties": {
                "command": {"type": "string", "description": "The command to run"}
            },
            "required": ["command"]
        }
    },
    {
        "name": "read_file",
        "description": "Read a file and return its contents.",
        "input_schema": {
            "type": "object",
            "properties": {
                "path": {"type": "string", "description": "File path to read"}
            },
            "required": ["path"]
        }
    },
    {
        "name": "write_file",
        "description": "Write content to a file.",
        "input_schema": {
            "type": "object",
            "properties": {
                "path": {"type": "string", "description": "File path to write"},
                "content": {"type": "string", "description": "Content to write"}
            },
            "required": ["path", "content"]
        }
    }
]

# ====================================================
# Layer 2: Permission Rules (对应 Claude Code 的 permissions.ts)
# ====================================================
DENY_PATTERNS = [
    r"^sudo\s",           # R01: 禁止 sudo
    r"rm\s+-rf\s+/",      # R05: 禁止 rm -rf /
    r"git\s+push\s+--force", # R06: 禁止 force push
]

ALLOW_TOOLS = {"read_file"}  # 只读工具始终允许

def check_permission(tool_name: str, tool_input: dict) -> tuple[bool, str]:
    """Layer 2: 权限检查 (简化版 hasPermissionsToUseTool)"""
    if tool_name in ALLOW_TOOLS:
        return True, "allowed by rule"

    if tool_name == "bash":
        cmd = tool_input.get("command", "")
        for pattern in DENY_PATTERNS:
            if re.search(pattern, cmd):
                return False, f"denied: matches {pattern}"

    # 默认:询问用户(对应 Claude Code 的 'ask' 模式)
    answer = input(f"  Allow {tool_name}({json.dumps(tool_input)[:80]})? [y/n] ")
    return answer.lower() == 'y', "user decision"

# ====================================================
# Layer 3: Tool Execution (对应 Claude Code 的 toolExecution.ts)
# ====================================================
def execute_tool(tool_name: str, tool_input: dict) -> str:
    """Layer 3: 执行工具"""
    if tool_name == "bash":
        result = subprocess.run(
            tool_input["command"], shell=True,
            capture_output=True, text=True, timeout=30
        )
        return f"exit_code={result.returncode}\n{result.stdout}{result.stderr}"
    elif tool_name == "read_file":
        return Path(tool_input["path"]).read_text()
    elif tool_name == "write_file":
        Path(tool_input["path"]).write_text(tool_input["content"])
        return f"Written to {tool_input['path']}"
    return "Unknown tool"

# ====================================================
# Layer 4: Context Engineering (对应 Claude Code 的 CLAUDE.md)
# ====================================================
def load_context() -> str:
    """Layer 4: 加载 CLAUDE.md 上下文"""
    claude_md = Path("CLAUDE.md")
    if claude_md.exists():
        return f"\n<project_context>\n{claude_md.read_text()}\n</project_context>\n"
    return ""

SYSTEM_PROMPT = f"""You are a coding assistant. Use tools to help the user.
Be concise. Don't explain what you're about to do — just do it.
{load_context()}"""

# ====================================================
# Layer 5: Agent Loop (对应 Claude Code 的 query.ts)
# ====================================================
def agent_loop():
    """Layer 5: 核心 Agent 循环"""
    messages = []
    print("Mini Harness (type 'exit' to quit)")

    while True:
        user_input = input("\n> ")
        if user_input.lower() == 'exit':
            break

        messages.append({"role": "user", "content": user_input})

        # 内循环:工具调用链(对应 queryLoop 的 while(true))
        while True:
            response = client.messages.create(
                model=MODEL, max_tokens=4096,
                system=SYSTEM_PROMPT,
                messages=messages, tools=TOOLS,
            )

            # 收集助手消息
            messages.append({"role": "assistant", "content": response.content})

            # 无工具调用 → 打印文本并退出内循环
            if response.stop_reason != "tool_use":
                for block in response.content:
                    if hasattr(block, 'text'):
                        print(f"\n{block.text}")
                break

            # 执行工具调用
            tool_results = []
            for block in response.content:
                if block.type != "tool_use":
                    continue

                # 权限检查(Layer 2)
                allowed, reason = check_permission(block.name, block.input)
                if not allowed:
                    tool_results.append({
                        "type": "tool_result",
                        "tool_use_id": block.id,
                        "content": f"Permission denied: {reason}",
                        "is_error": True,
                    })
                    print(f"  ✗ {block.name} denied: {reason}")
                    continue

                # 执行工具(Layer 3)
                try:
                    result = execute_tool(block.name, block.input)
                    tool_results.append({
                        "type": "tool_result",
                        "tool_use_id": block.id,
                        "content": result,
                    })
                    print(f"  ✓ {block.name} completed")
                except Exception as e:
                    tool_results.append({
                        "type": "tool_result",
                        "tool_use_id": block.id,
                        "content": f"Error: {e}",
                        "is_error": True,
                    })

            messages.append({"role": "user", "content": tool_results})

if __name__ == "__main__":
    agent_loop()
15.2 Running Your Mini Harness
# 1. 设置 API key
export ANTHROPIC_API_KEY="sk-ant-..."

# 2. 创建一个 CLAUDE.md
echo "# Project Rules
- Use TypeScript for all new files
- Run tests after making changes: npm test" > CLAUDE.md

# 3. 运行
python mini_harness.py

# 4. 测试权限系统
> run sudo rm -rf /
  ✗ bash denied: matches ^sudo\s

> read the file package.json
  ✓ read_file completed  (自动允许,无需确认)

> run npm test
  Allow bash({"command": "npm test"})? [y/n] y
  ✓ bash completed
15.3 Comparison with Claude Code's Design Patterns
| Mini Harness (200 lines) | Claude Code (512K lines) | Where the Gap Lies |
|---|---|---|
| 3 tools | 43+ tools | Tool count |
| Regex permission matching | 7-level hierarchy + AI classifier | Permission precision |
| User y/n confirmation | 5 modes + Hook system | Flexibility |
| No compaction | Four-level compaction pipeline | Long conversation support |
| No sub-Agents | 5 Agent types | Complex task decomposition |
| Static CLAUDE.md loading | Memory system + dynamic injection | Context management |
| No retry | 7 continue sites | Robustness |
Exercises: Try adding the following features to the Mini Harness (approximately 20 lines each): 1. Simple Hook system: Run shell scripts before and after tool execution 2. Token counter: Track token consumption per API call and cumulative cost 3. Session save/restore: Serialize messages to a JSON file with
--resumesupport 4. Sub-Agent: Add anagenttool that forks a new agent_loop() with independent messages
Chapter 16: Competitive Analysis
Claude Code is not the only AI coding Agent. Understanding competitor Harness designs helps distinguish which patterns are universal and which are unique innovations of Claude Code.
16.1 Harness Architecture Comparison of Three Major Agents
| Dimension | Claude Code | Cursor | GitHub Copilot |
|---|---|---|---|
| Runtime | Terminal CLI | VS Code fork | VS Code extension |
| Interaction Mode | Autonomous Agent | Collaborative editor | Reactive autocomplete + Agent Mode |
| Agent Loop | while(true) + 7 continue sites | Not public | Not public |
| Tool System | 43+ built-in + MCP extension | Built-in editing + terminal | Built-in editing + terminal |
| Permission Model | 5 modes + 7-level rules + AI classifier | Editor-level sandbox | GitHub permissions |
| Hook System | 26 events x 4 types | Not public | Not public |
| Context Management | CLAUDE.md + memory + four-level compaction | .cursorrules + codebase index | .github/copilot-instructions.md |
| Multi-Agent | 5 Agent types + Swarm orchestration | 8 parallel Agents (worktree) | Single Agent |
| MCP Support | 6 transport protocols | MCP support | Limited |
| Open Source Visibility | Source analyzable (512K LOC) | Closed source | Closed source |
| Evaluation Integration | SWE-bench + Headless Profiler | Not public | Not public |
| Market Share (2026) | 41% | ~15% | 38% |
Data sources: dev.to/raxxostudios, faros.ai, tech-insider.org
16.2 Key Design Difference Analysis
Unique Innovations of Claude Code: 1. Compile-time feature gating (bun:bundle dead code elimination) — no competitor has this mechanism 2. Six-layer defense-in-depth security model — the deepest security layering 3. Two-stage YOLO classifier — the only Agent using an independent AI to review permissions 4. Reversible tool design (Edit uses string replacement, not file overwrite) — reduces destruction risk 5. Prompt cache stability sorting — tool ordering optimizes cache hit rates
Unique Innovations of Cursor: 1. Codebase indexing (global semantic understanding) — Claude Code relies on Grep/Glob 2. 8 parallel Agents + worktree isolation — more aggressive parallelism strategy 3. Editor-native integration — superior diff preview and inline editing experience
Universal Patterns (shared by all competitors): 1. Project-level configuration files (CLAUDE.md / .cursorrules / copilot-instructions.md) 2. Tool call loops (ReAct pattern) 3. Permission confirmation mechanisms 4. MCP protocol support (gradually converging)
16.3 Architectural Insights from the OpenDev Paper
arXiv:2603.05344v1 "Building AI Coding Agents for the Terminal" proposes several important architectural patterns:
- Scaffolding vs. Harness Separation:
- Scaffolding = assembly before the first prompt (system prompt compilation, tool schema generation)
- Harness = everything after assembly (ReAct loop, tool dispatch, secure execution)
-
Claude Code's
main.tsx(parallel prefetch) corresponds to Scaffolding;query.ts(queryLoop) corresponds to Harness -
Dual-Mode via Subagent Rather Than State Machine:
- The paper finds that state machine patterns (Plan Mode <-> Execute Mode switching) tend to get stuck
- Recommended approach: Plan Mode as a tool-restricted sub-Agent rather than a state switch
-
Claude Code's Plan Mode follows exactly this design —
EnterPlanModeToolchanges the available tool set -
Defense-in-Depth: Five Layers vs. Claude Code's Six:
- The paper proposes five layers (Prompt -> Schema -> Runtime Approval -> Tool Validation -> Lifecycle Hooks)
-
Claude Code adds a sixth: hardcoded denials (non-configurable, unbypassable)
-
Context Pressure as the Central Design Constraint:
- The paper argues that token budget drives all downstream architectural decisions
- Claude Code's four-level compaction pipeline, tool lazy loading, and memory prefetching all serve this end
Conclusion: From Reader to Builder
Congratulations on reading this far. If you have carefully digested the content of the preceding 14 chapters, you now possess more Harness Engineering knowledge than most AI engineers.
Three sentences to summarize the entire book:
-
The Agent is not the product; the Harness is. Models will be replaced, but your carefully designed permission rules, Hook pipelines, and sandbox configurations — those are your moat.
-
Constraints are power, not limitations. Every precise permission rule you add enables you to confidently let the Agent do more. The six layers of defense in depth are what allow Claude Code to run dangerous commands like
rmandgit pushin production — because every layer stands guard. -
Build incrementally; do not over-engineer. Spend 1 hour building a Level 1 Harness with CLAUDE.md and basic permissions. Add Hooks when you hit real pain points. Configure MCP and custom Agents when team collaboration demands it. The best Harness is the one that is "just enough."
One final thought exercise: Claude Code comprises 512,664 lines of code, yet its Agent Loop core is nothing more than a single
while(true)and a State object. The remaining 99.9% of the code all answers the same question — "How do we make this loop run reliably in the real world?" That is the entire meaning of Harness Engineering.
Now go build your own Harness.
Appendix A: Claude Code Source File Index
Core Engine
| File | Size | Purpose |
|---|---|---|
src/main.tsx |
803 KB | Entry point, CLI bootstrap, parallel prefetch |
src/query.ts |
68 KB | Core Agent loop (queryLoop) |
src/QueryEngine.ts |
46 KB | LLM query engine, system prompt construction |
src/Tool.ts |
29 KB | Tool base interface, 60+ methods |
src/tools.ts |
25 KB | Tool registry, pool assembly, cache stability |
src/Task.ts |
3.2 KB | Task type definitions |
src/commands.ts |
25 KB | Command registration, conditional imports |
Permissions and Security
| File | Purpose |
|---|---|
src/utils/permissions/permissions.ts |
Main permission logic, decision pipeline |
src/types/permissions.ts |
Permission type definitions (13 KB) |
src/utils/permissions/permissionsLoader.ts |
Load rules from settings |
src/utils/permissions/denialTracking.ts |
Denial tracking |
src/utils/permissions/yoloClassifier.ts |
Auto mode classifier |
src/utils/sandbox/sandbox-adapter.ts |
Sandbox adapter (985 lines) |
src/tools/BashTool/shouldUseSandbox.ts |
Sandbox decision logic |
Hooks
| File | Purpose |
|---|---|
src/utils/hooks.ts |
Hook execution engine |
src/utils/hooks/hooksConfigManager.ts |
Hook configuration management |
src/utils/hooks/hooksSettings.ts |
Hook settings loading |
src/schemas/hooks.ts |
Zod Schema definitions |
src/types/hooks.ts |
Hook type definitions |
src/services/tools/toolHooks.ts |
Tool-specific Hook execution |
Settings and Configuration
| File | Purpose |
|---|---|
src/utils/settings/settings.ts |
Core settings management |
src/utils/settings/types.ts |
Settings Schema definitions (600+ lines) |
src/utils/settings/settingsCache.ts |
In-memory cache |
src/utils/settings/permissionValidation.ts |
Permission rule validation |
MCP
| File | Purpose |
|---|---|
src/services/mcp/client.ts |
MCP client, 6 transport types |
src/services/mcp/config.ts |
MCP configuration loading |
src/skills/mcpSkills.ts |
MCP Skills discovery |
Agents and Tasks
| File | Purpose |
|---|---|
src/tools/AgentTool/ |
Sub-Agent spawning |
src/tools/AgentTool/forkSubagent.ts |
Implicit forking |
src/tools/AgentTool/agentMemory.ts |
Agent memory |
src/coordinator/ |
Multi-Agent orchestration |
src/utils/swarm/ |
Swarm coordination logic |
Memory
| File | Purpose |
|---|---|
src/memdir/memoryScan.ts |
Memory scanning |
src/memdir/memoryTypes.ts |
Memory type definitions |
src/services/extractMemories/ |
Automatic memory extraction |
src/services/teamMemorySync/ |
Team memory synchronization |
State and UI
| File | Purpose |
|---|---|
src/state/AppState.tsx |
Main React context (23 KB) |
src/state/AppStateStore.ts |
Zustand-like Store (21 KB) |
src/cli/print.ts |
Rich text printing (212 KB) |
src/components/App.tsx |
Root component |
Appendix B: Reference Resources
Open Source Projects
| Project | Description | URL |
|---|---|---|
| learn-claude-code | 12-lesson Harness Engineering course | github.com/shareAI-lab/learn-claude-code |
| claude-code-harness | Plan-Work-Review cycle implementation | github.com/Chachamaru127/claude-code-harness |
| your-claude-engineer | Agent Harness demo (Slack+GitHub+Linear) | github.com/coleam00/your-claude-engineer |
Recommended Learning Path
Week 1: Foundations
├── Read Chapters 1-3 of this tutorial
├── Build a Level 1 personal Harness (CLAUDE.md + basic permissions)
├── Hands-on experiment: use Claude Code in your own project
└── Understand: Agent Loop, Tool Dispatch, Plan Mode

Week 2: Constraints and Security
├── Read Chapters 4-7 of this tutorial
├── Configure Permission Rules
├── Write a PreToolUse Hook
└── Understand: Permission Model, Hooks, Sandbox

Week 3: Context and Memory
├── Read Chapters 8-9 of this tutorial
├── Optimize CLAUDE.md
├── Configure Settings hierarchy
├── Hands-on experiment: write a PreToolUse Hook
└── Understand: Context Engineering, Memory, Compaction

Week 4: Extension and Collaboration
├── Read Chapters 10-12 of this tutorial
├── Configure MCP servers (start with GitHub MCP)
├── Create custom Agents and Skills
└── Understand: MCP, Sub-Agents, Skills

Week 5: Multi-Agent and Production
├── Read Chapters 13-14 of this tutorial
├── Build a team Harness
├── Implement the Plan-Work-Review cycle
└── Understand: Team Protocols, Worktree Isolation, Entropy Management

Week 6+: Advanced
├── Deep dive into Claude Code source code (start with query.ts)
├── Build an organization-level Harness
└── Explore: Bridge, Voice, Remote Triggers
Key Concept Quick Reference
| Concept | One-Line Definition |
|---|---|
| Harness | All infrastructure beyond the Agent itself |
| Agent Loop | The core cycle of message -> LLM -> tool -> loop |
| Tool | A standardized interface for Agent interaction with the outside world |
| Permission Mode | A mode determining the Agent's degree of autonomy (5 types) |
| Permission Rule | A declarative allow/deny/ask rule |
| Hook | A programmable callback for lifecycle events (4 types) |
| Sandbox | System-level file/network/process restrictions |
| CLAUDE.md | A project-level persistent context file |
| Memory | Cross-session structured memory (4 types) |
| Compaction | Context window compression strategy (4 levels) |
| MCP | Model Context Protocol, extending Harness capabilities |
| Sub-Agent | A context-isolated child Agent |
| Skill | A reusable workflow definition |
| Plan Mode | A 5-phase planning workflow |
| Worktree | Git worktree isolation preventing parallel conflicts |
| Entropy Management | Combating system degradation through periodic maintenance |
| Feature Gate | Compile-time feature toggle (bun:bundle) |
| Prompt Cache | API caching strategy optimized by tool ordering |
| YOLO Classifier | Two-stage AI automatic permission approval |
| Defense in Depth | Six stacked layers of security protection |
"Build rippable harnesses — the best harness is the one you eventually don't need."
This tutorial is based on reverse engineering of the Claude Code source code (2026-03-31 snapshot). All referenced file paths and code patterns are derived from actual source code analysis.
References
[1] Martin Fowler. "Harness Engineering." martinfowler.com/articles/exploring-gen-ai/harness-engineering.html, 2026.
[2] OpenAI. "Harness Engineering: Leveraging Codex in an Agent-First World." openai.com/index/harness-engineering/, 2026.
[3] "Building AI Coding Agents for the Terminal: Scaffolding, Harness, Context Engineering, and Lessons Learned." arXiv:2603.05344v1, 2026.
[4] "Evaluation and Benchmarking of LLM Agents: A Survey." arXiv:2507.21504v1, 2025.
[5] Jimenez et al. "SWE-bench: Can Language Models Resolve Real-World GitHub Issues?" ICLR, 2024.
[6] NxCode. "Harness Engineering: The Complete Guide to Building Systems That Make AI Agents Actually Work." nxcode.io, 2026.
[7] Phil Schmid. "The Importance of Agent Harness in 2026." philschmid.de/agent-harness-2026, 2026.
[8] Epsilla. "Harness Engineering: Why the Focus is Shifting from Models to Agent Control Systems." epsilla.com/blogs, 2026.
[9] EleutherAI. "lm-evaluation-harness: A Framework for Few-Shot Evaluation of Language Models." github.com/EleutherAI/lm-evaluation-harness, 2024.
[10] Harness Engineering Academy. "What is Harness Engineering? A Complete Introduction." harnessengineering.academy/blog, 2026.
Last updated: 2026-04-01
Featured Findings
Two reverse-engineered findings discovered while writing the textbook above. Both cover infrastructure not previously documented in any public analysis.
🔬 Grove: The Hidden Training-Data Pipeline in Claude Code's Source
From a user's keyboard to BigQuery's training warehouse — a complete, source-verifiable data pipeline.
While reverse-engineering Claude Code's 512K LOC TypeScript source, I found a previously unreported infrastructure for training-data collection. Not speculation, not analogy — every step has a precise file path and line number. This section traces the full pipeline.
One-sentence summary
Anthropic ships a system named "Grove" in Claude Code that explicitly tells users their data will be used to "train and improve" models, extends data retention from 30 days to 5 years, ships 796 telemetry events through a Protobuf-typed dual pipeline, and lands them in privileged BigQuery columns. The same pipeline carries SWE-bench evaluation IDs — meaning training-data collection and agent-capability evaluation share the same infrastructure.
Ring 1: Grove — "Help Improve Claude"
In Claude Code's source, a component named Grove (src/components/grove/Grove.tsx) presents users with a toggle:
// src/components/grove/Grove.tsx

// Line 47:
<Text bold={true}>You can help improve Claude </Text>

// Line 56 — the key copy:
"Allow the use of your chats and coding sessions to train and improve
 Anthropic AI models. Change anytime in your Privacy Settings."

// Line 63 — data-retention notice:
"Updates to data retention — To help us improve our AI models and safety
 protections, we're extending data retention to 5 years."

// Line 116 — what the retention actually means:
"Turning ON the improve Claude setting extends data retention from
 30 days to 5 years. Turning it OFF keeps the default 30-day data
 retention. Delete data anytime."
This is not a hidden backdoor. It's Anthropic's official, user-facing training-data collection mechanism. What hasn't been publicly analyzed is the engineering implementation behind it.
Grove's type definitions
// src/services/api/grove.ts Lines 25-35:
export type AccountSettings = {
  grove_enabled: boolean | null       // user opted into "Help improve Claude"
  grove_notice_viewed_at: string | null
}

export type GroveConfig = {
  grove_enabled: boolean
  domain_excluded: boolean            // some orgs/domains are excluded
  notice_is_grace_period: boolean     // within the grace window
  notice_reminder_frequency: number | null
}

// API endpoints:
// GET   /api/oauth/account/settings
// POST  /api/oauth/account/grove_notice_viewed
// PATCH /api/oauth/account/settings
// GET   /api/claude_code_grove
Worth noting: the domain_excluded field means certain enterprise customers' data is auto-excluded from training. grove_enabled is the toggle — flip it on, and your retention silently jumps from 30 days to 5 years.
Why 5 years? Product analytics typically retains data for 30–90 days. The most plausible explanation for 5-year retention is that the data feeds training datasets — and training datasets have a much longer lifecycle than ops logs.
Ring 2: 796 telemetry events × dual pipeline
Claude Code's telemetry runs regardless of the Grove switch — Grove controls retention duration (30 days vs 5 years), not whether collection happens. The source contains 796 unique analytics event names prefixed with tengu_. Every API call, every tool execution, every permission decision, every Bash command — all logged.
These events flow through a dual pipeline:
| Channel | Endpoint | Payload | Purpose |
|---|---|---|---|
| Datadog | logs.us5.datadoghq.com | Redacted (_PROTO_* stripped) | Ops monitoring |
| 1P (first-party) | /api/event_logging/batch | Full payload incl. privileged fields | Lands in BigQuery |
// src/services/analytics/sink.ts Lines 48-71:
function logEventImpl(eventName: string, metadata: LogEventMetadata): void {
  const sampleResult = shouldSampleEvent(eventName)
  if (sampleResult === 0) return

  if (shouldTrackDatadog()) {
    // Datadog only sees redacted data
    void trackDatadogEvent(eventName, stripProtoFields(metadataWithSampleRate))
  }

  // 1P gets the full payload, including _PROTO_* privileged fields
  logEventTo1P(eventName, metadataWithSampleRate)
}
// src/services/analytics/firstPartyEventLoggingExporter.ts Lines 714-750:
// _PROTO_* keys are PII-tagged values meant only for privileged BQ
// columns. Hoist known keys to proto fields, then defensively strip any
// remaining _PROTO_* so an unrecognized future key can't silently land
// in the general-access additional_metadata blob.
That comment spells out the architecture: _PROTO_* fields are routed to privileged columns in BigQuery, physically isolated from general-access analytics data. This isn't a casual product log — it's an intentionally tiered, segregated data warehouse.
Ring 3: Protobuf schema — production-grade data pipeline
These events aren't ad-hoc JSON blobs. They're strictly defined by a Protobuf schema, compiled from an external monorepo:
// src/services/analytics/firstPartyEventLoggingExporter.ts:
// Adding a field? Update the monorepo proto first (go/cc-logging):
//   event_schemas/.../claude_code/v1/claude_code_internal_event.proto
// then run `bun run generate:proto` here.
//
// claude_code_internal_event.ts — 865 lines of generated proto code
The generated schema defines 29 fields:
message ClaudeCodeInternalEvent {
  string event_name = 1;
  Date   client_timestamp = 2;
  string model = 3;
  string session_id = 4;
  string user_type = 5;                // "ant" vs "external"
  EnvironmentMetadata env = 7;         // platform, version, CI flags, 30+ subfields
  string additional_metadata = 13;     // event-specific data (BASE64 JSON)
  string device_id = 17;

  // ⬇️ These three are the surprising part
  string swe_bench_run_id = 18;
  string swe_bench_instance_id = 19;
  string swe_bench_task_id = 20;

  // Swarm/team agent attribution
  string agent_id = 22;
  string parent_session_id = 23;
  string agent_type = 24;

  // PII privileged columns
  string skill_name = 27;
  string plugin_name = 28;
  string marketplace_name = 29;
}
Three things this tells us:
- Not a temporary analytics hack — Protobuf + external monorepo (
go/cc-logging) + compile-time enforcement = production-grade data-pipeline infrastructure. - SWE-bench fields are embedded in every event — not a separate eval system; they share the same pipeline as user data.
- Dedicated PII privileged columns —
skill_name,plugin_nameare isolated, indicating tiered data management.
Ring 4: SWE-bench — evals and training data share the pipeline
This is the most surprising finding. The three SWE-bench IDs aren't off in some standalone eval script — they're embedded in the Proto schema of every analytics event.
// src/services/analytics/metadata.ts Lines 722-724:
sweBenchRunId:      process.env.SWE_BENCH_RUN_ID || '',
sweBenchInstanceId: process.env.SWE_BENCH_INSTANCE_ID || '',
sweBenchTaskId:     process.env.SWE_BENCH_TASK_ID || '',

// Lines 912-920 — written into the Proto event:
if (coreFields.sweBenchRunId) {
  core.swe_bench_run_id = coreFields.sweBenchRunId
}
What this means: when Anthropic runs SWE-bench internally, all 796 tengu_* events get tagged with swe_bench_run_id + swe_bench_instance_id + swe_bench_task_id. In BigQuery, they can do full agent-trajectory analysis per SWE-bench problem — which tools fired, how many tokens each API call cost, what the permission classifier decided, whether each command succeeded.
Implication: Claude Code is not just a product. It's also Anthropic's agent-capability evaluation platform. Eval data and user-interaction data share the same Protobuf schema, the same pipeline, and the same BigQuery warehouse.
Combined with the full evaluation harness CLI surface:
// src/main.tsx — eval-related CLI flags:
'-p, --print'              // non-interactive mode, exit after output
'--output-format <format>' // "text" | "json" | "stream-json"
'--max-turns <turns>'      // max agent turns
'--max-budget-usd <amount>'// budget limit
'--json-schema <schema>'   // structured output validation
This is a complete evaluation loop: env vars tag the task → --print mode runs non-interactively → streaming NDJSON output → exit code signals success/failure → all telemetry lands in BigQuery.
Ring 5: Developer comments — "training data"
Two internal developer comments are the most direct evidence:
// src/utils/messages.ts Line 245:
"content is fake, which poisons training data if submitted"

// src/utils/sessionStorage.ts Line 4388:
"Ant transcripts keep the wrapper so /share training data sees REPL usage"
The first says certain content "poisons training data" — the developer knows message content lands in the training pipeline.
The second describes /share data as "training data" — the most direct textual evidence.
Ring 6: Five-layer performance telemetry
Beyond functional data, Anthropic has embedded a five-layer performance-measurement system:
| Layer | Implementation | Sampling | Output sink |
|---|---|---|---|
| Headless Latency Profiler | headlessProfiler.ts | 100% internal / 5% external | tengu_headless_latency event |
| Frame Timing | interactiveHelpers.tsx | On demand | Local JSONL files |
| FPS Tracker | fpsTracker.ts | Continuous | avgFps + P99 frame time |
| Perfetto Chrome Trace | perfettoTracing.ts | Internal only | ~/.claude/traces/ |
| OpenTelemetry | instrumentation.ts | Continuous | OTLP / Prometheus / BigQuery |
Note the last row: OpenTelemetry's exporter list includes BigQuery. Performance data flows into the same warehouse.
Ring 7: Competitor detection
A small but telling detail:
// src/utils/codeIndexing.ts Lines 52, 82:
// Detect aider CLI and MCP server
// CLI: 'aider'
// MCP: /^aider$/i
// Use: track Claude Code coexisting with competitors in analytics
Anthropic tracks whether users run competitor tools (Aider) alongside Claude Code. That data also flows into BigQuery.
Full pipeline diagram
User interaction (every tool call, API request, Bash command)
  │
  ├─ grove_enabled = true → retention = 5 years
  │
  ▼
796 tengu_* events × 40+ metadata fields
  │
  ├─→ Datadog (redacted, _PROTO_* stripped) → ops monitoring
  │
  └─→ 1P API /api/event_logging/batch (full payload)
       │
       ├─ Protobuf schema, strictly typed (865 lines generated)
       ├─ _PROTO_* fields → BigQuery privileged columns (isolated)
       ├─ SWE-bench IDs embedded → eval shares the pipeline
       │
       ▼
     BigQuery warehouse
       │
       ├─ Feedback text "approved for BQ" (after PII redaction)
       ├─ Transcript shares → POST /api/claude_code_shared_session_transcripts
       ├─ OpenTelemetry performance data
       ├─ Competitor-tool detection
       │
       ▼
     Developer comments confirm: "training data"
       │
       ▼
     ???? (server-side training process, not visible to client)
Why this pipeline matters
- It's complete — every step from UI toggle to BigQuery privileged columns has a source line number.
- It's tiered — Datadog gets redacted, 1P gets the full payload, BigQuery has privileged-column isolation.
- It's reused — SWE-bench evals and user data share the same pipeline and schema.
- It's not speculation — Grove UI literally says "train and improve"; developer comments literally say "training data".
- It hasn't been reported — as of publication, no public analysis mentions "Grove", BigQuery privileged columns, or the SWE-bench-shares-telemetry finding.
What I cannot verify from the client source
To be honest about the limits of this analysis:
- What method Anthropic uses to train (RLHF? DPO? GRPO?)
- How BigQuery data is preprocessed and filtered
- Whether SWE-bench eval data is used directly for training, or only for evaluation
- How preference pairs are assembled server-side (no preference-pair construction in client code)
None of those gaps weaken the core finding: the complete data pipeline from a user's keyboard to BigQuery's training warehouse is verifiable in the client source code.
🛡️ How Claude Code Detects You Distilling Its Model — A 5-Layer Defense, Reverse-Engineered
Reverse-engineered from 512K lines of source: the complete engineering implementation Anthropic ships to prevent model theft. Each layer has a precise file path and line number.
Why distillation is the AI industry's #1 threat
Model distillation — recording API traffic from a frontier model and using its outputs to train a smaller model — is one of the largest commercial threats in AI. Replicate capabilities at a fraction of the cost.
This isn't theoretical. It's actively happening:
- January 2025: OpenAI publicly accused DeepSeek of distilling its reasoning models via the API, claiming DeepSeek-R1's training data contained OpenAI model outputs [1]. OpenAI subsequently hardened chain-of-thought protection, training models to avoid leaking reasoning paths and deploying classifiers to detect and block CoT leakage [2].
- February 2026: Google disclosed that attackers used over 100,000 structured prompts to clone Gemini's reasoning logic — specifically targeting "reasoning trace" extraction [3]. Google then trained Gemini to recognize distillation probes and refuse to comply.
- Academic follow-up: 2025–2026 saw a surge in anti-distillation research, including information-theoretic distillation-resistant sampling [4], semantic watermark fingerprinting [5], empirical analyses of whether watermarks block distillation [6], and trace rewriting as a defense [7].
Against this backdrop, Anthropic shipped a 5-layer defense system in Claude Code. Unlike competitors', the full implementation is exposed via source — making this the first complete, production-level analysis of a commercial AI system's anti-distillation engineering.
Overview: 5 layers
 Figure 1 — The five-layer defense: client attestation, fingerprint attribution, fake-tool injection, signature-bearing blocks, and the distillation-resistant streamlined output mode.
Layer 1: Native Client Attestation — "Are you really Claude Code?"
How it works
Before each API request, Bun's native HTTP stack injects an attestation token into the serialized request body. The server verifies the token to confirm the request came from a real Claude Code client, not a third-party proxy or recording tool.
Source
// src/constants/system.ts Lines 64-68:
// When NATIVE_CLIENT_ATTESTATION is enabled, includes a `cch=00000` placeholder.
// Before the request is sent, Bun's native HTTP stack finds this placeholder
// in the request body and overwrites the zeros with a computed hash. The
// server verifies this token to confirm the request came from a real Claude
// Code client. See bun-anthropic/src/http/Attestation.zig for implementation.

// Lines 81-82:
const cch = feature('NATIVE_CLIENT_ATTESTATION') ? ' cch=00000;' : ''
Engineering details
 Figure 2 — Attestation.zig at the Bun layer rewrites the
 cch=00000 placeholder to a real hash before the request hits the wire. The server validates the token; invalid or missing → request rejected.
Why a placeholder instead of direct injection? The source comment explains: "same-length replacement avoids Content-Length changes and buffer reallocation" — a 5-character placeholder gets swapped with a 5-character hash, no body length change, no memory reallocation.
Implementation language: Zig (bun-anthropic/src/http/Attestation.zig), running at Bun's native HTTP layer. The auth logic isn't in JavaScript or TypeScript — it can't be bypassed by patching the JS layer.
Layer 2: Fingerprint Attribution — "Which client generated this?"
How it works
Each API request carries a 3-character fingerprint computed via SHA256 over a salt + specific characters from the user's first message + the version string. This lets Anthropic trace every piece of training data back to its originating client.
Source
// src/utils/fingerprint.ts:

// Hardcoded salt (must stay in sync with backend verification)
export const FINGERPRINT_SALT = '59cf53e54c78'

export function computeFingerprint(
  messageText: string,
  version: string,
): string {
  // Pull characters at positions 4, 7, 20 from the user's first message
  const indices = [4, 7, 20]
  const chars = indices.map(i => messageText[i] || '0').join('')

  const fingerprintInput = `${FINGERPRINT_SALT}${chars}${version}`

  // SHA256, take first 3 hex chars
  const hash = createHash('sha256').update(fingerprintInput).digest('hex')
  return hash.slice(0, 3)
}
// src/constants/system.ts Lines 78-91:
// Fingerprint is embedded in the version string sent in headers
const version = `${MACRO.VERSION}.${fingerprint}`
const header = `x-anthropic-billing-header: cc_version=${version};
  cc_entrypoint=${entrypoint};${cch}${workloadPair}`
Compute flow
 Figure 3 — Salt + chars-at-positions-[4,7,20] + version → SHA256 → first 3 hex chars → embedded in the billing header.
The source comment explicitly notes: "IMPORTANT: Do not change this method without careful coordination with 1P and 3P (Bedrock, Vertex, Azure) APIs." — the fingerprint algorithm has to stay consistent across every API provider.
Layer 3: Fake Tools Injection — "Honeypot tools"
How it works
This is the cleverest layer. Claude Code sends anti_distillation: ['fake_tools'] to the API; the server mixes fake tool definitions into the normal tool list. If anyone records this API traffic and trains a model on it, the distilled model will "know" the fake tools — and that knowledge is the evidence of distillation.
Source
// src/services/api/claude.ts Lines 301-313:
// Anti-distillation: send fake_tools opt-in for 1P CLI only
if (
  feature('ANTI_DISTILLATION_CC')
    ? process.env.CLAUDE_CODE_ENTRYPOINT === 'cli' &&
      shouldIncludeFirstPartyOnlyBetas() &&
      getFeatureValue_CACHED_MAY_BE_STALE(
        'tengu_anti_distill_fake_tool_injection',
        false,
      )
    : false
) {
  result.anti_distillation = ['fake_tools']
}
Trigger conditions
 Figure 4 — All four gates (feature flag, CLI entrypoint, first-party API, GrowthBook gate) must pass before fake tools are opted in.
Critical limitation: only fires on Anthropic's first-party API. Requests via Bedrock, Vertex, or other third-party proxies do not get fake tools — shouldIncludeFirstPartyOnlyBetas() excludes those providers.
Honeypot mechanics: the actual fake-tool definitions live server-side; the client only sends an opt-in signal. Means the fake tools can be rotated server-side without shipping a new client.
Layer 4: Signature-Bearing Blocks — "Signatures as locks"
How it works
The API's thinking blocks and connector_text blocks both carry a cryptographic signature bound to the API key that generated them. Switch keys, and those signatures instantly become invalid — the API rejects them with a 400.
Source
// src/utils/messages.ts Lines 5060-5064:
// Strip signature-bearing blocks (thinking, redacted_thinking, connector_text)
// from all assistant messages. Their signatures are bound to the API key that
// generated them; after a credential change (e.g. /login) they're invalid and
// the API rejects them with a 400.

export function stripSignatureBlocks(messages: Message[]): Message[] {
  const result = messages.map(msg => {
    if (msg.type !== 'assistant') return msg
    const content = msg.message.content
    const filtered = content.filter(block => {
      if (isThinkingBlock(block)) return false        // drop thinking
      if (feature('CONNECTOR_TEXT')) {
        if (isConnectorTextBlock(block)) return false  // drop connector_text
      }
      return true
    })
    return { ...msg, message: { ...msg.message, content: filtered } }
  })
  return result
}
Connector Text — the anti-distillation mechanism
// src/utils/betas.ts Lines 279-284:
// POC: server-side connector-text summarization (anti-distillation). The
// API buffers assistant text between tool calls, summarizes it, and returns
// the summary with a signature so the original can be restored on subsequent
// turns — same mechanism as thinking blocks.
 Figure 5 — The API buffers assistant text between tool calls, summarizes it, and returns a summary plus a
 signature_delta. On the next turn, the signed summary lets the API restore the original text — but anyone recording the traffic only sees summaries.
Current limitation: Connector Text is only enabled for Anthropic-internal users (USER_TYPE === 'ant') — measuring TTFT/TTLT/capacity impact. Feature gate: tengu_slate_prism.
Layer 5: Streamlined Mode — "Distillation-resistant output format"
How it works
The source comment names this layer literally: "distillation-resistant output format". It strips information specifically to reduce the value of the output as distillation training data.
Source
// src/utils/streamlinedTransform.ts Lines 1-9:
// Streamlined mode is a "distillation-resistant" output format that:
// - Keeps text messages intact
// - Summarizes tool calls with cumulative counts (resets when text appears)
// - Omits thinking content
// - Strips tool list and model info from init messages
What gets filtered
| Original output | Streamlined output |
|---|---|
| Text content | ✅ Preserved |
| Thinking content | ❌ Dropped |
| Tool call details | 📊 Cumulative counts only |
| Tool definition list | ❌ Dropped |
| Model info | ❌ Dropped |
What does the would-be distiller lose?
- Thinking content: the model's reasoning chain — the most valuable distillation signal — is dropped entirely
- Tool definitions: the full schema for 43+ tools is removed; can't replicate the tool system
- Tool call details: only summaries like "Searched 3 files, Read 2 files" remain — can't learn tool-use strategy
Defense matrix
| Layer | Defends against | Detect / Block | Bypass difficulty |
|---|---|---|---|
| Attestation | Spoofed clients | Block | High — requires reversing native Zig code |
| Fingerprint | Anonymous distillation | Post-hoc trace | Medium — algorithm is public |
| Fake Tools | API traffic recording | Post-hoc detect | Low — don't request fake_tools |
| Signature | Cross-key data reuse | Block | High — server-side validation |
| Streamlined | Output distillation | Reduce value | Low — only applies to SDK mode |
Where this defense system is weak
From a pure security-research perspective (understanding the defense is how you improve the defense):
1. Fake Tools only fires on first-party. Bedrock/Vertex requests don't get fake tools, because shouldIncludeFirstPartyOnlyBetas() excludes third-party providers. If the distiller uses AWS Bedrock's Claude endpoint, this layer is wholly inactive.
2. Fingerprint algorithm is fully public via the source. Salt 59cf53e54c78, character positions [4, 7, 20], SHA256 — all visible. A distiller can forge fingerprints (though the server may have other validation).
3. Connector Text only on internal users. process.env.USER_TYPE === 'ant' means external users' conversation text gets no Connector Text protection.
4. Streamlined Mode only applies to SDK output. Normal CLI interactions don't go through Streamlined Transform; full tool-call details and thinking content are visible in standard output.
5. Attestation is the strongest layer. Native client auth runs in Zig, outside the JavaScript-controllable surface. But if a distiller calls the API directly (not via Claude Code), this layer doesn't apply — it protects against "impersonating Claude Code", not "using the raw API".
Key insight
Anthropic's anti-distillation strategy isn't a single point of defense — it's a layered, complementary system. None of the layers is perfect, but stacked together they cover different attack surfaces:
 Figure 6 — Each attack vector is covered by a different defense layer.
The deepest defense isn't on the client at all: the actual reasoning capability (the weights) never leaves Anthropic's servers. Client-side defenses protect training-data quality and API usage attribution — even if a distiller records output, Anthropic can trace its origin and detect fake-tool traces in the resulting distilled model.
Comparison with prior analyses
Alex Kim's blog [8] first reported the existence of fake tools and connector text, but only described the code snippets — without analyzing the full defense system. This article's new contributions:
- Systematic 5-layer framework — organizes scattered findings into a layered defense system.
- Native Client Attestation Zig analysis — not previously mentioned in any public analysis.
- Full fingerprint algorithm reconstruction — including salt, character positions, hash method.
- Streamlined Mode as a distillation-resistant format — the source comment literally says "distillation-resistant", not previously reported.
- Defense matrix and weakness analysis — assessing each layer's effectiveness and limitations from a security-research stance.
Mapping to the academic literature
Anthropic's anti-distillation implementation maps interestingly onto recent academic work:
| Anthropic implementation | Academic concept | Reference |
|---|---|---|
| Fake Tools Injection | Radioactive watermarking / data poisoning | [6] Can LLM Watermarks Robustly Prevent Unauthorized Knowledge Distillation? (ACL 2025) |
| Fingerprint Attribution | LLM fingerprinting | [5] LLM Fingerprinting via Semantically Conditioned Watermarks (arXiv 2505.16723) |
| Connector Text Summarization | Trace rewriting / output perturbation | [7] Protecting Language Models Against Unauthorized Distillation through Trace Rewriting (arXiv 2602.15143) |
| Streamlined Mode | Distillation-resistant decoding | [4] Towards Distillation-Resistant LLMs: An Information-Theoretic Perspective (arXiv 2602.03396) |
| 5-layer stack | Defense-in-depth for ML systems | [2] IAPS: AI Distillation Attacks — The Case for Targeted Government Intervention |
Worth noting: academic papers are largely theoretical proposals or controlled experiments — Claude Code is a production deployment serving millions of users. That gives this analysis distinct empirical value: we're seeing the engineering trade-offs Anthropic actually made under real adversarial pressure, not a paper algorithm.
References
[1] Berkeley Law. "The Innovation Dilemma: AI Distillation in OpenAI v. DeepSeek." The Network, 2025. Link
[2] IAPS. "AI Distillation Attacks: The Case for Targeted Government Intervention." Institute for AI Policy and Strategy, 2026. Link
[3] Google Cloud Blog. "GTIG AI Threat Tracker: Distillation, Experimentation, and Integration of AI for Adversarial Use." 2026. Link
[4] arXiv:2602.03396. "Towards Distillation-Resistant Large Language Models: An Information-Theoretic Perspective." 2026. Link
[5] arXiv:2505.16723. "LLM Fingerprinting via Semantically Conditioned Watermarks." 2025. Link
[6] arXiv:2502.11598. "Can LLM Watermarks Robustly Prevent Unauthorized Knowledge Distillation?" ACL 2025 Main. Link
[7] arXiv:2602.15143. "Protecting Language Models Against Unauthorized Distillation through Trace Rewriting." 2026. Link
[8] Alex Kim. "The Claude Code Source Leak: fake tools, frustration regexes, undercover mode, and more." 2026. Link
All code references taken from the Claude Code source (2026-03-31 snapshot). File paths and line numbers reflect actual source locations.